Art supply and hobby stores sell all sorts of sculpting tools made in all sorts of shapes and sizes and of all kinds of materials.
The most versatile tools you will be using are dangling at the ends of your arms. Yep, most of the work will be done with your hands.
For sculpting finer details, you will need some smaller tools.
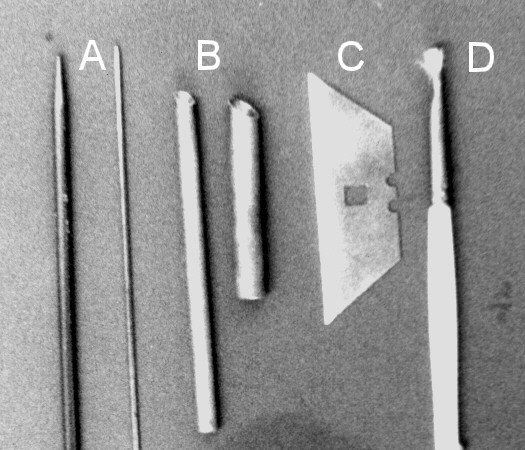
[A] To shape precise details, my tools of choice are knitting needles. I use two sizes-one aproximately an eighth inch in diameter and a smaller one aproximately one sixteenth inch diameter. Occasionally, I will use a straight pin or hat pin to get into really tiny spaces, but the knitting needles usually do the job.
[B] To scoop out quantities of Sculpey from a larger piece, I make scoops from brass tubing. Simply grind the end of a brass tube at an aprox. 45 degree angle. There you have it!
[C] Another tool that I find indispensable is a utility knife blade. These trapezoid-shaped blades can be purchased in packets of five at any hardware store. I use these because I find it easier to sight down the blade when cutting small pieces of Sculpy.
[D] A paint brush is useful for smoothing out unbaked Sculpey and for applying petroleum jelly .
So far, we haven't spent much money, have we?
Ah! How long could that last?
One piece of gear that I find really comes in handy is a device made by Kemper Tools. It looks like a silver hypodermic plunger, which in fact it is. Called "Clay Gun," it pushes Sculpy through variously configured holes in disks to make all sorts of different shaped ribbons of material. I use it primarily to produce long snakes of Sculpey that are uniform in thickness. When you need to have equally sized Sculpey pieces, (say for eyes, ears, teeth etc.), this tool will do the trick. More on this later. Think of it as a Play-Dough Fun Factory for grown-ups. They cost around $10, and are available at most art supply stores.

Here are some skin texture examples
To achieve credible skin textures on Dinos, Dragons and other non-human beasties, you'll need to make some special " texture stamps." These are easily created using a product called "Mountains in Minutes," a latex rubber mold compound found in most hobby shops, especially those that carry model railroad supplies. But first, you must find a source for the texture you want to re-create. Look around the house for fake leather finishes on luggage, hardcover books, your car's dashboard, or even a Marshall Combo Amp.
Mix some of the latex with water so that it is thin enough to fill all the recesses of your texture sample. Put the sample in as level a position as possible, and pour the latex over it, using a popsicle stick or similar device to work it onto the surface. When wet, the latex is a sky-blue color. As it drys, it turns a translucent dark blue. It is completely dry when all the milkiness has gone out of it. When the first application is dry, apply a second undiluted coat to strengthen the "stamp." This second coat usually takes longer to dry-a hairdryer can help. When dry, peel the latex off the sample, moisten with water or spit, press into soft Sculpey, and shout "Eureka!" at the top of your lungs. I did.
If I think of any other tools I may have missed, you'll be the second to know.
 Return to Headquarters