
| Activities > Gameboard Creation > Curved Path |
| For parallel wavy or circular lines, you
will need two markers (or whatever you are using to draw the board -- markers would
be easiest for this method), and a stick, pencil, or thin marker as well as tape
or string. Tape would be better. Lay down the markers in parallel form. Make sure
that they are only as wide as you want the game's path to be. Place the thin marker
on top of the two other markers, close to the top (the opposite end of the felt tip). Carefully tape it to the markers. Make sure it is secured to the markers to that when you gently turn the assembly over, it will not shift. Gently turn the assembly over. You should be able to do this by holding only the horizontal piece. If the markers 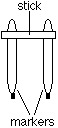 are
wobbly or loose, the middle piece has not been secured well enough. You do not have
to re-secure it yet, but it would be better to do so now. are
wobbly or loose, the middle piece has not been secured well enough. You do not have
to re-secure it yet, but it would be better to do so now.After you turn the 3 pieces over, tape the middle piece on to the two markers again. Do not remove the tape from the other side. After doing this, the assembly should be secure. Try drawing with the markers before placing them on the board. Hold the horizontal piece and drag (without pressing) the felt tips along the paper. Get the hang of it, then draw your path on your board. Hint: Map out how you want the path to go. You can do this with a single line on the game board, drawn lightly in pencil (rub it out after you've drawn the path). Remember to ensure that there is enough room on the board for the tools you want to use. Keep in mind, however, that the tools (cards, spinner, etc.) do not have to be placed on the board while you are playing. |
