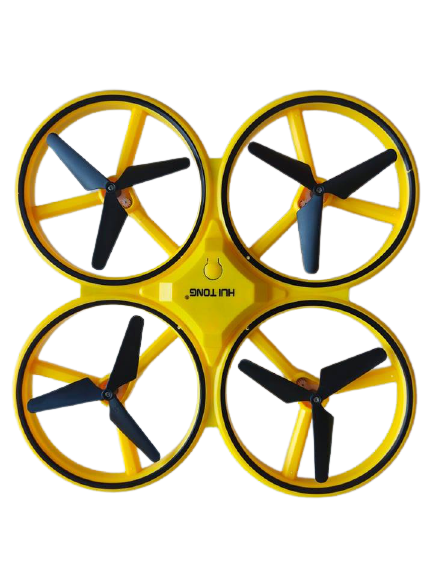
Home Profile Junkbot Projects  Materials Gallery


DRONE TECHNOLOGY


Introducing my product BrennS uav hand controlled rc drone.


The term “drone” usually refers to any unpiloted aircraft. Sometimes referred to as “Unmanned Aerial Vehicles" (UAVs), these can carry out an impre
ssive range of tasks, ranging from military operations to package delivery. Drones can be as large as an aircraft or as small as the palm of your hand. Because drones can be controlled remotely and can be flown at varying distances and heights, they make perfect candidates to take on some of the toughest jobs in the world. They can be found assisting in a search for survivors after a hurricane, giving law enforcement and military an eye-in-the-sky during terrorist situations and advancing scientific research in some of the most extreme climates on the planet. This drone is the beginning of drone innovation. Drone technology is constantly evolving as new innovation and big investment are bringing more advanced drones to the market.


Operating Instruction 


 RC Technical Parameters

Battery capacity: 3.7V 150mAh
Charging time: about 30 minutes
Use time: about 10 hours
When the remote control is motionless, it will be automatically turned off  after 1 minute.
When the remote control enters intthe low-voltage protection.the indicatolight flashes slowly,and is unable to be  used and needs to be charged.


 Aircraft Technical Parameters
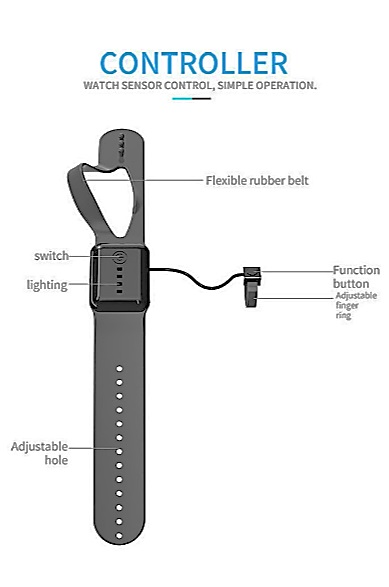
Length: 170mm
Width: 170mm
Height: 38mm
Battery capacity: 3.7V 550mAh
Charging time: 60 minutes
Flight time: 6 minutes
Remote distance: 80 meters


TRANSMITTER

 Main Body Button

 1.The first time short press for start up

 2.The second time short press for reset

 3.Short press is landing slowly functioin flight

 4.Long press the aircraft for 1 second temergency stop, 3 seconds to turn off


 Finger Button

 1.The first time short press for take off  to 1.2 meters

 2.Short press is roll function in flight

 3. Short press quickly 3 times in flight tenter into the infrared obstaclavoidance mode

 4. Long press the remote control to switch  to (throttle and steering) function


READY TO FLY

1.  Please put the aircraft on ground.  Long press the switch for 1 second  to turn in, the indicator lights change  from flash quickly to flash slowlyWaiting for code.

2. Short press the Gravity sensor remote  control switch, the remote control indicatolight flashes slowly. 3 times at the same time  and turns into long light indicating the end of  the code. The aircraft indicator light changes  from flash slowly to long light, indicating thathe code is successful.

3. Short press the remotcontrol finger button to takoff to 1.2 meters


HOW TO CONTROL

1. Long press the remote control finger button  and let the hand up or down, the aircraft will  ascend or descend accordingly.


2. Long press the remote control finger button  and let the hand to the left or right, the aircraft  will turn left or right accordingly.


3.Loosening the remote control finger button  and let the hand down or up, the aircraft will  move forward or backward.


4.Loosening the remote control finger button  and let the hand to left or right, the aircraft will  turn left or right accordingly.


MAIN FUNCTION

1.Hand Throwing Induction Mode

Please put the aircraft on the ground, long press the switch for 1 second to  turn on. The indicator lights change from flash quickly to flash slowly. Pick up  the aircraft and throw it out, the aircraft will hover in the air. Short press the  power button to reset. Long press the switch for 1 second to turn off. When  the aircraft is into throw flying induction mode, the watch remote control will  be switched on and connect with aircraft for connection successfully, and  throw flying induction mode will exit out at the same time. When it is flying in  the air into throw flying induction mode, the bottom of the aircraft will be  ascended when the hand is held rapidly, and when the hand is held continu-  ously the bottom of the aircraft will be descended.


2.Rolling

Short press the remote control finger button in flight, the aircraft indicator light  flashes quickly and you can tilt the remote control to roll accordingly. When the  remote control is motionless for 2 seconds, it will exit the roll function.


3. Slow descent

 Short press the remote control main body button in flight, the aircraft will land  slowly on the ground to stop flying.


4. Emergency stop

When the aircraft loss control in flight, long press the remote control main body  button for 1 second to emergency stop.


WATCH VIDEO TUTORIAL


Using ultrasonic sound wave to be tested on an oscilloscope

What is Oscilloscope?

An oscilloscope is a machine that shows the wave shape of an electrical signal. When connected to a ultrasonic module they can show the wave signal.


The Arduino ultrasonic module includes transmitters, a receiver and control circuit. This distance sensor works by sending out an ultrasonic wave from the trigger terminal and detecting whether there is a pulse signal back through the echo. If there is a returning pulse signal, it is measured, and the length of time the pulse remains at a peak corresponds to the distance an object is from the sensor.


The longer the returning pulse is, the further the object is away. A short pulse of at least 10 micro sec is supplied to the trigger input to start the ranging, and the module sends out an 8 cycle burst of ultrasound at 40kilohurts, and the echo is raised. 


Here is how to calibrate an Oscilloscope:

With the use of Probe
put the ground then the test calibration and setup the settings.


Oscilloscopes principally measure voltage and time. Measuring another physical property such as temperature, pressure, flow, velocity, or displacement on an oscilloscope requires use of a transducer or sensor to convert the measured quantity into voltage. Using the oscilloscope's function you can scale the input voltages into units that match the transducer's input. 


Procedure

The 5V DC supply was connected to the VCC pin on the sensor.

The function output was connected to the Trig pin.

All the grounds were connected together

Chanel2 of the oscilloscope was connected to measure the input pulse (Trig).

Chanel4 of the oscilloscope was connected to the Echo pin to measure the returning pulse, if any.

Without any object positioned in front of the sensor, the following was obtained on the screen of the oscilloscope:

The function output was set to produce a low frequency pulse.

The distance was measured, and the waveforms displayed on the oscilloscope were recorded. The waveforms displayed were used to calculate the actual distance the sensor measured from the object.

An object was then positioned in front of the sensor:

And the oscilloscope displayed the following. Here the peak of the returning signal was of a duration of roughly 1.5milli second, the distance measured with the calculated distance of approximately 25cm

The object was then moved closer to and further from the sensor. One such position

The angle of the object to the sensor was also varied to test the sensor’s ability in detecting objects that aren’t straight in front of it.


Here the peak of the returning signal was of a duration of roughly 0.333milli second, and thereby measured a distance of approximately 5.5cm when calculated, which is close to the distance.

The angle of the object to the sensor was also varied to test the sensor’s ability in detecting objects that aren’t straight in front of it. One such position

The waveform displayed on CH4 of the oscilloscope indicates that the object was approximately 25cm from the sensor, thereby showing that the sensor can quite accurately detect the distance it is from an object that is an acute angle. This maximum angle at which the sensor detected the object during testing was approximately 20°.


One negative about this sensor is that it’s blind for the first 2cm, but more importantly, careful mounting must be adhered to, as if it’s positioned too high it won’t detect other robots and if it’s positioned too far back on the robot, it will detect itself and presume it’s an opposition robot


Brenn Drone