Antarctic Field training
As part of our antarctic field training, we had to learn how to do several things:
![]() Pitch a Polar tent and build a snow
shelter (which was also part of our summer training but it was a
good time to refresh our skills on camp management.), cooking
facilities, how to use different types of radios for
communication ..etc.
Pitch a Polar tent and build a snow
shelter (which was also part of our summer training but it was a
good time to refresh our skills on camp management.), cooking
facilities, how to use different types of radios for
communication ..etc.
![]() Learn how to walk through crevasse
fields. Actually, its more about how to avoid walking through
them if possible. Crevasses are everywhere down here but most of
the time you walk over them without ever knowing (unless of
course you're the instructor or guide and then its your job to
know). Crevasses are created when the deep snow on a hillside
starts to slip down the hill under its own weight. As it peals
away from the hill it creates a slot across the hill (usually)
and this becomes a crevasse opening. As the crevasse ages it
might open up more or collapse. Some of the big ones are
accessible to people like ourselves. One of the bigger ones at
the moment is called the Imax and its located about 10km from
Scott Base only walking distance from "Room with a View".
Learn how to walk through crevasse
fields. Actually, its more about how to avoid walking through
them if possible. Crevasses are everywhere down here but most of
the time you walk over them without ever knowing (unless of
course you're the instructor or guide and then its your job to
know). Crevasses are created when the deep snow on a hillside
starts to slip down the hill under its own weight. As it peals
away from the hill it creates a slot across the hill (usually)
and this becomes a crevasse opening. As the crevasse ages it
might open up more or collapse. Some of the big ones are
accessible to people like ourselves. One of the bigger ones at
the moment is called the Imax and its located about 10km from
Scott Base only walking distance from "Room with a View".
![]() Simple
mountaineering skills and Prussic up a rope. That means if you
fall down a crevasse and you're still conscious, you should be
able to get yourself back out again using a couple bits of very
strong cord and the safety line you are (should still be)
attached to. It is a reasonably easy technique once you have been
shown how. In the photo below we went to try out our rope
skills and prussicking technique on some steep ice cliffs.
Simple
mountaineering skills and Prussic up a rope. That means if you
fall down a crevasse and you're still conscious, you should be
able to get yourself back out again using a couple bits of very
strong cord and the safety line you are (should still be)
attached to. It is a reasonably easy technique once you have been
shown how. In the photo below we went to try out our rope
skills and prussicking technique on some steep ice cliffs.
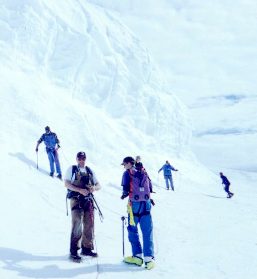
Antarctic field training at the ice falls
![]() How to
fit and use crampons, correct use of ice axes, and many
other bits of mountaineering equipment including climbing
harnesses. Crampons are just bits of metal you can strap to your
boot soles so that you don't slip on the ice, etc. It's a bit
like fitting chains to your car tires for traction. They can even
supply you with instep crampons, which are far smaller and fit
into the instep or your boot, then tie up like normal crampons.
Its good to understand how different types of crampons effect
your mobility on ice and snow. In some conditions they can
be more of a hindrance than a help.
How to
fit and use crampons, correct use of ice axes, and many
other bits of mountaineering equipment including climbing
harnesses. Crampons are just bits of metal you can strap to your
boot soles so that you don't slip on the ice, etc. It's a bit
like fitting chains to your car tires for traction. They can even
supply you with instep crampons, which are far smaller and fit
into the instep or your boot, then tie up like normal crampons.
Its good to understand how different types of crampons effect
your mobility on ice and snow. In some conditions they can
be more of a hindrance than a help.
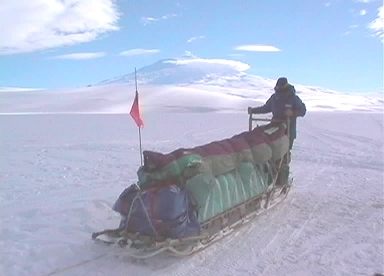
![]() Sledding
skills. Tying up loads on large sledges and towing them with
snowmobiles.
Sledding
skills. Tying up loads on large sledges and towing them with
snowmobiles.
As I was saying about winter training, they allow us a bit of time at the end of the summer period to train, and have a bit of fun and relaxation in the process. By taking us to these crevasses we get a chance to learn new skills and put them to use, as long as the crevasses don't crumble and kill us under hundreds of tons of snow and ice, never to be found again. Antarctic New Zealand wouldn't like that. They would have to find more "winter over" staff at short notice, which could be really difficult !!
Crevasses are created when a solid block of snow (or ice) is stressed in more
than one direction. Normally created on hillsides as the weight of snow
slips down the hill and the bottom half peals away from the top half or in areas
where there is more than one ice sheet on the move, and the two sheets create
friction against each other.
When these situations happen an opening will occur, often well below the level
of the ground or open to the outside world, but often covered with bridges of
snow. The bridges above the crevasses can be treacherously thin and hide
the danger below.
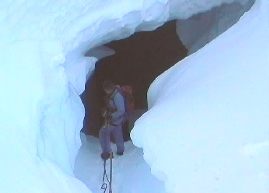
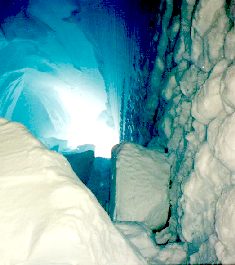
Entrance to a crevasse.
Notice the size of the ice boulders that have dropped from
the ceiling in the past.
In the picture above you can see the two sides of the entrance to
the crevasse but the bridge above is thick enough at the moment
to walk across without fear of falling into it, (you hope !! ).
Entrance to these crevasses was easy easily done through an
opening at one end, but you still need to proceed with caution.
What I was standing on was not necessarily the bottom of the
crack that had developed, it may have been just a small plug of
snow strong enough to walk on.
On this trip, Dave was our guide and instructor. Then there was Hermione, Steve, Jonathan and me. Hermione and Jonathan were semi experienced mountaineering people. Steve and I where both new to it so we just kept our mouths shut and learned alot in a very short time.
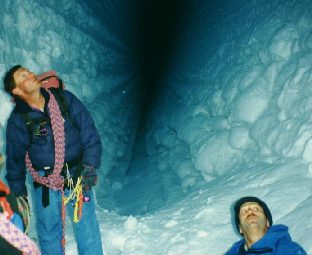
Looking Into a Crevasse
So !! Do you getting a feeling for why they call it the
Imax? I haven't done any alteration to the picture. What you see
is what it looked like. The light just disappears into the end.
Its also very cold, very still and very blue. An absolutely
amazing place to see for yourself; nature at its best. The name
Imax was given to it by the TV crew who found it a few years ago
and is named after a large type of picture theater.
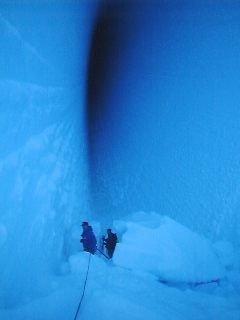
Looking around inside a crevasse..... totally awesome !!
Dave was our guide on this trip. His
experience in Antarctica has been gained over the 4 full years he has been down
here (not consecutively) as well as a summer season in the early 80s. As you
can see I altered the left photo colour slightly from the original (away
from the normal blue light) to give you a good idea of how we were roped to
each other for safety. Just because we are standing on snow doesn't mean its
the bottom of the crevasse and you still have to watch your step. It may be
a beautiful place, but you don't want to get to complacent and die here. Notice
the walls of the crevasse are slightly curved, it is very typical of the way
many crevasses form. If you fall into a crevasse and the fall doesn't
kill you then you may be trapped in the tapering of the walls at the bottom
of the crevasse. The weight of your fall and the body heat you create
can wedge you in and then melt you into place like a popsicle. Many people
have died in those circumstances.
Around Dave's shoulder is about 10 meters of rope for rescue purposes. The other
end is tied to his buddy who is normally ten meters away and he also has 10
meters over his shoulder. The harness around his waist is tied into the rope
with carabenas and two small prussic ropes tied to the main rope. He also has
on his SAR (Search and Rescue) back pack, just in case. Temperature was probably
about -25 to -40 degrees Celsius. Hard to say; it was just bitterly cold.
Polar tents
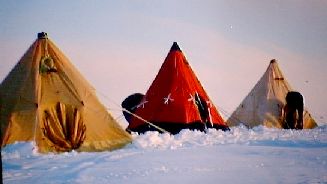
Polar tents. They are designed to fit 2 people comfortably,
3 people awkwardly, and 4 people intimately
The polar tents we use are like a Tee Pee. They have a solid pole (which is
never removed) down each of the four sides, vent holes around the top and when
you want to set them up you just stand them up and spread out the tent pole
base; really simple. Then all you do is put in a waterproof floor covering and
your tent is almost complete. The tents have flaps on the bottom so that you
can shovel snow on and stop the wind getting under it. They also have strong
guy wires all around to stop the tent from blowing away in even the worst of
storms.
The tents have an inner and an outer layer to stop heat loss, and the material
they are made from is not waterproof . No need to be waterproof in a place that
is drier than the Sahara Desert at about 2 percent humidity . The Polar tents
don't fold down very much. The solid poles hinge at the top, so you still get
to transport a full length tent. This is not a problem because it all goes onto
the long sledge. Same with all the other gear, ie, food boxes, shovels, kitchen
equipment, etc.
One of the biggest problems is ventilation. If you have to cook your meals inside
the tent, which is often the case if the weather turns bad, without fresh air
you would soon get carbon monoxide poisoning. This will put you to sleep for
good and after that the weather outside stops becoming an issue. To stop this,
there are tubes that poke through the top of the tent and allow fresh air to
come in. When putting up the tent you must always make sure that these are not
obstructed. If you look really closely at the inside of a New Zealand polar
tent wall you will see (in pen) the word KERO. This is to tell people which
side of the entrance (between the outer and inner layers) to store the fuel
for the Primus cooker. This is reasonably important because accidents do happen,
and you don't want to get fuel over any of your gear as it will lose its thermal
insulation properties. The chill rate is 25 times faster if you get wet.
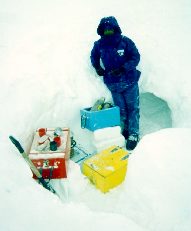
Snow cave, and the beginnings of a compact kitchen
Summer field training. The hole in the snow leads to a cave
big enough to sleep 4. Beside me is the food box, kitchen cooking equipment
box, and utensils box. Not forgetting the shovel used to make any critical
kitchen building alterations.
As you can see its just like regular camping out, but just a little bit more
thought has to go into your survival.
How do you make a snow cave ??. Get all your survival gear packs
and stuff. Through it into a big heap, then shovel the snow from around the
sides of the pile up onto the heap. Keep doing this until the mound is
well covered in a thick layer of snow then pack it down to create a hard shell.
Then, from the wind sheltered side of the dome, start digging an entrance, down
under and up into the middle of the dome where all the bags etc. are.
When you reach the bags pull them out of the hole through the entrance you have
just made. Then tidy it up a bit with a shovel and suddenly you have made yourself
a snow cave. This is only one example of how to make a snow cave.
Another way is to cut a trench in the snow and then build little cubby holes
to sleep in above the floor level. Not forgetting to create a roof with
some covers etc. Depending on how urgently you need shelter from
the elements and the situation you are faced with will determine the final outcome
and what you create, i.e. essential shelter or a 4 star accommodation.
Herm ridding a Tamworth Sledge,
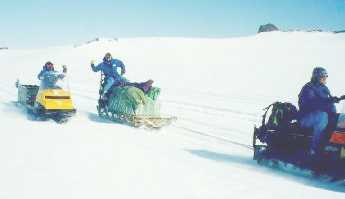
Sledge being towed by a skidoo
We all got turns at riding on the back of the Tamworth sledge. Even though it is being towed by a skidoo, it still helps if someone is on the back giving some sort of steering as it will wander around a bit if left to its own devices. Steering is done by leaning from one side to the other and hoping it will go in the direction you want it to. There is even a small break at the back. Its more like a piece of pliable wood with a metal tongue on it that digs into the snow when you step on it. Very simple at taking the edge off your speed when following the towing vehicle down-hill.
Dogs
A small side note:.. We don't have any dogs down at Scott
Base or McMurdo any more as they are not required due to the
reliability of vehicles these days. They are also environmentally
unfriendly. They were fed on a diet heavy with seal meat and food
scrapes from the large kitchen at McMurdo. The seals used were
very old bull seals that where deemed to be past any usefulness.
This kept the dogs in good shape compared to other meats which
they tried to use, but it was frowned upon to go shooting any
seals. The seal meat also stank, and I'm told it was never the
nicest of jobs for the dog handler. The reasons to get rid of the
dogs were far greater than the need to keep them. The dogs from
Scott Base went to a good home (in Minnesota , I think) and
where still used to tow sleds. The offspring of some of the dogs
even returned to Antarctica for a special trek across the ice a
few years ago. The average life span of a working dog was
about 9 years maximum, because the cold made them prone to
arthritis and a few other problems. The type of dogs
'preferred' where the ones that constantly freed themselves
of snow and ice instead of letting it build up, which would
result in the loss of large clumps of hair when they decided to
have a scratch.
The antarctic dogs where big and enjoyed the great
outdoors. You would seldom see them trying to find shelter
unless it was the worst antarctic weather you could imagine.
The also smelled real bad which didn't do much for them living
indoors even if they wanted to.
www.geocities.com/coolrunnernz/
This page
last updated 9-3-01
Re- Edited by Shirley Baston Fred - [email protected] - ICQ
# 15167279