Product Demonstration Sheet
Name of Product: Computerized Warehouse Management System
Team Name: DAL Consultant Company Ltd
Executable File: Warehouse.exe
Web URL: http://www.geocities.com/dal207
Inputs: 1. Schedule
2. Stock Information
3. Client Information
Outputs: 1. Client and History/Transaction Summaries
2. Stock Availability
3. Stock Locations
4. Space Availability
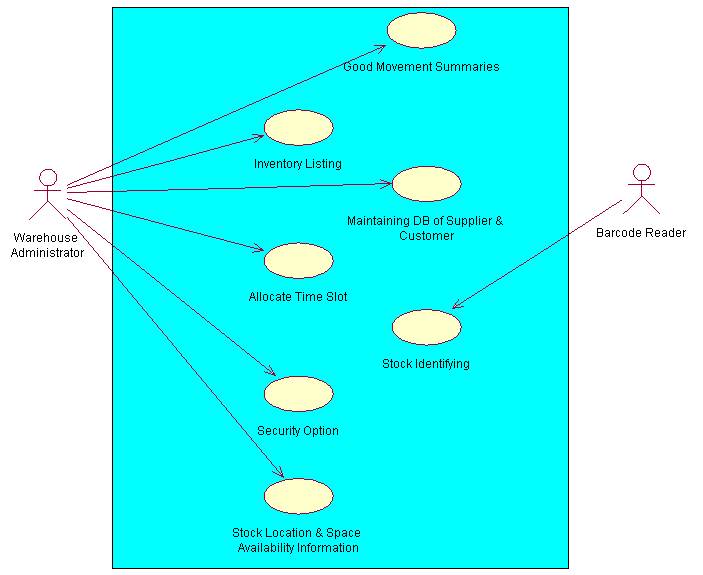
Use Case Diagram:
Explanations for Some Scenarios:
1. Client
Based on the class diagram, the user requests the main system to add client, and the system will call the add client service provided in the ClientDB class. In our implementation, the ClientDB class is implemented by the ClientMenu Form. The new client information will then be stored in a new database record cell.
Procedure:
Click on the Client Menu and choose the add client command button. Then a new set of empty textboxes is available for the user to put in the new client information. After filling up the information needed, confirmation is required before moving on to the other operations, such as edit client, etc. In this case, we disabled the other command buttons waiting confirm button to be pressed by the user.
Please be noted that there is no obligation to enter complete client information (i.e. all parameters must be filled). Some of the parameters can be left out empty. This supports flexibility, for example: if the client does not have any contact numbers.
This will delete the current client record pointed by the cursor. Confirmation is required to verify the user decision whether he/she is sure to delete that particular record. After the delete operation is completed, the cursor moves to the next record.
Procedure:
In the Client Menu click Delete Client command button. A message box will appear to ask users for confirmation of deletion. Users can either click OK to confirm or Cancel to abort the delete operation.
This operation will search a particular client based on the client’s name. An input box will appear as the user requested the client searching. If found, the cursor will be pointing at the desired record location. Detailed information about the desired client can be read after that.
Procedure:
In the Client Menu click Search Client button. An input box will appear for the user to fill in the desired client’s name. Click OK to proceed. If the record is found, you will be able to see the desired client information. Otherwise, an error message: “No current record” will be generated. The cursor will then be forced to point to the first client record.
2. Item
Similar to the add client operation. Each time the user put a new item, the item must be listed/registered in the transaction database first. To add the quantity, user must enter the schedule. Each time slot has half an hour interval (17 slots per day starting from 08:30 – 17:00). During a particular time slot, there might be in or out transaction or both occurring.
In this implementation, a timer is required to check the current time slot. For every activity done during and prior to the current time slot, it would automatically update the stock database. Deletion upon a time slot record does not affect the stock database, as they are managed independently.
Procedure:
In the Schedule Menu, click Add New Item button. New record cell will then automatically be added into the database (i.e. empty textboxes available for user to put the item descriptions in). Confirmation is also required to make sure whether the user really wants to put the new record or not.
Functionality is pretty similar to the scenario of delete client. The current pointed record will be deleted. Again, confirmation of deletion is required.
Procedure:
Identical to the delete client operation.
3. Schedule
a. Add Schedule
The operation is actually closely related to add item operation mentioned previously. The functionality of this procedure is combined with the add item operation.
Procedure:
Similar to the other add operations as in the previous cases.
b. Delete Schedule
Same functionality as in the previous delete operations, except it is applied to the schedule database record.
Procedure:
Identical to the other delete record procedures.
Layout Screenshots
This is the first page going to be displayed during program execution:

Then, you can enter the User ID and the password. The User ID and the password information are then checked from the administrator database. If the user ID and the password are incorrect, a "no current message" will appear. If correct entries, then a "log on success" message will appear.

The following is the Main Menu when first loaded. Note that here the user has not selected any option.
![]()
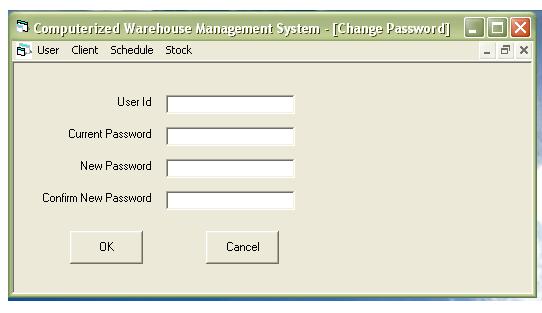
Enquiries about password change can be retrieved from the first option in the main menu (i.e. User). This will show new form for the validation of the new password entered.
The user can also add, delete, search a client by selecting client option in the main menu. In addition, user can also see the summary of the client database by clicking the view database command button. User can also perform find and sort operations. Find command will look for the matched strings entered to the textbox and the findings will be displayed in bolded font. Sort operation will sort the client database summary according to the client's name.


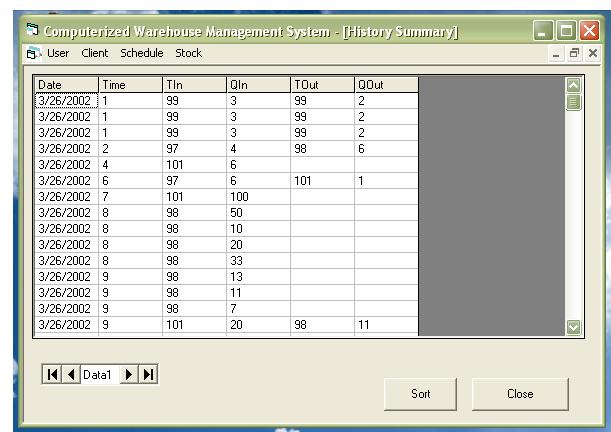
Schedule scheme for goods transactions is also available. Every good transaction needs to be scheduled first, whether it is incoming or outgoing goods transaction. Select the Schedule Menu in the main menu and the following will be displayed. A complete history summary for the goods transaction can be reviewed from the History command button given in the Schedule Menu.

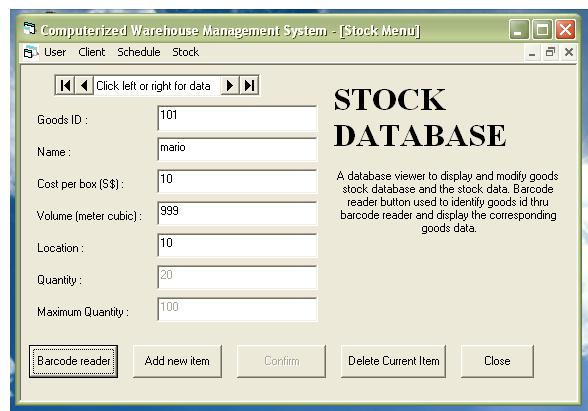
Stocks in the warehouse were managed from the Stock option in Main Menu. User can scan the item, add new item or delete current item record pointed by the cursor.
Important Design Decisions:
In our design, some important decisions were made. The pre-defined Class Diagram was designed with rough idea based on the system requirements.

After brainstorming, we decided to do several changes in the class diagram. We used the client class to represent the supplier and the customer for efficiency purposes. We also split the stock and the scheduling manager into two new classes: Warehouse Stock and Schedule. Hence, the stock and the schedule can be managed independently.
History and Event class are introduced to incorporate with the clients and goods summary. History class will summarize all the transaction events occurring in a certain period of time. Similarly, Timeslot class is introduced to help incorporate with the goods movement summary. In conjunction with security matters, we also decided to add the Warehouse Security class.

Implementation Strategies
Implementation tasks were done by two programmers and the project manager. In addition, we also include the test engineer into the implementation to perform unit testing for each module.
As stated in the software requirement, the software system would focus mainly on Graphical User Interface (GUI) and database accesses. We decided to use Object-Oriented approach as the most convenient way to incorporate with this requirement. We thus prefer to use Visual Basic 6.0 for the implementation. In that way, implementation for each module can be well-organized in terms of user interface management. Another reason for this is that Visual Basic is able to incorporate with Microsoft Access application. Hence, database manipulations can be done easily.
Difficulties/Problems encountered
Visual Basic is considerably a new language for our team. Almost 50% of the implementation time was spent to learn the VB language and syntaxes. Due to the limited project time, we were not able to manage to master completely all the VB syntaxes. In this case, no help menu or library listing is available in the VB itself.