| May 17, 2003, Rogue Trader
Tournament hosted by the Pittsburgh Iron Legion |
Return
to RTT Overview |
Dan Moore - Dark Eldar
Battle in the Eye of Terror is an interesting mission where the objective is to wipe out your opponent's army. One unique rule for this mission is that once per turn you can take any unit (excluding vehicles) and deep strike them anywhere on the battlefield. The deployment zones for the mission are 12" wide 'L" shaped areas in opposite corners of the battlefield.
As a side note to this battle, Jack and I had talked earlier in the day during the RTT registration. He had joked at the time that it would be ironic if the only two dark eldar armies (his and mine) ended up battling in the tournament. Little did we realize that this would come to pass. Jack and I are both very active on the Commorragh e-group, a discussion group for dark eldar players. Usually we are advising fellow dark eldar players on the best way to play against marines, necrons, etc. Now we had to figure out how best to defeat each other's armies.
Jack took a pretty standard skimmer-based dark eldar army. He had 4 raider squads, a Wyche squad on a raider, a ravager with 3 disintegrators, a Talos, and a Haemonculus HQ.
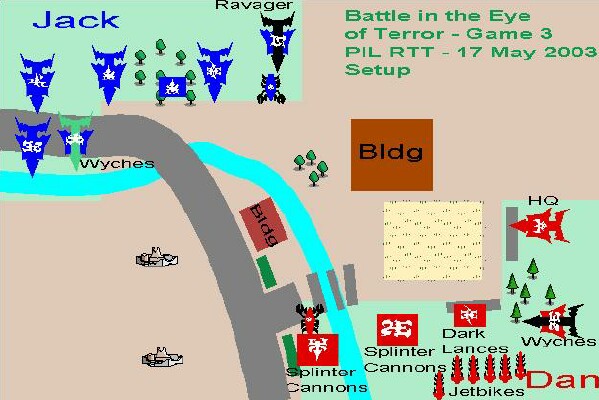
Jack deployed 3 of his raider squads and the Wyche raider along the left edge of the battlefield in his deployment zone. One of the 3 raider squad had a dark lance so he deployed the squad in some woods near their transport. The Talos, Ravager, and other raider squad were deployed closer to the center along the long edge of the battlefield. The Haemonculus was deployed with the wyches.
I deployed my Talos opposite to Jack's in the center of the dark eldar deployment zone. I thought it would be cool if these two fought each other in a titanic conflict. The two large warrior squads were deployed on the flanks of the Talos. The dark lance squad was placed back in the corner of the deployment zone behind the cover of a low stone wall. The HQ raider and Wyche raider were deployed behind some cover on the short side of the battlefield. The jetbike squad was deployed in a line behind the dark lance squad.
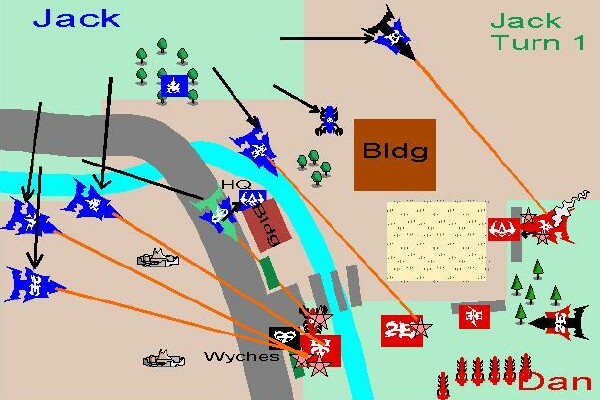
Jack got to go first and moved 3 of his raider squads and the Wyche raider along the left side of the battlefield. The Wyches and Haemonculus disembarked from their transport. The Haemonculus detached from the squad and took cover behind a building while the Wyches fleet-of-footed 6" toward the large Warrior squad at the center of the long edge of the battlefield. The remaining Raider squad moved towards the middle of the battlefield and took cover behind a large building. The Ravager moved from behind cover so that it had a clear line of sight to my HQ Raider. Jack's Talos advanced towards mine. During the shooting phase Jack's dark eldar unleashed a murderous hail of Disintegrator and Dark lance fire at my units. The HQ raider was shot down, the Talos took a wound, and the large warrior squad near the center of the battlefield lost 4 models. During the assault phase Jack managed to charge his Wyches (12" charge with combat drugs) into the warrior squad that had just taken shooting casualties. The wyches were able to kill three more warriors in close combat. Unfortunately, all their remaining attacks were wasted because no warriors were left in the 2" zone of destruction. The large Warrior squad made its leadership check and both sides made their "pile in" moves.
During my turn 1, I realized that Jack was pushing hard on my left flank with the bulk of his army. To counter this I moved my jetbike squad and Wyche raider 24" to bolster the left flank. The Talos also advanced to counter-assault Jack's Wyches. The Dracon and his Incubi retinue marched from the wreckage of their raider towards the large building in the center of the battlefield. Unfortunately, they could not reach the building and were out in the open. The other large warrior squad also advanced towards the center of the battlefield so that it could shoot at the Raider squad that was there. My shooting phase was disappointing as I failed to shoot down any of Jack's skimmers. During the assault phase, the Talos joined the melee between Jack's Wyches and my Warriors. Suprisingly the Wyches took more wounds than they gave. They failed their leadership test and fell back. The Warriors and the Talos consolidated behind cover as best as they could to avoid enemy fire.
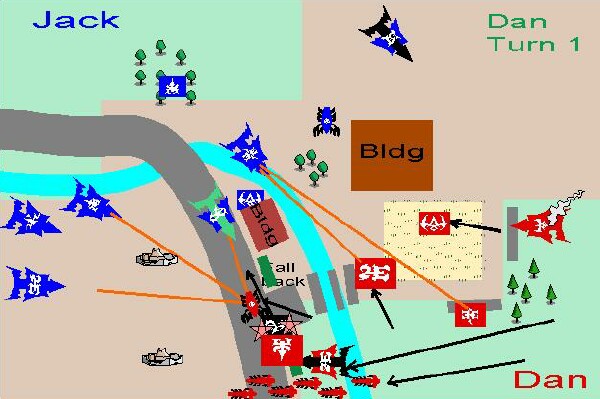
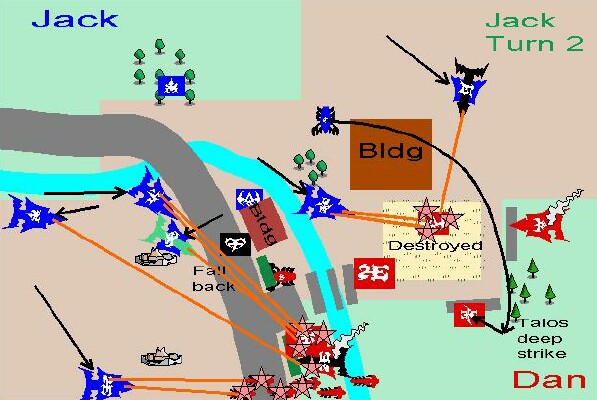
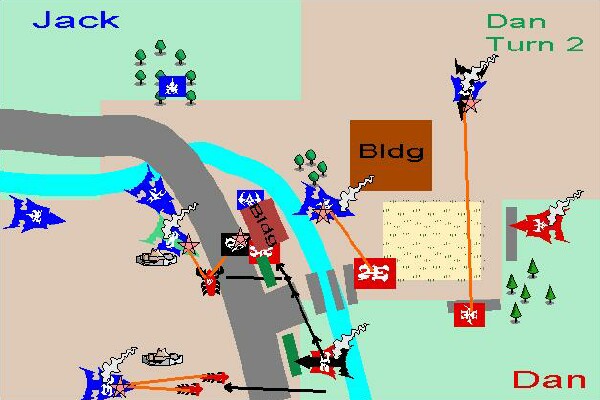
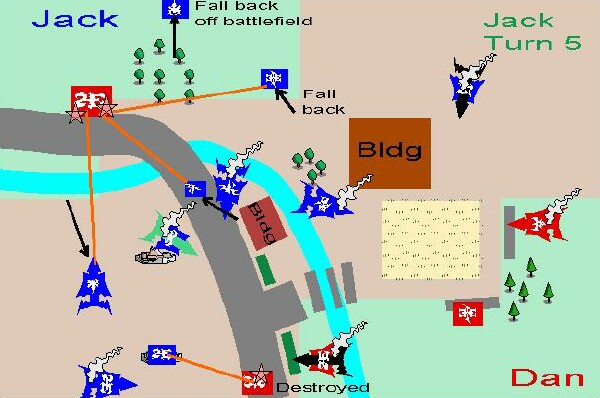
In turn two Jack tried to regroup his Wyches. They did not make their leadership check and continued to fall back. The Wyche raider and the 3 raider squads moved 12" further on the left side of the battlefield. The raider squad in the center of the battlefield moved in position to shoot at the Dracon and Incubi that were in the open. The Ravager took a 12" move so that it could do the same. Jack took a gamble and tried to deep strike his Talos in the middle of my lines. Unfortunately, it deviated right on top of the dark lance squad and was lost. During the shooting phase, Jack's dark eldar once again unleashed a deadly torrent of dark lance, Splinter, and Disintegrator fire. The Dracon and his Incubi were vaporized. The large warrior squad on the left side of my formation was decimated and fell back off the battlefield. The Wyche raider was shot down killing one of them in the crash. Four jetbikes were destroyed, but the survivors, both with blasters, made their leadership check.
Things were looking pretty grim for my Dark Eldar at this point as a good chunk of my army was destroyed and I had yet to shoot down any of Jack's Skimmers. Fortunately for me I had a secret weapon that would help turn the tide of battle. It was called the "Douglas factor."
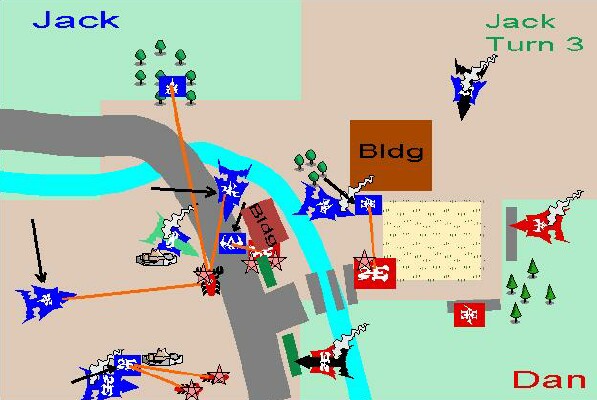
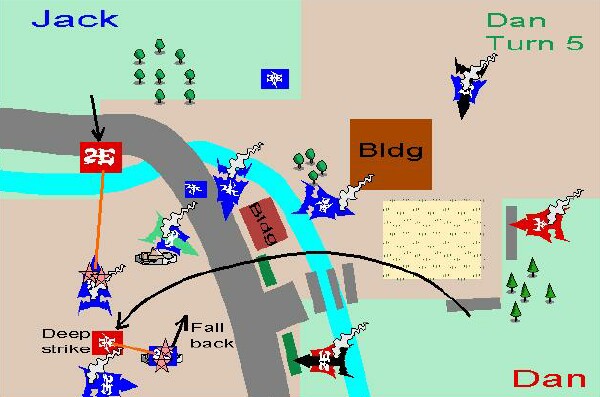
I moved my Wyches from the wreckage of their raider and fleet-of-footed them to get into assault range of Jack's Wyches. The Talos moved towards Jack's Raiders on the left side of the battlefield in hopes that it could shoot them down with a lucky shot from its sting. The remaining large warrior squad moved in position to shoot the Raider squad in the center of the battlefield. The two surviving jetbikes advanced towards the closest Raider squad to get in blaster range. During the shooting phase, I let my son, Douglas, assist me with some of the dice rolling for my attacks. This would be pivotal to the outcome of the battle because the kid did some mad dice rolling. The dark lance squad shot down the Ravager. The large warrior squad shot down the Raider Squad in the middle of the battlefield, killing three squad members in the crash. The jetbikes shot down another Raider Squad near my long board edge and killed three squad members in the crash. Jack was careful to deploy the squad far enough from my jetbikes so that I could not charge them in close combat. The Talos wild-fired and managed to kill a Wyche AND shoot down the Wyche raider. During the assault phase my Wyches charged Jack's Wyches. His wyches failed their leadership check, were unable to regroup, and were destroyed. I consolidated my Wyche squad behind some low hedges for cover. Things were starting to turn around for my dark eldar as 4 of Jack's 6 skimmers had been downed.
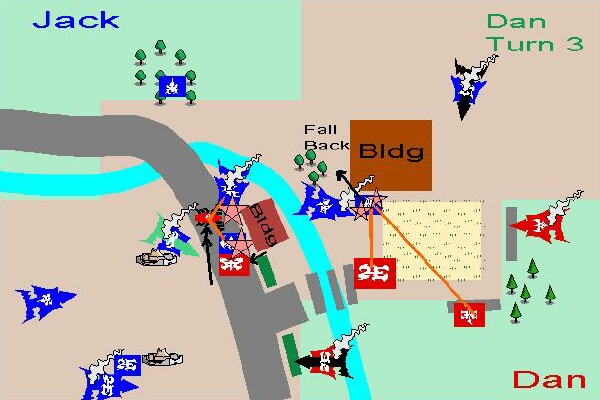
On turn 3 Jack moved his Haemonculus in position to fire its Destructor at my Wyche squad. The downed raider squad in the middle of the battlefield advanced to some cover where it fired upon my remaining large warrior squad. The other downed raider squad moved out from the wreckage to shoot at the remnants of my jetbike squad. The two surviving raiders positioned themselves to fire on my Talos. During Jack's shooting phase his Haemonculus killed 5 of my Wyches with its Destructor, although they passed their leadership check and held. His raiders and the squad on board one of them inflicted another wound on the Talos. The downed Raider squad in the center of the battlefield killed three members of the large warrior squad with splinter cannon fire. The other downed raider squad destroyed the remaining two jetbikes with blaster and splinter fire.
During my turn 3 I moved the three surviving wyches in position to assault the Haemonculus. The Talos advanced toward the Raider with its squad on board. In the shooting phase the Talos managed to wound the Haemonculus with a its Talos sting. The large warrior squad and dark lance squad fired on the downed raider squad in the center of the battlefield and killed all but one member, who promptly failed leadership and fled. During the assault phase the Wyches assaulted and killed the Haemonculus. They consolidated but were unable to gain any cover. In a desperate gambit, the Talos assaulted the nearby Raider with its squad on board and destroyed it. Four members of the 9-man Raider squad died in the crash.
For turn 4 Jack repositioned his lone surviving raider for another shot at the Talos. The squad of the Raider that was downed by the Talos moved into cover so that they could shoot at the remnants of my wyche squad. The other downed raider squad near my long board edge also moved into cover. Jack's shooting phase was rather uneventful for a change. The raider missed the Talos with its dark lance and the downed raider squad killed two wyches with splinter cannon fire. The remaining Wyche failed her leadership check and fell back.
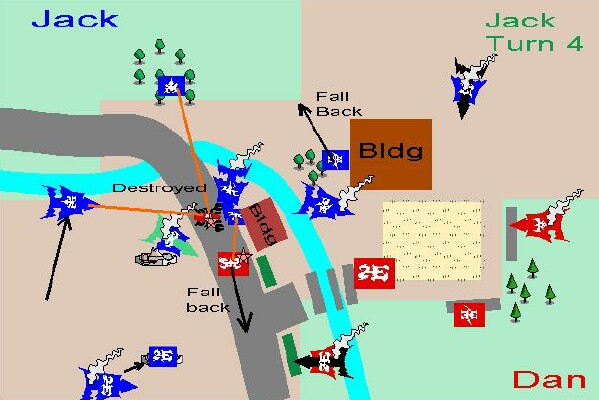
On my turn 4, I decided to gamble and deep striked the large warrior squad into Jack's deployment zone near the raider squad with dark lance that was deployed in some woods. The Talos moved to engage the downed raider squad that was nearby. During the shooting phase the Talos killed two members of the nearby raider squad with a deadly volley of fire from its Sting. The squad made its leadership check. The warrior squad killed over 50% of the raider, dark lance squad causing them to fail their leadership check and flee from the battlefield.

Turn 5 went pretty quickly because there were not many combatants left. Jack's lone surviving Raider managed to destroy my Talos with dark lance fire.
On my turn 5 I gambled again and deep striked my dark lance squad next to Jack's downed Raider squad near my long board edge. The dark lance squad killed all but one member of the squad with splinter rifle fire. The survivor failed leadership and fled. The large warrior squad advanced toward Jack's only raider and shot it down with splinter cannon fire.
Turn 6 amounted to an exchange of splinter fire between the few scattered warriors on the battlefield. When the smoke had cleared there were a combined total of 22 warriors remaining. I had my dark lance squad above 50% and less than half of a large warrior squad. Jack had three Raider squads that were each below 50%.
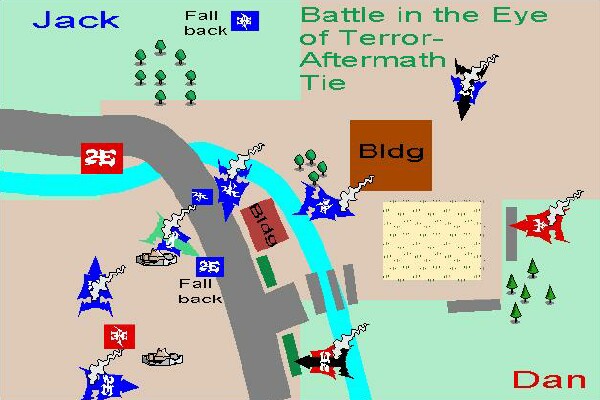
This battle was a very bloody draw for both dark eldar armies. It was a great game where the fortunes of war shifted wildly from turn to turn. I was pleased to get a tie with Jack in this game. He was shrewd player (won best Tactician) with a well-constructed, skimmer-based, dark eldar army. Fortunately for me, I had Douglas and his mad dice rolling to help me shift this game from a near massacre to a draw.