| Mandrake Tactics |
Dark Eldar
Tactics |
Check his club website at: http://members.rogers.com/newmarketgamesclub/
Mandrakes should be considered as ‘specialists’ and as such, it’s recommended to limit the number of Mandrake units in your army to one. There are some missions like Patrol, Rescue or Sabotage, in which Mandrakes naturally excel due to their special deployment rules, but in the average ‘house league’ or tournament it’s best to limit them to one unit. This unit will never form the backbone of any army and there are other units like Warrior and Raider squads that need to appear in abundance in any army. So after you’ve got one unit in your list, additional points are better spent on other choices.
The units can be as small as five or as large as ten. So that’s a point range of between 75-150 points. As Mandrakes don’t normally form a ‘front line’ unit and tend toward a more specific role in the army, I’ve always found it unnecessary to field them in a large unit. On the other hand a five-man unit can be too small if they get mixed up with a large unit of enemy ‘fodder’ troops etc. So I’ve always found a unit of seven or eight to work best for me in the long run. It’s cost effective, but still large enough to get some serious work done.
By far the single most important thing required to ensure for Mandrakes to work for you, is to REMEMBER all their special rules. If you are two turns into a Patrol mission and you suddenly realize you could have deployed the Mandrakes at the start of the mission (because they always deploy regardless of mission) then it’s too late and you’ve lost some their edge. So the unit is bound to perform below your expectations. The same can be said for their ‘shadow-skin’ ability. If you’ve removed a handful of models to shooting and suddenly remember that they should have received a ‘cover save’ you’ve done the unit a disservice. Although not a special rule specifically related to Mandrakes, it’s important to remember that Mandrakes can still make use of the Fleet of Foot rule once they have been deployed.
Although Mandrakes actually don’t infiltrate, they perform a similar function in the Dark Eldar army that infiltrating troops do in other armies. As they can always deploy regardless of mission they can normally penetrate deep into enemy lines in only two or three turns. In a mission with a standard deployment of 12” onto the table, Mandrakes can assault an enemy model from 35-40” across the table on the second turn. Deploy 12” + 1st turn movement of 6” + 2nd turn movement of 6” + between 1”-6” fleet of foot in the second turn shooting phase + 4” of deployment (see Mandrake special deployment) + 6” of assault movement. So if your target is a Tyranid Biovore, for example, you will be assured of getting to it on turn three and quite possible on turn two. This will mean the Biovore may get as little as a single shot in the entire game before being torn apart.
Combine this with the fact that you have three different possible positions to deploy the unit and you have quite a large range of coverage. So although they are not an exceptionally fast unit they are very adept at striking where and when you want them to. Some Dark Eldar commanders will even keep one, or more, of the three Mandrake ‘blips’ back for defensive reasons. The Mandrakes can then be brought on the table as a defensive reserve unit to deal with an enemy threat attacking the Dark Eldar line.
In addition to the benefit of having a wide range of table coverage, the Mandrakes special method of deployment also gives them another benefit as well. That being that they always arrive to fight at full strength. Before the Mandrakes position is revealed on the table the unit cannot be targeted by the enemy and will therefore not suffer any casualties to enemy fire. So unlike many other units in the Dark Eldar army, which run the risk of losing members of their squad to enemy fire, or to a nasty crash of a Raider, the Mandrakes always remain safe in the shadows until they are ready to attack. This ensures that when they do arrive, they will be at full strength and ready to deal with whatever threat you have directed them towards.
When the Mandrakes are ready to be placed on the table you have the incredible advantage of being able to place the models anywhere within 4” of one of the Drake ‘blips’ (although one must actually be the ‘blip’ itself). This means that you can position the models in exactly the way you want in order to get the maximum effect in the coming shooting/assault phase. So if you are about to tangle with a Space Marine Devastator squad you’ll probably want to deploy all the models at one end of the Space Marine squad for a ‘gang-up’ assault. In this way you will contact fewer enemy models when you do attack, and thus reduce the effectiveness of the enemies attacks in H2H. He will have only very few models in contact, assuming they survive the Mandrakes attacks that is. Remember, Mandrakes have an initiative of 5. This type of attack can be a great way of tying down a superior enemy squad for several turns. Even if the Mandrakes eventually loose the combat, the damage has been done in preventing the enemy heavy weapon squad from using it’s long range weapons on the fragile Dark Eldar vehicles etc. See images in Ganging-Up below for an example of this type of assault.
On the other hand if you wish to assault an enemy unit of Eldar Guardians, or Tau Fire Warriors, you can string the Mandrakes across the front of the Guardians only 1” away from them. This way you can safely fire your splinter pistols into the squad you are about to assault without having to worry about killing so many enemy models that you’ll not be able to get all your Mandrakes into base to base. A favorite defensive tactic in v3 40K is to remove casualties from the front of a squad, which is about to be assaulted, in order to reduce the number of enemy attackers which actually get into base to base. This then reduces the impact of the coming assault. Not an easy tactic to use against Mandrakes, who can snuggle right up close to the unit they are about to assault when they deploy. See images in Up-Close and Personal for an example of this type of assault.
The ideal target for a Mandrake assault is any model with the combined statistic of a T3 and WS3 (or lower). There are a great many models which fall into this category including Imperial Guard, Tau Fire Warriors, Tyranid Gaunts, Eldar Guardians, Chaos Cultist, and a great many others. Although these are not the toughest of opponents they all fulfill and important role in the enemy’s army, and if you can eliminate them it will enable the rest of your army to out play the remainder of the enemy’s force.
In the case of Tau or Imperial Guard, a Mandrake unit can cause so much damage that they pay for themselves three times over. While vs Tyranid, Chaos or even Orks against whom they can cause some serious casualties, they can greatly reduce the effectiveness of the ‘hoard’ strategy of the enemy. In the case of Eldar Guardians they can assault and savage a squad that is capable of dishing out a great deal of short range firepower without suffering a single casualty to shooting.
Other ideal targets for a Mandrake assault include many ‘indirect’ or long range enemy support squads. Examples include Tyranid Biovore, Eldar weapon teams or Rangers, Chaos Havoc squads, Space Marine Devastator squads etc. All these squads are ideal targets not necessarily because they can be easily defeated, but because the Mandrakes can prevent these units from accomplishing their intended goal. So although a unit of Mandrakes might have trouble wiping out a unit of five or six Devastator marines, they can realistically expect to tie them up for the majority of the game in close combat.
Here are a few example of specific tactics to use with Mandrakes.
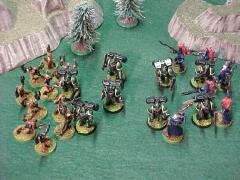
If you are about to tangle with a tough or nasty opponent like a Space Marine or an Aspect Warrior, you’ll probably want to deploy all the models at one end of the target squad so you can ‘gang-up’ in the assault. In this way you will contact fewer enemy models when you do attack, and thus reduce the number of enemies attacks in H2H. He will have only very few models in contact, assuming they survive the Mandrakes attacks, that is. Remember, Mandrakes have an initiative of 5. This type of attack can be a great way of tying down a superior enemy squad for several turns. Even if the Mandrakes eventually lose the combat, the damage has been done in preventing an enemy heavy weapon squad from using it’s long range weapons on the fragile Dark Eldar vehicles for example. See the images below for an example of this type of assault.
|

|
|
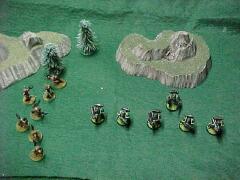
| Mandrakes (on
the left) deploy within 6" of the space marines at the edge of
their formation |
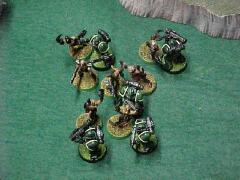
The mandrakes
assault only the nearest marines to reduce the number of enemy attacks
in hand-to-hand combat. |
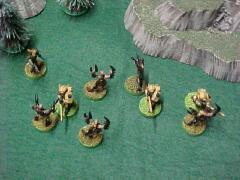
Aftermath: The
two marines that were assaulted are dispatched. The mandrakes engage
the remainder of the squad. |
Up-close and personal:
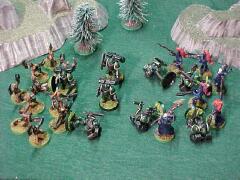
If you wish to assault a ‘softer’ enemy unit like Eldar Guardians, or Tau Fire Warriors, you can string the Mandrakes across the front of the target only 1” away from them. This way you can safely fire your splinter pistols into the squad you are about to assault without having to worry about killing so many enemy models that you’ll not be able to get all your Mandrakes into base to base. A favorite defensive tactic in v3 40K is to remove casualties from the front of a squad, which is about to be assaulted, in order to reduce the number of enemy attackers which actually get into base to base. This then reduces the impact of the coming assault. Not an easy tactic to use against Mandrakes, who can snuggle right up close and personal, to the unit they are about to assault when they deploy. See the images below for an example of this type of assault.

|

|
|
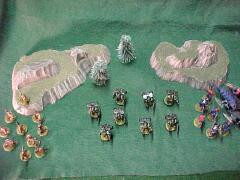
| Mandrakes (bottom)
deploy 1" away from Tau Fire Warriors during movement and shoot their
pistols prior to assault. |
Tau casualties
are removed from the front of the squad, but the mandrakes can still
assault all of the remaining squad members |
Aftermath: the
Tau Fire Warriors are decimated. If they don't fall back they will
be wiped out in the next HTH phase. |
Assaulting units deep in enemy territory as mentioned above also has an additional benefit. This type of combat also helps the rest of the Dark Eldar army as the Mandrakes will be engaged in melee close to the enemy board edge. This makes it more difficult for enemy units to rally and jump back into the game. So enemy units routing from the front lines will be unable to rally (enemy within 6”) and will run straight off the board.
In any of the Cleanse type missions it’s quite an easy matter to position a unit of Mandrakes to control/contest a quadrant of the board. In most cases you can combine this with the elimination of a modest enemy target. So at the end of the day the upside is quite significant for the points spent on the unit.
Mandrakes wide range of deployment can allow them to be used in a pinch against superior enemy troops in a support role to a Dark Eldar HQ and Retinue, sWychequad or Talos. They can appear out of nowhere and add their numbers to an assault. The biggest benefit being that even though they might not contribute directly by killing many enemy models their numbers will ensure the enemy suffers from a horrible ‘outnumbered’ modifier when rolling his break check. This could then lead to a ‘crossfire’ situation or just run a unit right off the board if you are close enough to the edge to prevent their ‘last chance’ check (enemy within 6”). It’s probably even a good idea to keep too many Mandrakes from actually getting into B2B contact with obviously superior close combat troops like Assault Marines, as it just gives the enemy more chances to hit. This can be a fantastic combination when used with Reavers or Hellions which can pursue the fleeing enemy unit with a 3D6” sweeping advance. See the images below for an example of this type of assault.
|
|
|
| A Dark Eldar HQ
(right) disembarks from its raider in preparation to assault a unit of
Assault marines. A mandrake squad (left) deploys to assist the HQ. |
The mandrakes charge
and engage only two marines in base to base contact. This will
limit the number of attacks that the surviving marines make against the
mandrakes. |
Aftermath: most
of the marines are killed in hand-to-hand combat. The mandrakes take
only one casualty. The surviving marines are outnumbered 5 to 1
and will most likely fall back. |
The Mandrakes special deployment rules make it possible to ‘appear’ right behind an enemy unit. This can to many wonderful things. They can shoot one unit and assault another, assault a unit in the rear or just stand there and ‘crossfire’ the enemy unit they appeared behind.
I’ve always found the ability to assault an enemy unit from the rear to be a subtle, but very effective way of throwing an enemy off his game. Not only is it usually unexpected, but it has the effect of drawing the combat away from your lines. This can be a very frustrating tactic to employ against an Ork or Tyranid army that is trying hard to rush towards your army with all speed.
The option to stand and ‘crossfire’ an enemy unit is a bit of a gamble and will usually end up with the Mandrakes standing in the open and being shot up. So it can be a suicide tactic, but remember that even Space Marines can be ‘crossfired’. So in the right situation it’s worth it. Combine this with a unit of Grotesques, which force a fallback when they win a combat, and you have one nasty little trick up your sleeve.
This is a very important thing to consider in v3 40k. Some armies are just so strong in the assault the best defense against them is a good offense. A great example here as far as the Mandrakes are concerned is the Tyranid Genestealer. Just a brutal menace if it gets into your ranks, but believe it or not, they are the perfect target for a Mandrake ambush. If Mandrakes can get the jump on the Genestealers – wait!, they always get the jump on them – they can really make them regret being born. Sure, the Genestealers have a higher initiative than the Mandrakes and will probably drop one or two of them before they get to strike, (remember that Shadow Skin provides a cover and that does not give the Mandrakes first strike when attacking – only defending) but the overall effect of the Mandrake ambush will usually be too much for the poor little critters. Just remember to use the ‘gang-up’ assault mentioned above. The Mandrakes appear and fire their splinter pistols into the Genestealers. Not a great shooting weapon, but against Genestealers you don’t need great one to drop a couple of bugs. The Mandrake’s BS 4 and the AP 5 of the Splinter Pistol will make up for the strength 3 here. In the end at least a couple of Genestealers should drop to shooting. Once the Mandrakes assault they will loose one or two of their number to the Genestealers, but even then they will reply with a bucket load of attacks and kill many Genestealers. At that point the damage has been done. An enemy ‘ace in the hole’ unit has been ravaged or destroyed and it’s effect on the game will be very negligible, if it has any effect at all.
It goes without saying that Mandrakes are of almost no direct use against vehicles of any kind. However, there are one or two little things they can to lend a hand to other units in the Dark Eldar army where enemy vehicles are concerned.
If an enemy transport vehicle is about to be assaulted by a Talos, IC or Wychesquad with Haywire grenades etc., the Mandrakes can deploy on the far side of a transport vehicle and assault it. Although they have no chance of damaging the vehicle they can block the disembarkation point on the far side of the vehicle, which will spell disaster for the squad within if it’s destroyed by the other Dark Eldar attackers.
Another little trick to deal with embarked troops is to deploy them at the end of your movement phase on the far side of an enemy transport vehicle that is about to be the target of some nasty Dark Lance fire. Many players will leave their destroyed transport on the table as a wreck and position the surviving passengers behind the wreck, using it as cover. Positioning the Mandrakes there first will prevent them from bailing out behind their vehicle after it’s destroyed. So they will have to either, remove the destroyed tank from the table and ‘deploy’ in it’s place, or just bail out on the Dark Eldar side of the wreck. In either case, they are exposed to any remaining fire from the Dark Eldar army. If the transport is targeted and destroyed by some of the first shots in the Dark Eldar shooting phase, it’s possible to really hammer the exposed passengers later in the same phase and then possibly crossfire them with the Mandrakes if they break. Of course this can be a bit of a suicide tactic if things don’t go well, or even if they do, as the Mandrakes will be exposed. However, in certain situations is can be very well worth the sacrifice.
Don’t throw away a unit of Mandrakes, in a hopeless assault. Anything in power armor or with a T of 5 or more is normally too much for them to handle in close combat. They can still contribute to the game in these cases, but one on one combat isn’t the way to go.
For the most part, Mandrakes specialize in bully tactics. Pick on smaller units, pick on weaker units or get them to gang-up with other Dark Eldar units in an attack to outnumber your opponent. In short, if you think what your about to do with your Mandrakes isn’t really all that ‘fair’, then guess what? You’re probably using them correctly. Mandrakes don’t play fair.