Geckoinc99's DDR Pad
Sorry for the simplistic page here. I will have a more detailed page up later. Anyway, this is my DDR pad based mostly on Riptide's design (found at http://www.digitaltorque.com/mydancepad/). The changes I made involved the arrow system mostly, but there were a few minor things done.
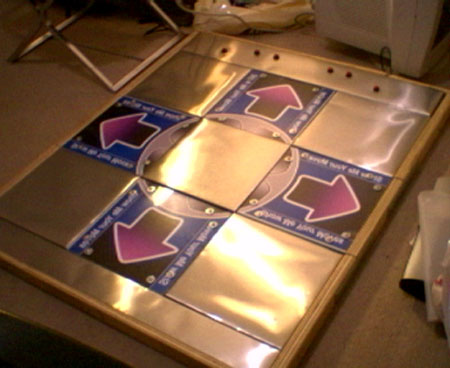
(Please forgive my terrible pictures. I really don't have a digital camera and had to use the web cam on my computer) Here's the overall pad. The arrows are mostly like the standard, but I added a couple of my own flares to the graphics just to make it different.
The first thing veterans will probably notice is that there are no corner brackets. I don't have an arcade machine in town (stupid town) and didn't feel like paying the high cost for them. I felt like they would get in the way too (now those wanting authentic arcade experience will want the corner brackets). When I built my pad, I had specific goals which guided my construction. The border is just 1" plywood (I made 3/4" plywood 1/4" thicker to get the 1" border) which I didn't spend a lot of time on because I started to run out of money and couldn't do something better. The pad as as quiet as the arcade, at least as far as I can tell. It's hard to tell the sound from a noisy arcade to a quiet living room (well, quiet except for the DDR playing over the speakers). It's not overly loud. My wife can sleep while I play on it. Anyway, that's just some background on the pad.
My design goals when I made the pad were:
| Better gameplay over a softpad |
| Easy access to components under the arrows |
| Ability to add lights |
| Protable |
| Handle a lot of weight |
Actually, the portable part isn't as neccessary as it use to be, but I had already made the pad. The drawbacks to this pad design are:
| Not as solid as a full pad (no sections) |
| Can't use corner brackets without some creative installation |
| More complicated to make |
Now, before you write this off, realize that the problems aren't that bad. I'll elaborate more on it later. As far as the pad's performance, I've nearly AA'd Rhythm and Police and AA at least half of the Heavy songs. Keep in mind it's my playing ability that holds my scores back, not the pad. I also didn't have to strict scoring of the arcade to force me to be better. Everyone that has played on my pad and had arcade experience loved my pad. So now that we have the basics down, lets look at the details of the pad.
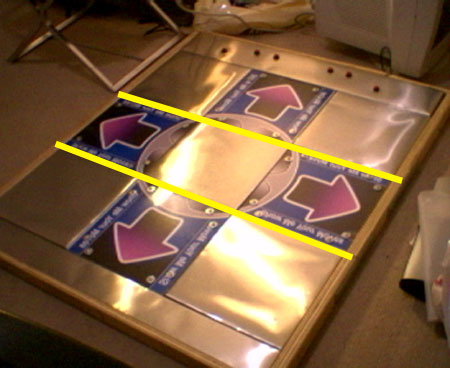
The lines on this picture show where my pieces come apart. Basically, I cut the base along the lines where the squares meet. I use hefty brackets on the sides to hold the pieces together. The larger the bracket you use the better for stability.
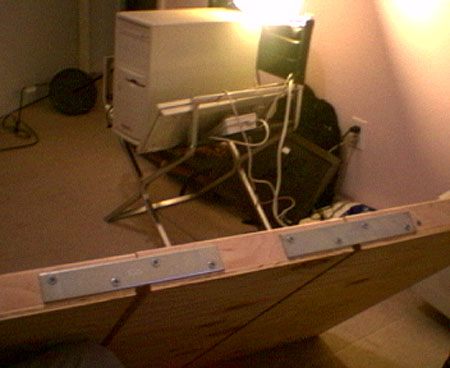
This is the view of the pad from the side. You can now see the brackets that hold it together. Like I said, these are hefty brackets. I can pick up the pad and it won't flex much.
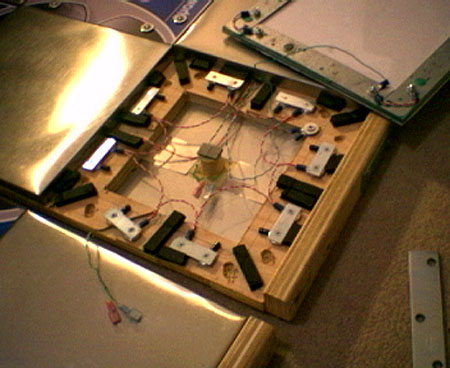
Here's a picture of the internals. You can see the Riptide contact system, but there are a few changes. One, all the mending brackets are attached to power. The sheet metal on the bottom of the arrow, which you see in the upper right, is all connected to common. By doing this, you only need to make contact with one point instead of hoping it will bridge two brackets. This made the accuracy increase tremendously. Now, I will say it will spoil you in comparison to the arcade (at least the ones I've played at). Again, since I don't have an arcade, I cared more about accuracy than arcade authenticity (I have played on three separate arcade machines and they all acted the same way). You can see the separation of the sections in the picture (sorry, I didn't have enough room to completely separate it out, but you get the idea).
Now something some of you may have noticed is that there's nothing holding my arrows down (other than gravity). It's a floating design. It just sits on the weather stripping, and if you need to get under it you just lift the plexi off. I designed it so that the plexiglass sits recessed slightly from the other squares and the border. This helps to hold in the pad in and keeps it from flipping out during playback. It's just as stable as any other design as far as playing is concerned. Where this design doesn't help is if you have to pick up the pad and turn it sideways. However, some tape or a couple of straps will hold them in place fairly well. You will also notice the platform in the middle (round piece of wood with some gray weatherstripping on top). This little platform keeps the plexiglass from bending, and therefore increases the weight that the pad can hold. To date, I have had 400lbs on the pad, and it help up with no problem. Also, my plexiglass is standard plexiglass (not Lexan). The mending brackets and that center post give enough support that it can hold quite a bit of weight. If you need to hold a lot of weight, this is something to look into.

This is a closer look at the arrow. My arrows are made with a 0.093" top piece, the graphic, then a 0.22" piece on the bottom. Screws with nuts and locking washers hold the pieces solidly together. They also hold the sheetmetal together. An advantage of doing this is that every piece is easily replaced by just unscrewing it. It also makes the pad quieter as long as you put something between the sheet metal and the plexiglass. I used this green floor underlayment for mine. I wouldn't recommend it because it's expensive for the roll (I had it lying around from another project) and it makes the arrow pad heavier which is wearing out my weatherstripping. I'm looking for something light to place in between to keep the sound quiet. The sheetmetal strips themselves are actually framing reinforcement pieces. I liked them because they were about the right thickness and width. They come is 12" lengths, but it's a simple cut to bring it down to the right size. I then used wires between the bolts holding them so that they were all electrically the same thing. I really like this design over others because it makes a very solid foundation for the pad with the surface area of the mending brackets and it has the increased sensitivity over other designs. The nice thing is that it can be added to any pad already made with Riptide's design.

This picture points out the plugs that I can undo in order to pull the pad sections apart. You can use whatever you want for plugs, but these power connectors are very easy, slim, and cheap.
Anyway, that is a quick overview of my pad. If you don't need portability (at least you don't need it to break down smaller than the normal size) then I suggest keeping it one solid piece for simplicity and stability. If you need a pad to be portable, for a small car for example, this design will work very well and still be almost as good as a normal metal pad. To keep the arrows in place when you pick it up, you can use Stoli's design by using screws to hold the pieces down. I would probably glue the sheetmetal to the plexiglass instead of my nut and bolt system. It's really up to you. If you have questions, please post them to the DDR Freak forum on http://www.ddrfreak.com