
|
 |
Auxiliary Battery using an Isolator
(This describes the battery isolator
system
that I installed in our '90 westy.)
Link to Sure Power
The manufacturer of the1202 r battery isolator.
Link to Smith Auto Electric,
an interesting read explaining the benefits
of an auxiliary battery isolator over a solenoid or relay.
Click on photos and diagram to enlarge.
 |
Battery isolator with remote sensing terminal |
Relay versus Isolator?
Some call the dual battery relay a “battery-isolator-relay”.
Don’t let that confuse you.
The relay is not
a "battery isolator".
A dual-battery-relay (see "relay" page) is a simple switch,
disconnecting the two batteries, when the engine is turned off.
But the moment the relay reconnects the batteries, the
drained battery robs power from the starting battery.
This sudden transfer of current from one battery to another
can damage batteries, and shorten their life.
That is one of the reasons bigger mobile homes, trucks etc.
mostly
use “battery-isolators” for multi-battery installations.
You can also use this isolator technology in a vanagon
to keep two batteries charged.
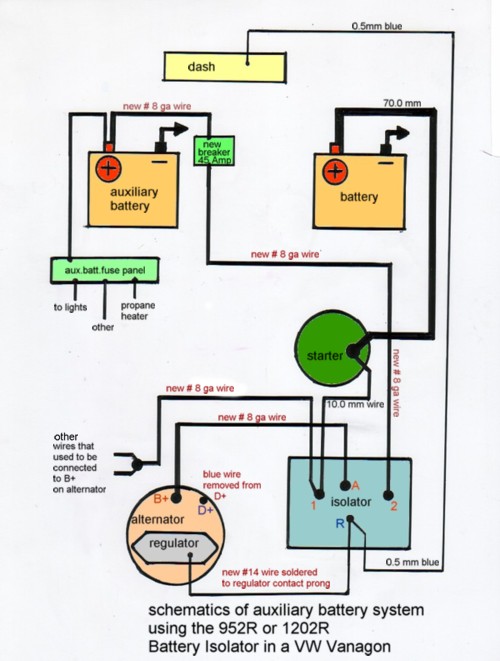 |
Wiring diagram for aux. battery installation with battery isolator in VW vanagon. |
What does the isolator look like?
The multi-battery isolator contains several diodes,
mounted in a heat-sink.
(diodes are like one-way-valves for electric current.)
The dimensions are approximately 4" x 4".
It has 4 terminals.
No. 1 terminal is connected to the main battery.
No. 2 terminal goes to the second battery.
The A terminal goes to the alternator output.
The R the remote sensing terminal goes to the regulator.
Auto electric, battery, or rv shops can order the correct
isolator
from the company.
Sure Power Industries, Inc.
Tualatin, Oregon 97062
phone (503) 692-5360
fax (503) 692-9091
The model for vanagons must be for the Bosch alternator.
If you have the big 90 amp alternator on the later vanagons,
only use model number 1202R, maximum 120 amp.
On the air-cooled vanagon smaller alternators, you can use
model number 952R, maximum 95 amp.
.------------------------------------------------
Some real life experience with the battery isolator:
First the installation is somewhat more tricky, but not that
difficult. Slight alteration to the regulator is required,
to compensate for the 0.7 v. voltage drop across the diodes.
Batteries charge well, and both batteries are always in top
condition. Batteries last a long time with this setup.
It is safe to use 2 dissimilar batteries with the isolator.
Example: one old marginal batt. for the aux, and a strong new
batt. for main battery. Or small deep cycle, and regular main batt.
The isolator has no moving parts and is very reliable.
About the installation in my '90 vw westy camper:
(1) The isolator is mounted in the engine compartment by the
right tail light.
 |
1202 R Battery isolator mounted behind right tail light in my '90 VW camper. |
(2) One long 8 awg wire is routed under the van to the auxiliary
battery by the driver's seat (see photos on battery page) and
connected to terminal 2 on the isolator.
The 8 awg wire is protected from chaffing with a clear vinyl hose.
A 45 amp automatic-reset thermo breaker protects the 8 awg
charging wire. (installed next to battery)
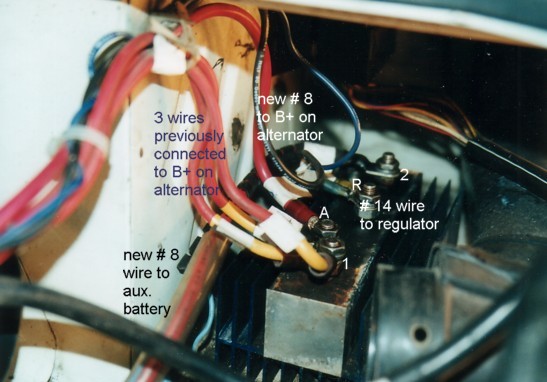
(3) All the original big red wires at the alternator on
terminal B+ are removed, rerouted, and connected to
terminal 1 on the isolator.
(4) A new 8 awg wire is connected to terminal B+ on the
alternator
and fastened to terminal A on the isolator.
 |
View of alternator with the new # 8 wire to A terminal on isolator |
 |
Back of alternator.
|
(5) The regulator is removed, and a 14 awg wire soldered to the
connecting prong. Then the regulator is reinstalled, and the other
end of the 14 awg wire is connected to the R terminal on the isolator.
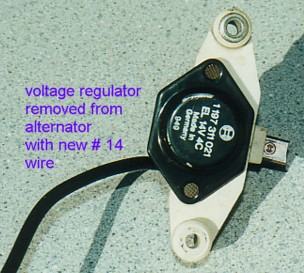 |
Front of voltage- regulator |
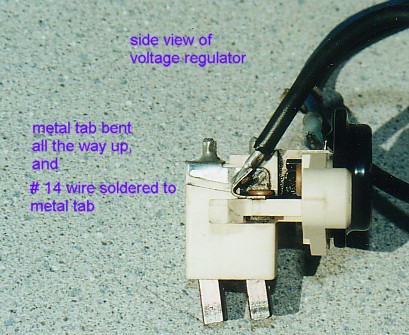 |
Side view of regulator, with new # 14 wire soldered on the metal tab. Wire goes to R. terminal. |
If you need some more details on how to do this:
Alternator does not need to be removed. Just unscrew the
regulator (that black thing with the little round disc) and
take it out. ( be careful with the brushes)
Bend over the metal tab that contacts
inside the alternator. ( bend it all the way up)
and solder a #14 wire to the metal tab. (see photo above)
Push the contact prong inside the alternator in a bit more,
to assure there is no contact with the prong on the regulator
Reinstall regulator.
The new #14 wire that you just soldered on the regulator
goes to the R terminal on the isolator.
Make sure to remove all the red wires, also the
air conditioning
wires, from the alternator B+. Then extend the wires and
connect them to the nr. 1 terminal on the isolator.
You should have only one 8 awg wire (large size) go from the
alternator B+
to the isolator A terminal.
That’s it. Not that difficult at all.
For more details on how-to-install the auxiliary battery,
you can take a look at the dual battery relay page.
Disclaimer: Consult a automotive electrician to double check
everything. For the installation and wire size, follow Sure Power
installation instructions.