Gold Lattice Frame
Tutorial .. Page 2.


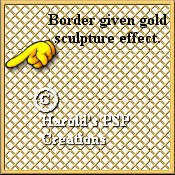
29. Go to "Image/effects/sculpture" and apply the same settings as before.

30. Go to your "Layers Pallet" and you will notice that you have 4 layers. They are "Layer1" [which is your transparent base layer], "color layer" [which is your white color layer], "Lattice layer," and "Border layer."


31. Add a new layer and name it "Ellipse."

32. Click on your "Preset Shapes Tool," Preshapes Tool open your "Tool Options Pallet" Tool Options Pallet and choose the following settings. "Presets shape type=Ellipse; Style=stroked; Line width=10; Antialias=checked; create as vector=unchecked." Click Ok.

33. Start at co-ordinates W=175 x H=175 and draw an ellipse to about 20 pixels from the Gold border top and bottom and about 30 pixels from the sides.

34. Click on the "Magic Wand Tool," Magic Wand Tool and click anywhere on the "10 pixel ellipse." The "Marching Ants" will appear.

35. Go to "Image/effects/sculpture" and apply the same settings as before. Deselect. The "Marching Ants" will disappear.

Now to save your work again. Go to "File/save" and your work will be updated in the same name of "Gold_frame1.psp."

36. If your "Layers Option Pallet" is not already open, click on the "Layers Option Pallet." Layers Options Pallet You will have 5 layers in the Tool Options box." The "Layer 1", the "Color layer", the "Lattice layer," the "Border layer" and the "Ellipse layer."

37. Make sure that you are still on the "Ellipse layer." Click on the "Magic Wand Tool," Magic Wand Tool and click anywhere in the center of the "Ellipse." The "Marching Ants" will appear inside.

38. Go to "Selections/modify/expand" and when the "Options box" pops up type in expand by 1. Click Ok. The "Marching Ants" will expand by 1 pixel inside the "Gold Ellipse." Do not Deselect.

39. Now activate the "Lattice layer" by left clicking on the "Lattice Heading." Press the "Delete key." The center Gold lattice will disappear leaving the white "Color" showing through.

Now to save your work again. Go to "File/save" and your work will be updated in the same name of "Gold_frame1.psp."

40. Back to the "Layers Option Pallet." Layers Options Pallet You still have 5 layers in the Tool Options box." The "Layer 1", the "Color layer", the "Lattice layer," the "Border layer" and the "Ellipse layer."

41. Now to remove the "Color layer" as we no longer need it for the "Gold Frame Master." Activate the "Color layer" by clicking on the heading. Then left click on the "little Rubbish bin" on the top left hand corner of the "Layers Option Pallet." When the "Options box" pops up and asks if you want to remove the layer, click Ok.


42. We have 4 layers left. Turn "Off" layer 1 by clicking on the small glasses on the "Layers Option Pallet." [see illustration at the top of this tutorial to locate the small glasses.] A small "red cross" will appear.

43. Go to "Layers/merge/merge visible" and the layers will be reduced to two. "Layer 1" and "merged layer." Turn "layer 1" on again by clicking on the "small glasses" and the "red cross" will disappear.

44. Right click on the "Merged layer" heading and when the "Options box" pops up, left click on "Properties" and rename the layer, "Lattice." Click Ok.

Now to save your work again. Go to "File/save" and your work will be updated in the same name of "Gold_frame1.psp."

45. It would be helpful to "Duplicate" your finished master to save in your PSP Frames folder. Press your "Shift+D" keys together and a copy of "Gold Frame Master Image" will appear. Go to "File/save as" and save this duplicate image as "Gold_Frame2.psp." Make sure that you save it in the ".psp extension."

46. Now to apply your finished "Gold Lattice Frame." Open a photo or Graphic of a scene.

47. Resize it to W=350 x H=350, or click on the "Crop Tool," Crop Tool. and crop the image if it is larger than W=350 x H=350.

48. Go to "Selections/select all"and the "Marching Ants" will surround your graphic. Go to "Edit copy." Deselect.


49. Activate your "Gold Frame1.psp" image. Open your "Layers Option Pallet." Layers Options Pallet if it is not already open. You have 2 layers. "Layer 1" and "Lattice layer."

50. Make sure that you are on "Layer 1." Go to "Edit/paste/paste as new layer" and your graphic or photo will appear behind the "Gold Lattice Frame."

51. Go to "Layers/merge/merge all flatten." Now go to "File/save as" and save your graphic as "Gold_Lattice_Frame.jpg" in the ".jpg extension.


52. Here are 2 more examples of what you can do with this "Gold Lattice Frame." Try different photos or graphics and have fun.

Congratulations! You have finished.
I do hope you enjoyed doing this Tutorial.

To Page 1: To Tutorial Index:


This tutorial is written by Harold E. Jones.

Other than for personal use, No part of this tutorial maybe copied or reproduced
on any other Web site without permission from me, the author.
Harold E. Jones - Copyright � 2001-2002.

For further information, please E-mail me.

Hosted by www.Geocities.ws

1