
I fabricated the steering assembly as shown in the sketch from stainless steel. After completion I told myself that if I ever made a "How to page" I would recommend putting the pipe on top of the steering piece. It's hard to get at for assembly on the under side. Also Stainless steel is a pain to work with, It's hard to drill and cut.
I made the rudder post from nylon rod turned down on a lathe to match the ID of the rudder sleeve. There are no "O" rings or seals in my steering assembly. Instead I brought the rudder sleeve above the water line to keep the water out. I figure what little water gets in will be no big deal with a waterproof bulkhead in place. So far the area has been bone dry.

I built the hull with an extended keel by modifying the last 6 forms. I glued a piece of mahogany down the center for impact resistance and stripped the hull just as I would have normally.
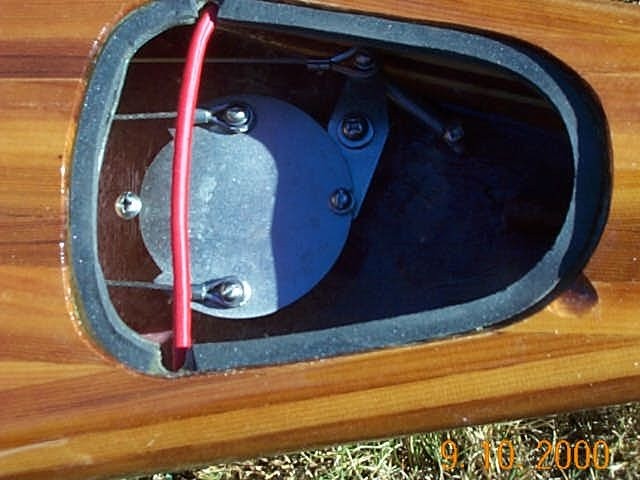
Once the hull was stripped and glassed inside and out I installed a plywood bulkhead far enough forward to allow room for the steering assembly. I drilled through the hull and installed the stainless rudder sleeve with thickened epoxy. Once the sleeve was in place I made one big epoxy pour. The pour gave me a flat area to mount the steering lock assembly. The pour added a lot of weight and I would recommend boxing the area in with plywood to reduce weight. The rudder is carved from a solid piece of mahogany and is pinned to the rudder post with a wood dowel.


With the steering assembly complete I swedged the cables and installed the cable covers with small padeyes. I left the forward part of the cable long and did not install the foot pegs or lock control until I completed glassing the deck and hull together. I removed the whole assembly before glassing.
I made the access hatch the same way as all the other hatches. Cutting the hatch and making the lip was done just as Nick describes in his book "The Strip Built Sea Kayak". I intended to make the hatch with an internal bungie like the other hatches but found space was lacking. I ended up putting two padeyes on the underside of the deck and cut holes through the hatch lip and cover to pass the bungie up through and over the hatch cover. The end result worked great, it also provides a tie down for a storm paddle.


The steering lock control knob was a trial and error deal. I had tried several other ideas with little success. The end result was quite simple. I took a blank deck fitting and drilled a hole through the middle for a screw. I added some wood to the back side with a groove around the outside for the cable to ride in.
The housing for the assembly is made from a block of wood carved to match the deck contour and was installed after the hull and deck were glassed together. The housing has an egg shaped hole that the knob goes in. When the knob is turned, the set screw for the cable eventually rubs the housing and holds the steering lock open. I made the cross piece for the knob in two pieces, one inside the hull and one outside. The pieces were glued together and the lock knob assembled after the pieces dried.

The steering control cables are connected to a standard set of sliding type foot pegs purchased from John R. Sweet Company. I installed the pegs on blocks with "T" nuts to avoid drilling holes in the hull.


The whole modification was a lot of work for something I was unsure would work. The end result was far better than I could have imagined, The tracking of this boat at 14'-6" is unbelievable! And the steering has proved to be very functional.
