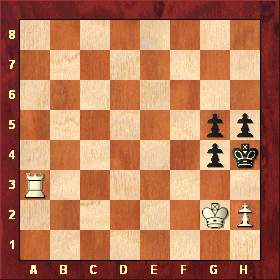
Normal winning can be achieved by anyone, but to win in style, here comes the moves: 1.Rh3+! gxh3+ 2.Kf3 g4+ 3.Kf4 g3 4.hxg3#.
2. In the following position, white wins against a batallion of pawns with equal chances of queening for black and white. How?
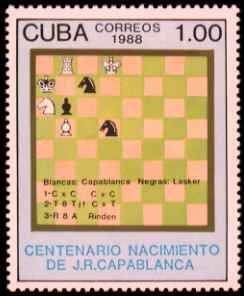
3. Following is the stamp released by Cuba in acknowledgement of the contributions of the Great Chess wizard Rose Jaul Capablanca featuring a position occured in his game against the immortal Lasker.
4. In the following end=game study white wins against the best opposition. How?
The solution: 1 Bd5 Ba8 2 Rg6 Bb7 3 Rxd6+ Kc7 4 Bxb7 Kxd6 5 Ba6 and wins.
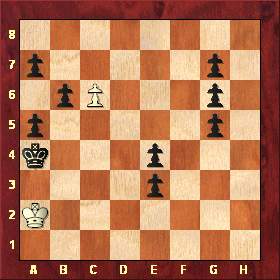
5. A BEAUTIFUL DRAW.
Please refer to the chess position below.

White to play and draw. Here the difficulty for white is that he cannot penetrate into black's fortess whereas black can get through via 2 ways into white's territory. Inspite of this, White moves marvelously to gain draw. How?
Answer:
1 Kb2! Kg8 2 Ka1!!.
Begin by observing that the White king is permanently restrained by the rigid pawn structure, but the Black king has two potential routes for penetration, via g4-f3 or c6. Thus, whenever Black plays Kg4 White must respond Ke2 or Kf2, and actually Ke2 is forced since the White king must be able to reach a5 in the four moves it takes the Black king to reach c6 from g4 (there's no time for White to reach b5 first, and conversely if White ever responds Kb5 to Black's Kd7 he'll never get back to the kingside in time to stop Kf3). Next note that there's only one way for the Black king to get from g4 to c6 in four moves, and likewise for the White king from e2 to a5; so we have five pairs of corresponding squares: we've already seen that Black's g4 corresponds to White's e2, and c6 to a5, and now we also have f5, e6, d7 corresponding to d2, c3, b4 respectively (for instance on Black's Kf5 White must respond Kd2 so as to be within one move of f2 and within three of a5). What, then, if Black plays Kf6? This threatens both Kf5 and Ke6, to which White must respond Kd2 and Kc3 respectively; so on Kf6 White must play Kc2. Again, Kg5 threatens Kg4, Kf5 and Kf6 and so forces Kd1 to control the corresponding e2, d2, c2. Proceeding in this manner we find the corresponding pairs e7:b3, g6:c1, f7:b2, e8:a3, d8:a4, h5:d2, h6:c2, g7:b1, f8:a2, and finally h7:b2 and g8:a1 which explains White's mysterious retreat to the corner. Adding to this the pair h8:a2 we further find that all these corresponding squares give mutual zugzwangs: White to move must abandon the corresponding square and lose, but with Black to move the White king can always stay on the corresponding square and rebuff Black's incursions via g4 or c6 indefinitely, assuring the draw.
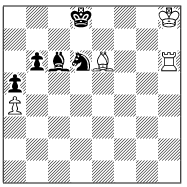
6. ANOTHER DRAW.
Please refer to the given chess position here.

White has to draw against the battery of black pawns assisted by their bishop. How to accomplish the task?
Answer:
White hopes to trade his rook for Black's connected central pawns and reach a theoretical draw against the h-pawn and "wrong" bishop. First, 1 Re5? e3 2 Kg4 e2 3 Kxf4 e1/Q? 4 Rxe1+ Kxe1 5 Kf3! Kf1 6 Kg3 h5 (else 7 Kg2 or 7 Kh2 and draws) 7 Kh4 would draw as planned, except for 3 ... Bh2+! winning. Note that the position after 6 Kg3 is a mutual zugzwang: were it White's turn he would lose quickly after 7 Kf3 Bf2(h2) or 7 Kh3 Kf2 8 Kg4 Kg2 and 9 ... Be3. This explains Black's play against the second thematic try:1 Rc4! e3 And now 2 Rxf4!? e2 3 Re4 e1/Q+! 4 Rxe1+ Kxe1, and this too is a mutual zugzwang, White losing as before with 5 Kg3 Kf1, 5 Kh3 Kf2, or 5 Kg4 Ke2! 6 Kg3 Kf1. But had Black played here 2 ... Kd2 3 Rxe2+ Kxe2 then White would instead prevail by zugzwang with 4 Kg4! and now 4 ... Kf1(Ke3) 5 Kg3! and 4 ... Ke1 5 Kf3! draw as in the first thematic try, while 4 ... Kf2 blocks the Bg1 and thus abandons the remaining pawn to 5 Kh5. Hence the solution: after 1 Rc4 e3 White interpolates 2 Rd4+! Kc2 Or 2 ... Kc1; blocking the e-pawn with 2 ... Ke1(e2)? only helps White. Only now does White play 3 Rxf4 e2 4 Re4 Kd2 Note the threat 5 ... Be3! winning outright-- if 5 Re8 Be3 6 Rd8+ the Black king runs to h5 or h7 and then the e-pawn promotes. 5 Rxe2+ Kxe2 6 Kg4! And White draws by the progressive zugzwang analysis above. Remarkable depth with only four men in play!
7. Retrograde analysis
Please refer the following chess position

Prove that at least one of the players has castled.
Proof:
Each side has a promoted Rook. Since the Pawns did not pass each other on the c-file, at least one Pawn made three captures: off the c-file, back on to the c-file, promote on the d-file. Now each side's Queen's Rook and King's Bishop were captured on the back rank and not on the d-file. Therefore the three pieces captured must have been the Queen, a Knight, and the King's Rook. If A captured B's Rook on the d-file, then B must have castled, for his King and Rook have no other way to switch places. Q.E.D.
8. Bishop and pawn ending: White to move and win. How?

O. Gubin
Svobodne Slovo
1949
Win
Answer: 1 h6 gxh6 2 f6 Be6/i 3 f7/ii Bxf7 4. Bb3+ and wins.
i) 2...Ke6 3 Bf5+ Kxf6
4 Bxc8
ii)
3 Bb3+ Ke5 4 f7 Bxb3+
9. In this following position, Black to move and wins the game marvellously. How?

Solution: Black has a fairly simple strategy - give up the rook for the a-pawn and rush his king forward to win white's kingside pawns. The problem though is that the white king reaches the h1 square or is able to box the Black King on the h-file. For example: 1...Rc7+? 2.Kb8 Rxa7 3.Kxa7 Ke6 4.Kb6 Kf5 5.Kc5 Kg4 6.Kd4 Kxg3 7.Ke3 Kxh4 8.Kf2 or 1...Rh8? 2.Pa8Q Rxa8 3.Kxa8 Ke6 4.Kb7 Kf5 5.Kc6 Kg4 6.Kd5 Kxg3 7.Ke4 Kxh4 8.Kf3.
Thus black must be a bit more creative and find the stunning... 1...Ra8!! This move reveals a different, tactical strategy based on zugzwang. 2.Kxa8 Kc7 (2...Kc8 would be a major mistake since White's h-pawn would Queen with check!) 3.g4 (White is forced to make this losing move) 3...hxg4 4.h5 g3 5.h6 g2 6.h7 g1Q 7.h8Q (without check!) 7...Qg2 mate.
10. Test your skill with Knight's tour
11. Challenging Chess problems
![]()
 Viswanathan Anand(India)
 Vaselin Topalov(Bulgaria)
 Rustam Kasimdzhanov