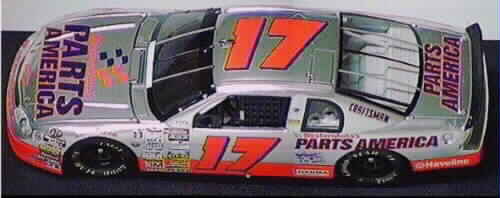
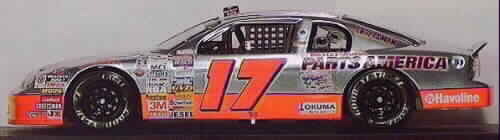
This is a sample of the dozens of models at Randy Ayers Home Page. I'll include a quote from his page describing his build of this model, but I recommend if you wanna see lots of NASCAR models this is the site to visit!
"This is the car Darrell Waltrip drove in the Daytona 500 in 1997! It is one of 6
different paint schemes he used throughout the year to commemorate his 25 years
in Winston Cup racing!
This kit is a late 1997 Monogram Monte Carlo (Terry Labonte) with decals from a
buck fever kit (slixx) the buck fever kit had 1995 parts in it!!! This kit has
the new chassis and body ... slab sides, jack posts, side skirts are molded in
which means no modifications YEA!!! and the front airdam is reasonably low so I
didn't add to it either!
Painting, well this one was a dooozy!!! I tried 3 ...yes that's 3 times ...to
paint the chrome on the body!!! I tried testors chrome (airbrush) and it was
dull! Got out the brake fluid and took off that coat.
Brake fluid you might ask??? Well I learned from someone at a place that sells
NASCAR models here that if you screw up and have to remove paint from a body all
you ahve to do is soak it in brake fluid (a couple hours for fresh paint a while
longer ... like over night ... for drier paint) and it will loosen the paint and
not harm the plastic in any way! So now you know what it's all about!
I then tried plasticoat chrome (spray) it looked better but when I tested the
clear coat (on a separate piece of plastic ... which by the way I didn't do
until after I painted the body again, duhhh!!! Oh well nobody's perfect!!!) It
dulled the finish which looked worse than the testors ... so it was back to the
brake fluid!. Well though they looked fair neither of the two previous paints
really gave me the desired effect so I tried one last time with Rust-olium
premium metalized brite chrome enamel. It was more expensive than the other two
put together but it was very, very slick when applied not quite a mirror finish
(but then neither was the actual car (race). Well I decided I would not gloss
coat the body and leave the decals uncoated as well (didn't want to dull it).
Before I painted the chrome (rust-olium) paint I decided to put the florescent
red on first ... this was easy ... I masked off the lower body and painted it
with testors florescent red (model master) using an airbrush. I then waited
about an hour (leaving the mask on) and gloss coated the red I let the red dry
for approx. 3 days ... wanted to make sure the paint (red and clear coat) didn't
pull off! ... and masked off the upper body and sprayed it with the chrome. I
then applied the decals in about 2-3 days once again being sure to remove the
adhesive residue (even if you don't gloss coat it can still mar the paint
underneath and leave a mark! The chassis is painted with light gray (2 parts
testors white to 1 part grey applied with an airbrush) as is the body interior.
The rear spoiler isn't painted black ... I used black decal material from
microscale cut to size front and rear ... I was afraid to mask on the chrome!!!
This one will not be out of the case or handled because any chrome or silver
paint I have used (whatever the brand) seems to rub off easily and will even
smudge if handled too much and since it has no gloss over it...I think you get
the idea here. The windows (after painting) can be put on the body before or
after installing it on the chassis because with this body you don't have to
spread it over the chassis to get it on, it simply drops into place! Sometimes
these monte bodies (1997) are rather loose so if you want you can glue small
pieces of plastic along the bottom inside to catch the chassis and hold the body
more solid!
It was a pain but well worth it! I dare say there won't be another built by me!
Actually I couldn't if I wanted to because the only source for the decals is the
buck fever kits!!! Slixx didn't release a run to the general public!"
Nice Work, Randy - when do you get the time for all these?? - Mr N.