Notes For Converting Rear Wheel To One Speed
INTRO:
In converting multi-speed rear hubs to one-speed service, there are a couple of complications. Due to the geometry, the rear axle flexes quite a bit. This can lead to the chain binding or coming off the sprocket entirely. In extreme cases, the rear axle can bend permanently. The best fix is to use a dedicated one-speed freewheel such as one for BMX bikes. If a multi-speed freewheel will be used (by removing the unnecessary cogs), the following notes should be followed.
1. Select a gear ratio with the small cog no less than 16 teeth . Preferably, choose larger diameter rear cogs (such as 17,18,19, and 20) and front chain rings accordingly. This will help to minimize chain tension (while retaining the desired gear ratio) which will minimize the force trying to bend the rear axle.
2. The front chain ring must be spaced as close to the frame as possible. Change bottom bracket as necessary to achieve this.
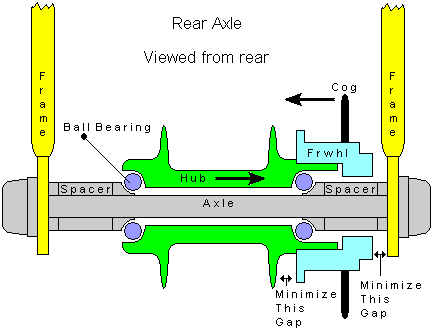
3. To minimize axle flex, minimize the distance from right axle bearings to the right frame stay. This means the hub should be spaced as far right as possible (as viewed from the rear). This is done by removing or adding spacers of different lengths to each side of the axle as needed. The freewheel should be fully seated on the hub with no spacers. The freewheel should just clear the frame.
4. To minimize the bending leverage on the axle, the rear cog should be spaced as far left on the freewheel as possible, but the cog must also be in perfect alignment with the front chain ring. They need to be in the same plane. The front chain ring location becomes the limiting factor. This is why the front chain ring should be spaced as close to the frame as possible. On certain freewheels (such as BMX type), cog location is not movable. In these cases, it will be necessary to space the hub accordingly to get perfect chain alignment. If the hub/freewheel needs to move to the right, it may be necessary to get a longer axle (and widen the rear frame stays). If the hub/freewheel needs to move to the left, a shorter axle may be required (squeeze the frame stays together).
5. By widening the rear frame stays (and thus requiring the use of a longer axle), step 3 can be achieved to a higher degree. The limiting factor is the wheel dishing limits (when centering the wheel). Also, if the axle is longer, it will flex more due to vertical weight loads. It is best to avoid changing the frame dimensions if possible.
6. Re-dish the wheel to center the rim in the frame.
7. The last step is to fine tune the setup. This means making compromises in the geometry to accomodate frame and axle deformation to achieve overall functionality. At rest, the frame may be out of alignment to make up for flex during use.
Sometimes, when pedaling hard, axle flex is unavoidable. This will feel like a slight rubbing sensation during a down stroke. A stop gap measure would be to slightly misalign the rear cog so that under high load, it will flex into alignment. this can be done two ways. The rear wheel can be mounted so the rear cog points slightly to the right of the front chain ring or the rear cog can be spaced to the right of the front chain ring's plane (it will be in a parallel plane). The former requires horizontal axle slots and will cause slight dog tracking and the latter violates step 3. However, if done sparingly, the side affects might not be noticed.