Tour
of PaintShop Pro
The
first time you open PaintShop Pro (aka PSP)
you could be quite daunted by the prospect
of using such a huge programme and you may
think that you will never know how to do
all the things that everyone else is
doing.
I
can't promise the moon on a stick, but
hopefully by the end of this tutorial you
will know what a few of the basic buttons
and functions in PSP do and it won't look
like *such* a daunting task to make that
first graphic :o)

You
will need:
A
copy of PaintShop Pro - you can download
a 30 day trial version from here
Grab
yourself a drink, make yourself
comfortable, and then open up PaintShop
Pro.
You
may have a splash screen come up while
it's loading - it will disappear
automatically so just wait for it to do
what it needs to and then disappear.
You'll
now have the basic workspace in front of
you. Some things will look familiar
from other Windows programmes but most of
them will be new to you. Don't be
put off by all the buttons and menu's...
they help you to do all kinds of wonderful
things! :o)
Right
at the top of the screen you have a
toolbar that is common to all Windows
programmes. This is where everything
lives in PSP.
Go
to the first menu on the title bar.
The name will be familiar to you, but some
of the features will be totally new.
Click on "File" to bring up the
dropdown list.

Now
we're going to go through each of the
options in the list to see what they do.
If
you click on "New" it brings up
the New Image dialogue box. I'll say
more about the New Image dialogue box
later, and there'll be a tutorial on what
it all means later on. The
"New" option does exactly like
it says on the can - it opens up a new,
blank image for you to work on.
The
"Open" option will be familiar
to you - if you click on it, it brings up
a dialogue box that lets you navigate to
where an image is saved and it lets you
open it for viewing or editing in PSP
The
"Browse" option will be a new
option but I find it an incredibly useful
option and it's the very first thing I
open every time I fire up PSP. There
will be a whole tutorial on using it later
- it's definitely one of my favourite
things about PSP. By clicking on
"Browse" it will open up a new
window within PSP that shows you all the
images that PSP can see and a little
thumbnail picture of what the graphic
looks like.
One
of the things that PSP can do is to save
your "workspace". The
screen you are looking at now and all the
screens you look at when you are working
with a graphic are what PSP calls your
"workspace" and it's got a handy
little feature where it can save the whole
screen you are working on so that you can
bring it up exactly the same at a later
time/date.
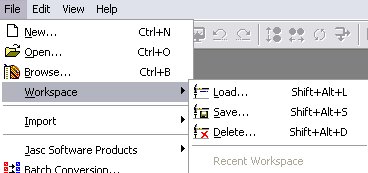
This
is a handy little option to have, but
personally, I wouldn't save a workspace
that has a graphic you are working on as
that graphic could change at a later date,
but the workspace will still have the old
version of the graphic... it's probably
best to use this feature of PSP after you
have done a lot of customisation within
the programme that you want to save for
another time.
The
"Import" option in PSP is for
when you want to scan a picture from a
paper image into PSP, when you want to
take a screenshot (like the ones you are
seeing throughout the tutorial) or when
you want to download a picture from a
digital camera into the computer.
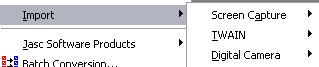
Use
the "Screen Capture" option for
taking screenshots (you need to set it up
the way you like it first). Use the
"TWAIN" option to access your
scanner so that you can access the options
that let you scan your image into PSP and
use "Digital Camera" to set up
the options to download the images from
your digital camera
The
"Jasc Software Products" option
is a shortcut to other Jasc programmes you
have installed on your computer. If
you download the trial version you may not
have anything linked in here, but if you
have the full version, and you've chosen
to install everything, "Animation
Shop" will be linked to in
here. Animation Shop is the
programme that is used to animate
graphics.
The
"Batch Conversion" option is
used when you want to change the format of
lots of different files, for example, if
someone sent you some PhotoShop graphics
and you wanted to make them into .jpg's,
this is the option you would use to do it
The
"Preferences" option is where
you do some of the customising in PSP.
There's lots of stuff you can do in here,
so I'll go into that in another tutorial.
The
"Exit" option does exactly what
it says on the can - it closes down PSP