
Navigation Bar Tutorial #1, Page 3:
NetStudio makes it real easy to add and modify text on an object, using the A icon you see below. You can change the font and point size of the text using the scroll bars, just like the word processing program you're probably used to. In the menu/tool bar below, the font is set to Times New Roman, 24 pt.

In your NetStudio workspace, you can click on the A icon or simply click anywhere outside of the image you've already created. NetStudio opens a text box which will allow you to start typing. Type HOME or whatever you want to use for the text on your first navigation button. Then select the font and size you want. Another neat trick is, you can resize your text the same way you can with an image by dragging the sides, top, bottom, or corners of the selection box that surrounds the text, so if you want to, you can make something that looks like this:
![]()
Or, something like this:

Of course, the image quality begins to suffer if you take it too far, but you get the idea. You can also modify your text by selecting it, then choosing FORMAT > FONT from the menu, which will open up a box that looks like the one below. Click on it to see the full-sized version, then use your BACK button to return here.
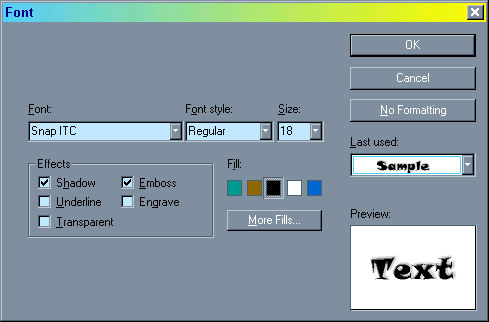
After creating the text for your first navigation tab, drag the text over the tab to position it where you want it. Again, you can use the arrow keys for more precise alignment, one pixel at a time. You can also emboss or engrave the text or even apply a shadow to it, like we did with the main image. In the image below, I've applied the engrave effect to the text on the left, and the emboss effect to the text on the right. I've also added a shadow to the text on the right, using black as the shadow color and no blur.

The EMBOSS ![]() and ENGRAVE
and ENGRAVE
![]() icons are right next to each
other in the middle of the bottom row of the icons on your NetStudio toolbar.
You can also choose them by selecting FORMAT > EMBOSS or ENGRAVE from
the menu. The latter option gives you a little more control as opposed to an
all-or-nothing option.
icons are right next to each
other in the middle of the bottom row of the icons on your NetStudio toolbar.
You can also choose them by selecting FORMAT > EMBOSS or ENGRAVE from
the menu. The latter option gives you a little more control as opposed to an
all-or-nothing option.
Now go ahead and apply the text you want to the rest of your navigation tabs. You'll notice that NetStudio remembers the formatting of the last text that you used, so any new text you create will have the same color, size, font, etc. It even remembers if you applied a shadow or embossed or engraved it. Now you've got something that looks like the example at the beginning of this tutorial, but you may want to modify it further. For example, you may want to have the navigation tab on the current page engraved, to remind your viewers what page they are on. For instance, the image below might be the one for the Products page of a web site. I've engraved the Products tab and embossed the others, to make it look a little more 3D.

The image above looks a little dull, however, so I've added some text for the name of a fictitious web site, to make it a little more interesting, and came up with the image below. Another thing you can do with your text is to apply a fade as opposed to filling it with just one plain color. This option can be found under the MORE... button after you click the FILL COLOR icon. Click on the FADE tab, then select the direction of the fade and the start and end colors. In the image below, I've chosen to fade from white at the top to a light blue at the bottom in the main text.

That concludes this tutorial. On to the next one...


![]()
![]()
Home Navigation Bars Buttons Backgrounds Cool Tricks Next Page