PAPER PIECING
Recently I have started using Paper piecings. I think the only reason that I haven't used them before now is that they are so large and can overtake a page. So I now scan them into my computer and shrink them down to a smaller size.
When using a paper piecing pattern, be sure to make a copy so that you do not cut up your original.
You can finish off your paper piecings or die cuts with chalk to give it an original finished look.
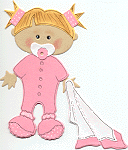
Here is a great example of a die cut that has been embelished with chalk and pen.
The baby was done by Nikki
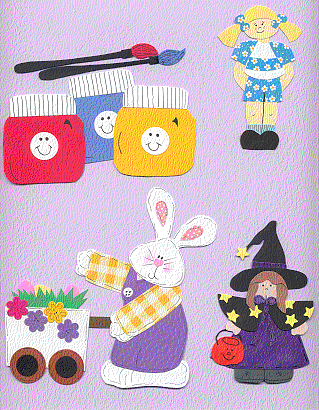
Here are some examples of paper piecings that I got during a swap. You can use any size or paper to alter the appearance. Notice the pen work on the bunny rabbit and the Paint cans it really adds to the piece.. The wiches cloak is made up of velvet.
The Bunny Rabbit was done by Sue Burkhardt, From a picture on the Jangle web site. (see links)
The witch was done by Ann Davidson. She made a pattern from a clip art image.
The girl (right)- by Windows of Time is a "flip flop" meaning that they give you a paper piecing pattern for both the front and the back in case you want to put both on your layout.
The paint and paintbrush were done by Shannon Tremblay from a Windows of Time pp.
PAGE TITLES
Please see "links" for more information on places to purchase paper piecing patterns.
Page titles are just that, they introduce the reader to the layout. Here are some page toppers that I made using fonts I downloaded from the internet for free, (see the links page)I used decorative scissors, and punches.
You can buy pre done page toppers at a scrapbook store, or use one of the many programs out their to create your own. I prefer the free way.
DIE CUTS


These are some examples of Die cuts that were done at a local scrapbook store (the Mad Scrapper). There are litterally hundreds to chose from, many stores have a self service area. There are, pre packaged ones, individuals, or theme packed ones. I prefer to try and cut my own out using clip art, or tracing an image i like. You can do this by using a light box, or tracing over the image with your paper underneath, pressing hard with a pencil. Then cut along the indent.