|
|
|
|
|
This site will no longer be updated, please visit http://pixel-tickler.com instead. | ||||
|
|
|||||||||||||||||||
|
|||||||||||||||||||
|
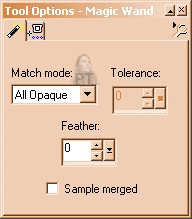
Step 1: Using the magic wand with the setting
as shown, you will need to select both the moon and the star. PSP5 and 6
users will use "All Pixels" from the drop down menu. |
|||||||||||||||||||

|
|||||||||||||||||||
| Step
2: Go to
Selections/modify/contract 2 pixels then save to alpha channel. You can choose to name the selection if you want to. If you are working on a bigger project where you have saved several selections to the alpha channel, you should name each one. For this tutorial, this will be the only time that you will be saving to the alpha channel. |
|||||||||||||||||||
| Step 3: Don't deselect yet. Click the undo button one time. Add a new raster layer and then hide the layer with the moon and stars. You should see the marching ants and you need to make certain the new layer is the active layer as demonstrated in the picture below. | |||||||||||||||||||
|
|
|||||||||||||||||||
|
Step 4: Flood fill this new selection with a solid color. I usually use white. Next you will go back to the sections menu and load your save selection from the alpha channel. The marching ants will move to your previously saved selection. Hit the delete key on your keyboard and then select none. |
|||||||||||||||||||
| Step 5: Use the magic wand tool again and select all pixels. You can now either flood fill with a solid color, gradient, or pattern of your choosing. I am going to flood fill with a dark blue. Keep this area selected because you will need it whether you go to step 6a or 6b. | |||||||||||||||||||
| PSP6 & 7 users go to step 6a | PSP5 users go to step 6b | ||||||||||||||||||
| Step 6a: PSP6 users go to Image, effects, inner bevel. PSP7 users go to effect/3d effects/inner bevel. I used the metallic preset. | |||||||||||||||||||
|
|
|||||||||||||||||||
| Step 6b: Note: Since my PSP6 crashes immediately after opening, I'm not going to be able to do any screen shots for this. Add another new layer. This is a work around that won't create quite as pretty of a frame, but will work. | |||||||||||||||||||
|
|
||||||||||||||||||
|
Step7: PSP5-7 users: Go to selections/select none (control +d) so that you have no selections. Re-enable the moon and star image. Merge visible. |
|||||||||||||||||||
| Congratulations! You are now ready to place your framed odd shape on the background you desire or add anything else that tickles you. | |||||||||||||||||||
|
Download the PDF of this
tutorial here. |
|||||||||||||||||||
 |
|||||||||||||||||||
| Updated 02/06/02 | |||
| Copyright ©
1999-2002 All rights reserved. All graphics on this site are property of Pixel-Tickler and are protected under US and International copyright laws and may NOT be copied, stored or offered for sale without written permission from the owner unless so stated otherwise. PSP tutorial groups may use these tutorials as part of their weekly lessons. If you have any questions regarding the content or images used on this site, drop me a note at news://news.annexcafe.com/annexcafe.psp.tutorials. I browse there regularly. |
|||