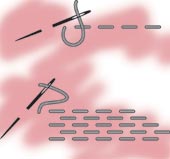
Two different ways
Way 1:
Use a large embroidery needle and the same heavy cotton thread that you use to sew on the ribbons. You just start in the center of the platform and do a chain stitch in a spiral, with the swirls of the spiral touching each other. You just go round and round until you reach the outside of the platform.
Way 2:
How does a modern-day dancer darn her shoes? With the right tools and a bit of patience. First, collect a thimble, a curved needle, darning thread, a pencil, an Exacto knife, a pair of needlenose pliers and your pointe shoes. If your local dance shop does not carry darning thread and curved
needles, try searching online, through sewing supply catalogs or in fabric, craft or sewing shops. Pink embroidery floss or button thread can be substituted for darning thread.
When you are finished you should have a row of Xs. ///// + \\\\\ = XXXXX.
Next, prepare the shoes. Wear them to break them in a little. Then, using the Exacto knife, carefully cut away the satin that covers the platform and the front edge of the pleats. Put the shoes on and decide which is going to be right and left (once you custom darn a shoe, you can�t switch feet). Now rise up on pointe and take a look in the mirror to determine exactly where to add darning. Do you tend to sit too far over your big toe? You can add a layer of darning on the edge of the platform around the corner of the big toe to gently �nudge� you back to center. The same goes for dancers who sit toward the little toe�do the same darning but on the opposite side. Notice where the trouble spots are and mark them with a pencil, shading in the area that you want to darn. Now you are ready to start the actual darning.
Thread the curved needle with darning thread or embroidery floss, pulling the thread through and tying the ends together in a knot. Now here�s the fun part�making that first stitch. Getting the needle to go through the first layer of material will be tough and pulling the needle out may be hard, too. Remember that you are sewing through a layer of fabric hardened with glue, so anticipate some difficulty�the needle may stick in the glue. Use the thimble over your thumb or grip the needle with the pliers to push it down into the fabric and use the pliers to pull it out the other side. You should make small, even stitches that are not pulled too tight. The curved needle really helps you accomplish that. If you haven�t used a curved needle before, try practicing first on a heavy fabric like denim, canvas or several layers of upholstery cloth until you feel more confident with the technique.
If you are darning the pleats for traction, keep your stitches straight, fairly short and evenly spaced. Place your rows of stitches next to each other to form a flat, even layer in a V shape from the edge of the leather sole to within about a 1/2� of the back edge of the platform. The point of the V should start near the sole and open out toward the toe. Be careful not to build up a ridge that will hinder your ability to roll up to pointe.
If you are spot darning to adjust the balance of your platform, you will need stitches that are a bit heavier. In this case, use slightly larger stitches made on an angle like this /////. Place the shoe on pointe and mark with a pencil where the edge of the platform meets the floor. This will be where your stitches begin and end. Stitch across the area you need to cover once and then go back over the same stitches, angling the next row in the opposite direction. When you are finished you should have a row of X �s.
If you want help centering your balance from all angles, do the same as above, but rather than darning in just one spot, stitch all the way around the front and side edges of the platform, stopping when you hit the pleats. That will make a ridge three-quarters of the way around the platform, but will leave the space in front of the pleats open for ease of roll-through. You can build up more of a ridge and reinforce the X stitches by using a straight or chain stitch to connect them along the edge of the platform. Try the shoes on as you darn to make sure that your stitches are in the correct place. Basically, when the shoe feels balanced, you�re done.
By Tina Dunn
