I present here my methodology and philosophy for building simple unfolded quarter-wave speaker cabinets. This note applies specifically to the FT-1600 and LT-2000 MLTL cabinets and the FB-16 and FB-20 BR cabinets, but can be applied to most any bass reflex or quarter wave cabinet.
For a long time, I used ¾” MDF with ¼” HardiBacker® (a cement backer board) laminated with Liquid Nails®. This combination creates a very dead cabinet. At the power levels encountered in single-driver speakers, no meaningful sound escapes through the cabinet walls. To me, this is a good thing and I stand behind these materials. The down side of MDF is that cutting it creates large amounts of very fine dust that is a health hazard. ALWAYS use a dust mask when cutting MDF. Cutting the HardiBacker® also creates a lot of dust, but the cement dust is very heavy and falls out of the air quickly. The conventional wisdom, particularly in the DIY community is that MDF cabinets have a dull, lifeless sound. Actually, they have no sound at all. A poorly built plywood cabinet will strongly color the speaker’s sound by adding a lot of noise in the midrange. Apparently, a speaker with an aggressive, overblown midrange has “life”, while a balanced speaker is “dead”. But I digress…
Plywood comes in any number of grades. Some are usable for speaker cabinets, some are not. The cheapest plywood is construction grade. Construction grade plywood varies by region, and here in the South it is either loblolly pine or southern short-needle pine. This stuff is course, rough and loaded with voids. Even the A-C grade “sand ply” should be avoided at all costs. At this writing, Lowes and Home Depot have a Chinese plywood that has 7 layers rather that the normal 5 layers for ¾” material (actually it is 18mm). I find this plywood acceptable when laminated to ¼” birch plywood. If you can get it, 13 layer Baltic birch plywood is very nice to work with.
If you use MDF, the best liner is a cement board like HardiBacker® is the best bet. It adds a lot of mass to the cabinet walls and isolates the wall from the interior. Use of an elastic cement to laminate the HardiBacker® and MDF forms a constrained layer effect that further damps any vibration entering the walls. If you choose not to work with a cement board, Masonite® or another hardboard may well work. I have not tried this. Some builders have use vinyl damping pads, but again I have not tried this. I am told that ¾” “Sonic Barrier” from Parts Express works as a replacement for both lining and damping. If you use plywood, I recommend that you laminate ¼” birch plywood to the main ¾” panels. The adds both mass and stiffness to the walls. I have not tried any dissimilar material lining, but any constrained layer technique should be good.
The preferred damping material is 5/8” high density Fiberglas®. Anything between ½” and ¾” will work. You may be able to find this material at a HVAC contractor. I use Armstrong #420 ceiling tile with the plastic liner removed. An alternate is 1” polyester batting. Stuffing per se is pretty much a matter of taste. I do not put any stuffing behind the driver of my commercial units. Most customers seem to prefer the "lively" sound caused by some reflections back through the cone.
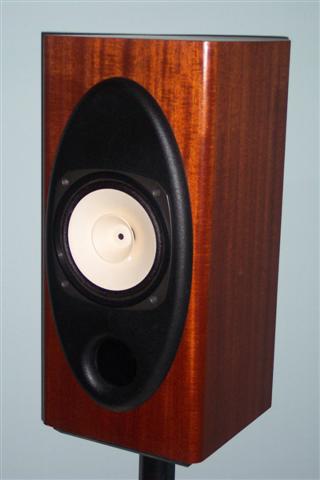
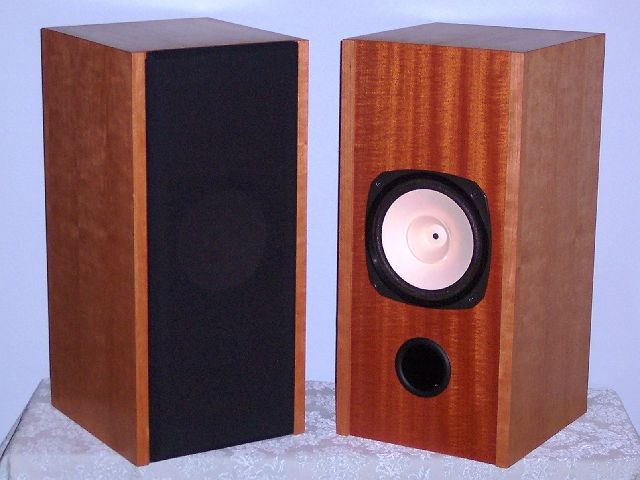
The cabinet as presented in the plans is intended for sale by me to a customer. This is my signature design. It looks good and requires a fair degree of skill to do correctly. Of note are the rounded edges of the cabinet and the oval supra baffle around the driver. There will be little change in the sound of these speakers if you omit the supra baffle and leave the edges of the cabinet square. Another option is to extend the side panels ¼” beyond the front panel. This is particularly effective if a grill is required. It is all up to you.
|
|
| Rounded Edges and Supra Baffle | Square Edges with Grill |
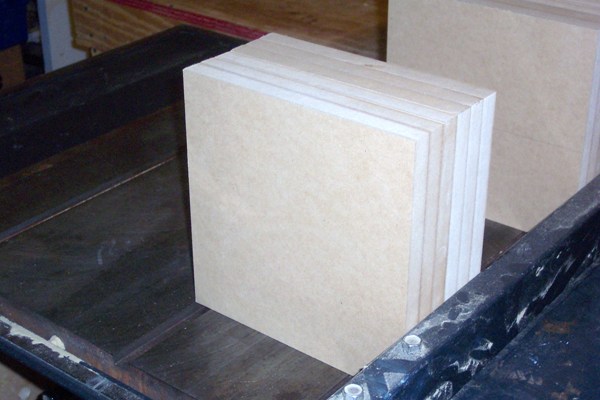
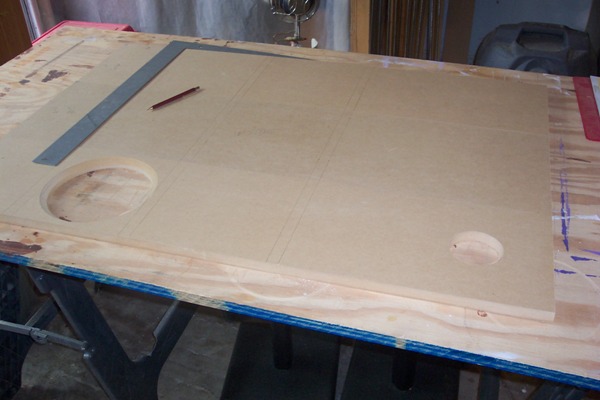
The first step in construction is to cut out the panels. I have provided cutting layouts using 4’ x 8’ sheets of ¾” material. If you don’t feel that you can man-handle a full sheet,there are other options. You can buy ¼ sheets (2’ x 4’) or 12” shelving. Either option will cost more and produce more scrap, but a 2’ x 4’ panel is a whole lot easier to handle than a 4’ x 8’ panel. You can have your sheet goods cut up by the lumber yard, but do not expect the results to be on dimension or square. Leave at least ½” to re-cut every edge. To assure the best fit between panels, you should make all of the cuts at a particular width without changing the fence position of your table saw. In general, that means that you should cut the widest panels first and work your way down to the narrowest panels.
The plinth pieces and tops are made of double thickness. There are two easy options depending on what tools you have:
1. If you do not have a table saw, cut two pieces to exact size and make the other two pieces slighly over size. Then, after gluing the pieces together, you can trim the wider pieces to match the correct sized pieces, preferably with a router. The same procedure applies to the top pieces.
2.At the table saw, cut all four pieces oversize. Glue up the doubled pieces. Re-cut the doubled pieces to dimension. Wait to cut the side-to-side dimension of the tops until you do front and back panels.
The braces can be cut out with a saber saw or a scroll saw, but it is far faster to use a router with a circle jig. Mark the center of the hole and drill for the circle guide pin. Then cut out the holes with a ¼” spiral bit. Finally, round the inside edges with a 5/16” round over bit. (Note: Rounding-over the edges of the window braces is most likely purely cosmetic. While it is theoretically correct to avoid any sharp edges inside the cabinet, it is unlikely to make any practical difference. I do it anyway.) It will be easier to use a router if you cut the holes before you separate the individual braces from the sheet of raw material. Again, wait to cut the side-to-side dimension until you are ready to cut the front and back panels.
Much of the sheet goods you will encounter, plywood or MDF, is not ¾”, but 18mm. That means that the outside dimension over the front and back panels will be 2mm undersize. This is a good thing, since you want the sides to stand slightly proud of the front/back a small amount so that they can be trimmed flush. If you are not using a table saw or question you skills, you might want to add a little to the width of the sides for trimming. Likewise, you might also consider cutting the long panels ¼” long to allow the top edges to be trimmed after glue-up.
It is imperative that all of the front and back panels, the tops and the braces be cut to exactly the same width. Otherwise, you will have no end of problems making things fit properly. Also, if there is any possibility that your table saw fence is out of square, keep track of which edges are at the same angle.
Checking tops and braces for square
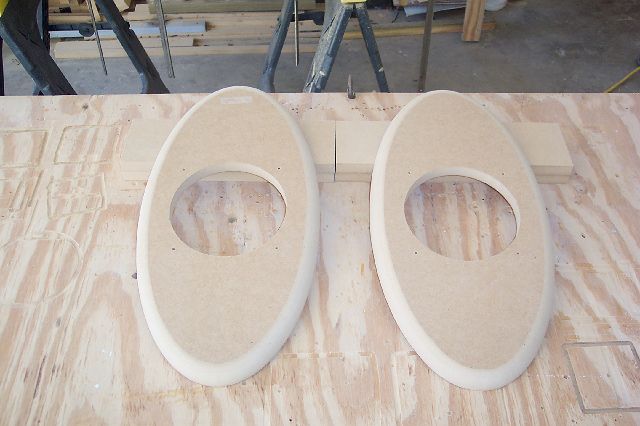
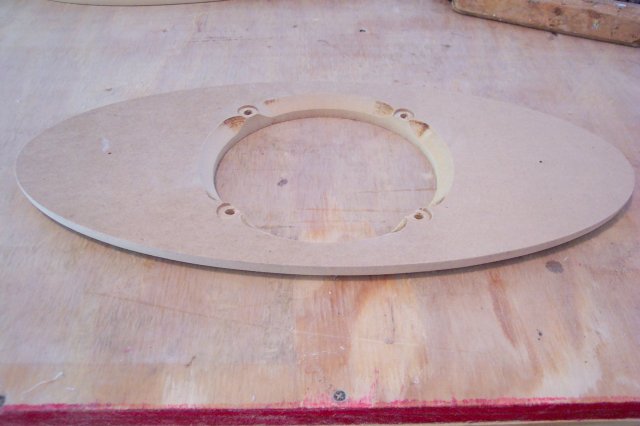
The supra baffle pieces should be cut oveersize to allow enough material to trim the oval. If you have a router, make a pattern. Print and paste up the outline from the 1 x 1 supra baffle file. Glue the outline to a piece of ¼” hard board, then trim the hard board as accurately as possible. Drill the four driver mounting holes and the center hole with a 1/8” bit. This is best done with a drill press. Make the holes as square as possible.
Once the pattern is complete, Mount the pattern to the supra baffle blank with a small screw at either end of the pattern. You want the screws short enought that they do not penetrate the other side of the blank. Drill the holes in the supra baffle through the holes in the pattern. Trace the outer edge of the pattern onto the false baffle. Remove the patters and cut the hole for the driver. If you are using a router, use a circle jig and the center hole.(I use a Japer Jig because it is easy, but a home-made jig will work fine.) If you are using a saber saw, mark the hole with a compass and cut/file/sand the holes as accurately as possible. Chamfer the inside of the baffle and supra baffle holes at 45° ½” deep. This is a required step. A router makes this easy, however if doesn’t take long to do the chamfers with a coarse wood rasp. Remount the pattern and cut the blank to size with a pattern bit, and then make the round-over with a 3/4" round-over bit.
If you do not have a router, print and paste up two outlines togehter. Then glue the outlines directly to the panels with rubber cement. Drill the holes, cut out the driver hole and cut the blank to size using a rasp and sandpaper to get to the line. The round-over will have to be done with a rasp and/or plane and sandpaper. A spokeshave would work well here, but I suppose if you have one of these, you probably have a router.
A note here about the chamfer on the inside of the driver hole. If you are going to use t-nuts or screw inserts, you will not want to chamfer around the mounting holes. Also for t-nuts, you will want to put a relief in the back for the t-nut to rest in.
The driver hole is cut into the front panel and needs to be chamfered as is the back of the supra baffle. You will also have to cut a hole for the port. The actual dimension of this hole will depend on the material used for the port. You can test the speaker with a paper tube before you commit to cutting the tube. Measure the diameter of your material before you cut the hole.
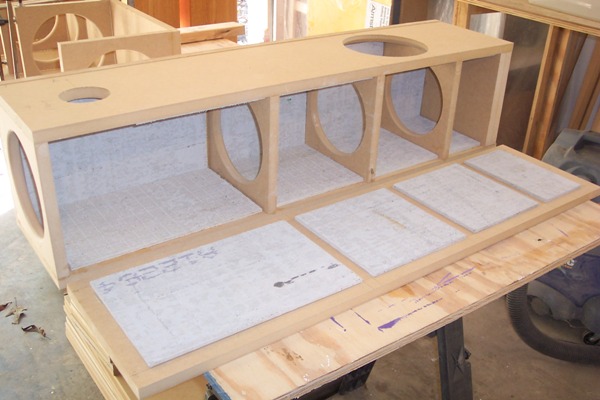
Lay out the positions of the three braces. Also mark a line 1 ½” below the top, which is the lower extent of the doubled top panel. Measure the position from the bottom. It is imperative that the bottom of the cabinet be square so that it seals against the plinth. It will be most accurate if you draw the lines on the inside of the right side first. Then lay the back and baffle panels against the right side and extend the lines across the sides. Finally, draw the lines across the left side. Now start the glue-up.
You will probably want to use a yellow PVA carpenter’s glue. I’m fond of Titebond Original for panel gluing because it gives ample open time for adjustments. Titebond II sets too fast for me, and it remains a bit rubbery, which makes sanding a somewhat of a chore. Titebond III works well and does give additional open time. However, Titebond original sets up harder making it easier to sand. Of course, you can use Elmer’s or anything else that works for you. I hate urethane glues and avoid them like the plague. The only feature of urethane glue that might be useful is its gap-filling ability, but if you have done anything that approximates decent joinery, there are no gaps to fill. Besides, if you veneer the cabinet, you also guarantee that there are no air leaks. You may use any technique that works for you, but here is what works for me. I do not use screws. I simply glue and clamp. If you want use screws, screw everything together BEFORE you apply any glue. You must remove all screws before routing the cabinet edges. In any case, dry fit everything before you apply any glue. I place the left side panel on the workbench. I use two 2” x 4” boards to elevate the work. This allows easy placement of clamps under the work.
Apply glue to the edge of the back panel, the top and one of the braces. You only need enough glue to wet the edge. Nothing is gained by having glue running all over the place. If your cuts are straight and square, you won’t need to worry about air leaks. Place the back panel in position, then the top and the brace at the bottom of cabinet. Clamp these pieces down, making sure that the bottom edges of the panels match exactly. Don’t worry about the top edge -- you will trim this at the end of the glue-up.

Use a clamp every 6” or so. How many clamps do you need? I have 21. That is barely enough. Next, glue in the three braces. Position and clamp these parts to the right side and back, again using the front panel to help position everything. It helps to use a machinist’s square to position the parts. Be very careful that nothing moves as you tighten the clamps. The wet glued edges will tend to creep as pressure is applied, particularly if you have used too much glue. No more than 1/16” bead of glue should ooze out of a joint. Note that I placed the front piece in position without glue to help square the spacers.

Finally, glue the front panel to the side/back/brace assembly. You will not glue the right side on until after the lining is installed.
The cabinet shown in the pictures is made of MDF. The cabinet is lined with HardiBacker®. I have supplied a cutting layout. Basically, the pieces for the sides are cut ¼” smaller than the openings. The pieces for the front and back panels are cut ¾” smaller to that they will fit between the side pieces. Cutting the HardiBacker® offers a couple of options:
Putting the pieces in the cabinet is straight forward. Put the pieces on the front and back, then the right side. When you glue the pieces of the left side, check the fit of each piece as soon as you apply it by placing the left panel in place on the cabinet assembly. If you misplace a piece, the left side won’t go into position and you will have to trim the HardiBacker® with coarse sandpaper. I use Liquid Nails® “Panel Adhesive” to glue in the HardiBacker®. Apply the adhesive to the entire piece with a ¼” notched trowel. Firmly press the piece into the cabinet. You will have a couple of minutes to position the piece after it is in place. You will have to cut out the port opening on the front piece. Wait at least an hour for the adhesive to set. The easiest way to cut the hole is with an abrasive blade in a saber saw. Otherwise, rough out the hole with a cold chisel and finish with coarse sandpaper.
If you build your cabinets out of plywood, you will want to use 1/4" plywood or Masonite® (hardboard -- HDF) for the lining. The lining can be installed the same way as the HardiBacker® lining with Liquid Nails®. For my production cabinets, I laminate 1/4" plywood to the 3/4" with PVA glue, then route the 1/4" layer for the braces and side panels. This way, all of the pieces are self-aligning and glue-up can be accomplished in a single step.
Once the HardiBacker® is in place, cut and attach the fiberglass pieces. Cut the fiberglass into pieces with a utility knife before you remove the white plastic facing. It is just easier that way. I use 3M No. 77 Spray Adhesive. Spray the adhesive on the cabinet (the HardiBacker® liner. Apply enough adhesive so that it bubbles. Remember that No. 77 is a contact cement, so you only get one change when positioning the fiberglass panels. It is no problem if you squash the edges of the fiberglass, but try not to compress the center of the pieces.
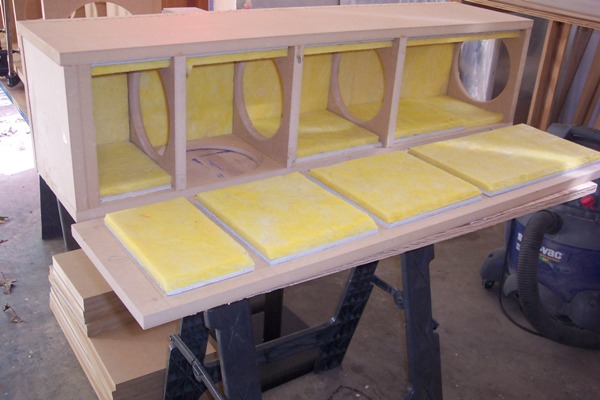
Now that the lining is complete, it is time to close the cabinet. Apply glue to the edges of the previously glued-up assembly and clamp down the right side. If all has gone well, the bottom will be dead square all the way around. There will be a raised edge at the front of the side panels and possibly also at the back. There may also be a raised edge around the top. Once the glue as set, trim the cabinet edges if you intend to do round-overs. Either a router with a trim bit or a hand plane makes quick work of this. Drill the mounting holes in the bottom brace with a 5/16” drill and insert a T-nut into the hole from the inside of the cabinet. I have patterns to align all of the holes. You might consider making patterns, or drill the plinth first and use it as a pattern for the mounting holes. Now is the time to apply round-overs if you choose. A router is far and away the best way to do this, but if can be done successfully with a hand plane and sandpaper. The technique is explained elswhere on my web site. If you are going to veneer the cabinet, do not round over the top edges. If you are going to do a paint finish, then you can round over the top edges also.
Finish the cabinets as you choose. You are on your own here, but if you choose to veneer your speakers, there is my technique:
Cut two pieces of veneer the height of the cabinet plus 1" and the full width of the veneer. These pieces will wrap completely around the smaller cabinets. The LT-2000 cabinet is too large, and you will only be able to do three sides with one piece of veneer.You will need a second sheet of veneer to do the back, or alternately, you can paint the back. Apply a coat of PVA glue to the cabinet and the veneer. I prefer Titbond II for this as it remains slightly rubbery for a considerable time and melts better under heat. However, Titbond I will work. Allow the glue to dry completely. It will turn from milky to transperant. If you do not wait longenough, the glue will act as a contact cement and you will ruin the veneer trying to get it off.
Place the cabinet with the front baffle up on the bench or on horses. Position the veneer with a book line exactly on the centerline of the cabinet, but with the overlap located on the back. Mark the edge of the cabinet and the inside of the veneer. Place the veneer over the cabinet and align the marks you just made. Lightly clamp the veneer to the cabinet:
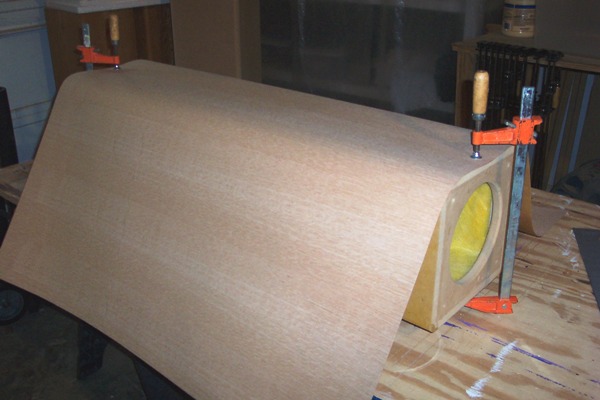
Tack the veneer to the cabinet with a hot iron and remove the clamps. (You will want the iron as hot as possible so as to quickly ment the glue, but not so hot that it burns the veneer. A bit of practice with some scraps.) Work from the center out to the edges

Work around the sides of the cabinet taking care to get the rounded edges down smoothly. When you get to the back, only iron down about 2" at the edges. Overlap the edges of the sheet of veneer and clamp it down with a straight edge:

Cut both layers of the veneer with a new utility knive blade. You want to apply enough pressure that both layers are cut in a single pass. Butt the two edges together and iron down the back.
Supra Baffles:
The supra baffle is installed with silicone sealant. Lightly mark the position of the center of the top and bottom edges of the false baffle. Then, apply the silicon sealant to the back of the false baffle. Use a ¼” bead spaced about 2”, but keep the bead at least ½” from the edges.

Finish the plinths to your taste. I put a ¾” round-over on the top edges and paint the plinths with black truck bed liner that comes in spray cans. Drill the 3/8” holes for the spike inserts and, the ¼” holes for the mounting bolts. Countersink the ¼” holes. If you are going to place the speakers on a hardwood or tile floor, replace the spikes with felt or rubber feet that are adjustable. If you are placing the speakers on carpet, definitely use the spikes. Now attach the plinths to the cabinets with ¼”x20x1 ½” machine screws. Install the port. The method you use will depend on the materials you choose for the port. The recommended port tube is a press fit.
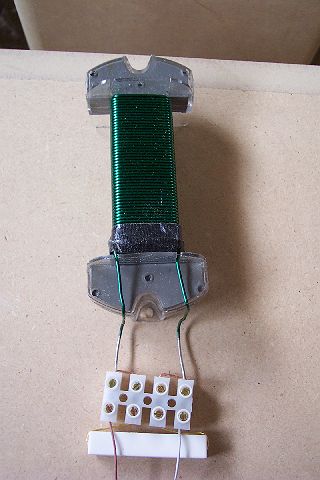
The electrical terminals go in next. You can use any type of terminals or terminal cups that you want. The recommended terminals are long enough to go through the cabinet and the HardiBacker®. Many terminals are not long enough and you will have a new problem to solve. I place the terminals on the back panel at the level of the driver. Mark two holes EXACTLY ¾” apart in the center of the back panel. Drill ¼” and tap the terminals in place. Install the terminals from the inside of the cabinet, no easy task for large hands. You might want to solder the wires to the terminals before you tighten things down. It is finally time to take the drivers out of the boxes. But first, cut about 18” of wire to connect the drivers to the terminals. For most full-rangers, I use a single pair of wires from a CAT5e cable. I do not use clip-on connectors for the driver terminals. You can connect the contour filter now or later. (You might want to connect the filter outside of the box for testing, a pretty good idea.) Cut the hot wire and solder each end to one of the leads from the inductor. Solder the resistor across the inductor – one lead of the resistor to one lead of the inductor. Alternately, you can use barrier strips to wire the filter:
Attach the filter assembly to the inside back of the cabinet with ¾” screws. Solder the wires to the driver terminals and screw the drivers into position. You can use the screws provided with the drivers or #10 pan-headed sheet metal screws. Parts Express and Madisound sell these as “speaker mounting screws”. I like to use #10x24x3/4" Allen head cap screws and screw inserts. Your option.
You’re Done! OK. Take them upstairs and plug them in. Warning: You may be disappointed with the initial sound you get from these speakers. They will sound thin, boxy and screechy. Paper full-range drivers need a long break-in . They start to come around in a few hours. They will sound really nice after 100 hours or so. They will just sound better and better as you use them. They will break-in faster if they are played loudly (within reason, of course), so plug them into your HT and watch some movies.
Good luck and happy listening.
Bob