![]()
Photographing Birds at Nest
![]()
![]()
Photographing Birds at Nest
![]()
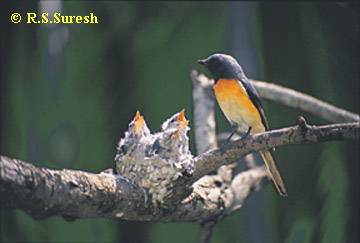
Photographing Birds at their Nests is an interesting and challenging part of Bird Photography. The article reflects my experiences in India with limited equipment. Here's how I go about in Capturing Birds on my film.
As all the Nature Photographers worldwide agree, Nature Photography, especially Bird Photography is 90% Study and 10% Photography. Like all branches of Nature Photography, Bird Photography needs utmost care and patience. To be in the right place at the right time is the main thing behind a successful Bird Photographer. Your luck plays an important role too.
Regular Birdwatching: Regular Birdwatching is a must to succeed in Bird photography. I go out regularly to the outskirts of the city and to the nearby areas for watching birds. I keep track of the kind of birds seen in various seasons at various places. Keeping good notes of the observations helps a lot. I keep track of the birds that nest in those areas. A good pictorial field guide on local birds helps in knowing more about the birds in advance. A good Binocular (preferably 8X40) makes Birdwatching a pleasure.
Finding the Nest: Study about your local birds well in advance through various field guides, articles, books and Internet. Knowing about the birds that you are most likely to see in your area helps. Refer to local bird reports and nesting reports if available. Your Birdwatching notes will help you in knowing what kind of birds that you had seen earlier in those areas. Locating the nests of the birds can be quite challenging and demands ultimate patience. Most of the birds tend to behave in a strange manner when they are around their nests or during nesting. Observing the birds for such behaviour helps you in finding the nest. One of the easy ways of finding the nest is to follow the bird when it is carrying the nesting material or feed. You can also follow the birds during courtship. Watching birds closely from a vantage point will help you in doing this. Shorebirds nest in the vicinity of the water source. Follow them carefully. Advance knowledge about the nest of the bird that you are looking will help you locating the nest. Most of the nests are camouflaged or hidden. You get deceived many times.
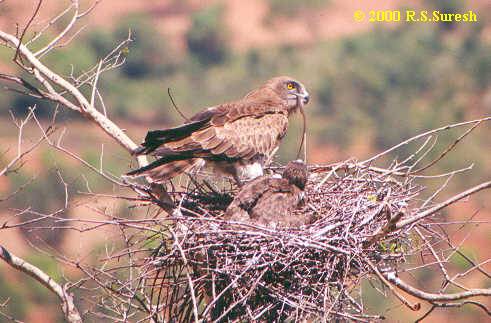
Know more about the bird and the nest: Once you locate the active nest of a bird, you need to plan for your first shoot. Know about the stage of the nesting, whether it is in the construction stage or whether full egg clutch has been laid or whether the eggs have hatched. Knowing about the approximate incubation period, feeding period, etc. of the bird helps in planning for the kind of pictures that you are looking for.
Setup the hide/machan: After you have decided about when to shoot, start planning to setup the hide/machan. I always use the hide or blind to photograph birds at nest. Hide acts as a cover between you and the bird. Most of the birds ignore the things in the surroundings that are still. Plan your angle of shooting and then erect the hide/machan. When I use the hide for birds that nest below 6 feet from the ground, I adopt gradual approach method. Setup your hide far away from the nest and then gradually move closer in steps till the birds get used to the hide and the equipment. Make sure that you are not disturbing the birds. You need to be very careful especially when there are hatchlings in the nest.
Your hide/machan: Hide or Blind is used for the birds that nest on the ground or at a height of about 6 feet from the ground. Machan is used for all other birds that nest in tall trees or cliffs above 6 feet. There are no hard and fast rules about the construction of Hides and Machans. They should serve the purpose of concealing your presence/movements and serve as a shelter for you and your equipment.
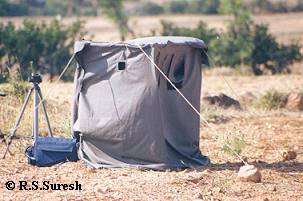
My hide has a removable light alluminium frame covered with a camouflaging cloth. You can use different coloured/patterned cloth for different surroundings. My hide can tightly accommodate two persons (thin). The front of the hide has two openings with cloth flaps for Camera and Flashes. Always use sturdy Tripods. You can tie the corners of the hide tightly with threads to the nearby branches of trees or to the rocks on the ground to avoid flapping of the cloth when wind blows. The total time to either assemble or disassemble this hide takes only 15 minutes. The disassembled hide can be accommodated in a tripod cover.
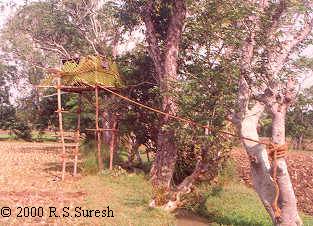
Machans are normally made with Bamboo or light wooden logs and ropes. You can also use steel slotted angle frame for small machans. The top of the machan will have a platform preferably of wood for keeping the equipment and for you to sit. This top portion is covered with cloth and branches/leaves of trees which would serve as hide. The whole structure is firmly secured to the ground and the nearby trees with ropes. The setup should be safe and secure and should not create unwanted shake while photographing. Machans will have many steps 2 or 3 feet apart to reach the top platform. The construction of machan should be done fast so that the bird will not get disturbed. You can do the work when the parent bird/birds go for fetching the feed. Make sure that your activity does not keep the Parent bird away from the nest for long time. Many times this setup will take one or two days.
The setting up of Hide/Machan is the most important stage of bird photography that consumes most of the time. Have patience; it pays you off later.
Installing the equipment: Know more about your equipment. Get well versed with all the controls. I use a 35mm SLR with 100-300mm zoom and a flash. A lens of 500mm will be very helpful. Flash is mainly used to fill the shadows and to get the catch light in the bird's eye, which makes the picture lively. Flash acts as main light source for birds that nest in bushes and under bad climatic conditions. Slowly install your equipment in the hide after you feel that the bird has resumed its normal activities in the presence of hide. Make sure everything is fine before you actually start shooting. Use proper film to suit your taste and application. I always use 100ASA film though it is recommended to use slower films for good results.
Finally, the thrilling experience of watching birds so close from the hide for a long time cannot be explained by words.
Happy birding!
![]()