
Windows Power-User Series
Windows Power-Users know that some tasks (such as changing the
appearance of the Taskbar's
"Start" button) can only be finished after exiting to
Real DOS. Other users have special programs or games that must be
run under DOS only. And some programs, such as a Windows
debugger which must be initiated from a DOS prompt before
Windows boots, are best placed in a Menu or even a batch file rather than
running them every time you power-up your computer!
This page tells you how to set up a Menu System which allows you to
boot directly to a DOS prompt at power-up, or more importantly
to 'drop back' into real DOS from a Windows session and then go back
into (boot) Windows again -- without having to reboot
your whole system!
( If you're old enough to remember using Windows 3.1, this procedure not
only returns your system to the freedom of choosing whether or not you
want to use Windows at boot-up, it also gives you the choice of
personal options from your own menu. This Personal Menu is limited
only by your skills and imagination! )
Although it may seem like a round-about-way, to do this correctly
(that is, so we can return to Windows by simply entering:
win
at a command prompt ) requires us to set The Windows Startup
Menu to always boot DOS first. And don't worry
: If you know you'll rarely use DOS at boot-up, you can simply set a
batch file (AUTOEXEC.BAT) to automatically boot Windows with very little
difference compared to how your system boots now! A second menu which we'll refer to as
your "Personal Options Menu" can also be used. ( The
settings for this second menu -- with a variety of choices as to how it
appears being set by the user, including the use of
color -- are controlled by the file CONFIG.SYS
with various commands for each option set to run from AUTOEXEC.BAT
. ) The reason for booting Windows from a DOS prompt is to
ensure that you will always be returned to DOS at the end of each Windows
session.
If your system
already boots-up with The Windows Startup Menu, then review the
material in Step 1 ( How to Edit Msdos.sys )
and make any necessary changes described in
Step 2 ( the Options Header )
BEFORE proceeding to
Step 3 ( Removing Logos.sys )
or
Step 4 ( The Menu System ).
If your system still boots directly into Windows
(called the 'Graphical User Interface' or GUI ), you need to make the following changes
to see The Windows Startup Menu at boot-time:
Step 1
How to Edit MSDOS.SYS
For those of you already familiar with
changing system file attributes at a DOS prompt, you may wish to use the
DOS-window Experts approach below! If this is
the first time you've heard of a file called
MSDOS.SYS or you're
still an entirely GUI-dependent user, you can follow the graphical
directions here:
The GUI Approach
Making a Backup Copy of MSDOS.SYS
Open the Windows Explorer, click on your C: Drive icon in the folder pane
and locate the file Msdos.sys
in the "Contents of 'C:\' " pane. Right-click on the
filename and choose Copy from the menu. Now scroll down to the bottom
of the files list in the Contents pane, right-click in any empty space there
and choose Paste from the menu. ( If you don't see
Paste on the menu, that means you still have a filename highlighted
somewhere; right-click in an empty space and try again.)
You should now see a new file at the bottom of the list called "
Copy of MSDOS.SYS "
(without quote marks). Right-click on this file
and 'Rename' it to:
MSDOS.SYS.SAV ( This
window should pop-up; click on ' Yes ' ):
The DOS-window Approach
Open a DOS-window (click here to review the use
of DOS-windows) and change to your root directory ( cd\ ). Change the
attributes of your MSDOS.SYS file so you can edit it:
C:\>attrib -r -s -h
msdos.sys
If you're a DOS fanatic, you can even use EDIT to open MSDOS.SYS
(
C:\>edit msdos.sys
) and complete the changes there.
( Don't forget
to return the attributes to 'read-only, system and hidden' after
saving the changes:
C:\>attrib +r +s +h
msdos.sys )
Editing the MSDOS.SYS File
Start NOTEPAD, click on 'File' then 'Open...' and in the
" File name: " box enter the following:
C:\msdos.sys
For the MS-Windows Operating System, this file contains only text (rather
than binary code; like it did in MS-DOS) and it should look similar to the
lines of text shown below. There may be other lines in your file which are
not shown here, or in some cases, there may be no [Options]
lines at all!
( An explanation is given for each possible line under the
[Options] header in the next section.)
Example MSDOS.SYS file (Do _NOT_ copy this one!)
======================================================
[Paths]
WinDir=C:\WINDOWS
WinBootDir=C:\WINDOWS
HostWinBootDrv=C
[Options]
BootDelay=2 <-- Not used in Windows 98
BootGUI=1
Logo=1
BootMenu=0
BootMenuDefault=1
BootMenuDelay=30;
;The following lines are required for compatibility with other programs.
;Do not remove them (MSDOS.SYS needs to be > 1024 bytes).
;xxxxxxxxxxxxxxxxxxxxxxxxxxxxxxxxxxxxxxxxxxxxxxxxxxxxxxxxxxxxxxxxxxxxxa
;xxxxxxxxxxxxxxxxxxxxxxxxxxxxxxxxxxxxxxxxxxxxxxxxxxxxxxxxxxxxxxxxxxxxxb
;xxxxxxxxxxxxxxxxxxxxxxxxxxxxxxxxxxxxxxxxxxxxxxxxxxxxxxxxxxxxxxxxxxxxxc
;xxxxxxxxxxxxxxxxxxxxxxxxxxxxxxxxxxxxxxxxxxxxxxxxxxxxxxxxxxxxxxxxxxxxxd
;xxxxxxxxxxxxxxxxxxxxxxxxxxxxxxxxxxxxxxxxxxxxxxxxxxxxxxxxxxxxxxxxxxxxxe
;xxxxxxxxxxxxxxxxxxxxxxxxxxxxxxxxxxxxxxxxxxxxxxxxxxxxxxxxxxxxxxxxxxxxxf
;xxxxxxxxxxxxxxxxxxxxxxxxxxxxxxxxxxxxxxxxxxxxxxxxxxxxxxxxxxxxxxxxxxxxxg
;xxxxxxxxxxxxxxxxxxxxxxxxxxxxxxxxxxxxxxxxxxxxxxxxxxxxxxxxxxxxxxxxxxxxxh
;xxxxxxxxxxxxxxxxxxxxxxxxxxxxxxxxxxxxxxxxxxxxxxxxxxxxxxxxxxxxxxxxxxxxxi
;xxxxxxxxxxxxxxxxxxxxxxxxxxxxxxxxxxxxxxxxxxxxxxxxxxxxxxxxxxxxxxxxxxxxxj
;xxxxxxxxxxxxxxxxxxxxxxxxxxxxxxxxxxxxxxxxxxxxxxxxxxxxxxxxxxxxxxxxxxxxxk
;xxxxxxxxxxxxxxxxxxxxxxxxxxxxxxxxxxxxxxxxxxxxxxxxxxxxxxxxxxxxxxxxxxxxxl
;xxxxxxxxxxxxxxxxxxxxxxxxxxxxxxxxxxxxxxxxxxxxxxxxxxxxxxxxxxxxxxxxxxxxxm
;xxxxxxxxxxxxxxxxxxxxxxxxxxxxxxxxxxxxxxxxxxxxxxxxxxxxxxxxxxxxxxxxxxxxxn
;xxxxxxxxxxxxxxxxxxxxxxxxxxxxxxxxxxxxxxxxxxxxxxxxxxxxxxxxxxxxxxxxxxxxxo
;xxxxxxxxxxxxxxxxxxxxxxxxxxxxxxxxxxxxxxxxxxxxxxxxxxxxxxxxxxxxxxxxxxxxxp
;xxxxxxxxxxxxxxxxxxxxxxxxxxxxxxxxxxxxxxxxxxxxxxxxxxxxxxxxxxxxxxxxxxxxxq
;xxxxxxxxxxxxxxxxxxxxxxxxxxxxxxxxxxxxxxxxxxxxxxxxxxxxxxxxxxxxxxxxxxxxxr
;xxxxxxxxxxxxxxxxxxxxxxxxxxxxxxxxxxxxxxxxxxxxxxxxxxxxxxxxxxxxxxxxxxxxxs
======================================================
Msdos.sys
Step 2 Necessary Changes under
the [Options] Header
Note: Unless specifically directed to do so in the instructions below,
do _NOT_ remove or change any lines in your Msdos.sys file
(UNLESS you have decided that the change is appropriate for your system)!
If your file is missing one of the required lines below, then
you must, of course, add it.
( You may wish to read my DISCLAIMER statement at this time; its near
the bottom of this page.)
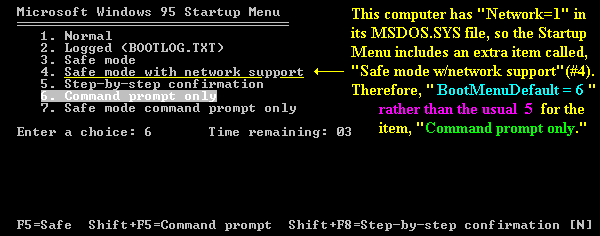
To view The Windows Startup Menu at boot-up and boot into DOS (where
our "Personal Options Menu" can be created), you need to
make the following changes to your Msdos.sys file:
======================================================
[Options]
BootDelay=2 <-- Not used in Windows 98
BootGUI=0
<--- You MUST do this!
Logo=1 <-- If you want to hide the MS
splash screen at boot-up, make
Logo=0.
BootMenu=1
<--- You SHOULD do this... UNLESS you want to skip
seeing the StartupMenu altogether once you get used to running your system
this way! ( I now have both my BootGUI and BootMenu
lines set to ZERO, so the first thing I see is my "Personal Options
Menu" which you'll learn about later. For now, I'd recommend setting
this to a 1.)
BootMenuDefault=5 (or
6)
<-- You MUST change this setting to agree with
the item number for "Command prompt
only" in your Startup menu!
If you have
a line in your file that
states: "Network=1," then use a
setting of 6 here.
Otherwise, set this to 5.
( Note the choices on your Startup menu after instructed to Re-Boot
your system; if necessary, change it.) A setting of 1 here, means your machine will immediately
Boot-up into Windows rather than booting only to DOS.
Note: Some MS-updates and 3rd-party Internet
file installations will add the "Network=1" line to your MSDOS.SYS
file! If this happens, you'll have to edit this line again... So, it might
be best to just go ahead and add the 'Network=1' line now if it's not in
this file, and then set this line to a 6.
BootMenuDelay=30 <--- You may wish to leave
this set for 30 seconds until you have completed your DOS menu. I have this
set to only 3 seconds to shorten my
own Boot-up time.
======================================================
The Meaning of the [Options] lines
The [Options] Header itself may be missing from your original MSDOS.SYS file; simply
insert it as shown above.
If any [Options] line is missing from the file,
then its Default setting (see below) will be used when booting!
--------------------------------------------------------------------
BootDelay=[Seconds]
Default:  2

Purpose:  Sets the amount of time the "Starting Windows 95" message
          remains on the screen before Windows 95 continues to boot.

NOTE: BootDelay is not supported in Windows 98.
---------------------------------------------------------------------
BootGUI=[Boolean]   Our setting must be: 0
Default:  1

Purpose:  A setting of 1 forces the loading of the GUI interface. A
          setting of 0 disables the loading of the GUI interface.
---------------------------------------------------------------------
Logo=[Boolean]
Default:  1

Purpose: A setting of 1 forces the default Windows 95 logo to appear. A
         setting of 0 prevents the animated logo from being displayed.
         A setting of 0 also avoids hooking a variety of interrupts
         that can create incompatibilities with certain third-party
         memory managers.
---------------------------------------------------------------------
BootMenu=[Boolean]   Our setting must be: 1
Default:  0

Purpose:  A setting of 1 enables the Startup menu. If this setting is 0,
          then you must press the F8 key when "Starting Windows 95"
          appears, (or press and hold the CTRL key when your Windows
          98-based computer restarts) to invoke the Startup menu.
---------------------------------------------------------------------
BootMenuDefault=[Number]   Our setting is: 5 or 6
                           It depends upon the Network line!

Default:  1 if the system is running correctly
          3 if the system hung in the previous instance

Purpose:  Use this setting to set the default menu item for startup.
---------------------------------------------------------------------
Network=[Boolean]
Default:  0

Purpose:  A setting of 1 means a network was installed and adds "Safe
          mode with network support" as an option on the Windows
          Startup menu.
---------------------------------------------------------------------
BootMenuDelay=[Number]
Default:  30
Purpose:  This setting is used to set the number of seconds your system
          will pause on the Startup menu. If the number of seconds counts
          down to 0 without intervention, the BootMenuDefault is activated.

NOTE: This option is not functional unless BootMenu=1 has been added to
the [Options] section of the Msdos.sys file.
BootKeys=[Boolean]
Default:  1

Purpose:  A setting of 1 enables the use of the function key boot
          options (that is, F4, F5, F6, F8, and CTRL). A setting of 0
          disables the use of these function keys during the boot
          process.

NOTE: A setting of BootKeys=0 overrides the use of BootDelay=n.
---------------------------------------------------------------------
BootWarn=[Boolean]   WHY would anyone set this to 0 ?!
Default:  1

Purpose:  A setting of 0 disables the safe mode boot warning message
          and the Startup menu.
---------------------------------------------------------------------
BootSafe=[Boolean]
Default:  0

Purpose:  A setting of 1 forces your computer to boot in safe mode.
   NOTE:  The OS itself will toggle this setting when it has certain
          problems booting Windows!
---------------------------------------------------------------------
BootMulti=[Boolean]
Default:  1

Purpose:  A setting of 0 disables the multi-boot option. (For example,
          with a setting of 0 you cannot boot your previous operating
          system.) A setting of 1 enables the F4 and F8 keys to boot
          your previous operating system.
---------------------------------------------------------------------
BootWin=[Boolean]
Default:  1

Purpose:  A setting of 1 forces Windows 95 to load at startup. A setting
          of 0 disables Windows 95 as your default operating system (this
          is useful only if you have MS-DOS version 5.x or 6.x on the
          computer).

NOTE: Pressing F4 inverts the default only if BootMulti=1. (For example,
      pressing the F4 key with a setting of 0 forces Windows 95 to load.)
---------------------------------------------------------------------

DoubleBuffer=[Boolean]
Default:  0

Purpose:  A setting of 1 is a conditional setting that enables double-
          buffering for controllers that need it (for example, SCSI
          controllers). A setting of 2 is an unconditional setting that
          enables double-buffering regardless of whether the controller
          needs it or not.
---------------------------------------------------------------------
LoadTop=[Boolean]
Default:  1

Purpose:  A setting of 0 does not let Windows 95 load COMMAND.COM or
          DRVSPACE.BIN/DBLSPACE.BIN at the top of 640K. If you are
          having compatibility problems with software that makes
          assumptions about the available memory try setting this to 0.
---------------------------------------------------------------------
AutoScan=[Number]
Default:  1

Purpose:  Defines whether or not ScanDisk is run after a bad shutdown.
          A setting of 0 does not run ScanDisk; 1 prompts before
          running ScanDisk; 2 does not prompt before running
          ScanDisk but prompts you before fixing errors if any
          errors are found.

          This setting is used only by OEM Service Release 2 and
          Windows 98.
--------------------------------------------------------------------
For the meaning of any other lines in your own
Msdos.sys file or for any [Paths] statements, take this link to the
Microsoft Knowledge Base article:Make sure to set the
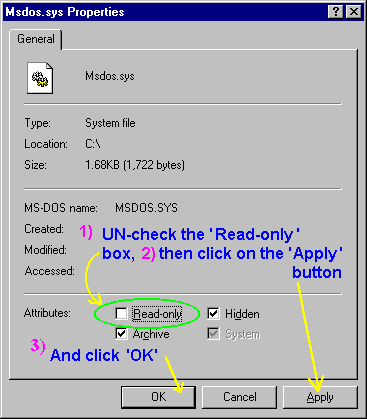
file attribute for MSDOS.SYS back to
Read-only :
IF you used the Properties window (under the
GUI Approach above), then right-click on the filename,
MSDOS.SYS, in Explorer and make sure all four of the boxes under
"Attributes" are checked.
If you used the ATTRIB
command from a DOS-window prompt to remove the Read-only, System
and Hidden attributes, then you should use the following command from
a DOS-window prompt again:
C:\>attrib +r +s +h
msdos.sys
You can now reboot your system to view the Windows
Startup Menu.
 |
If you changed the Logo line under [Options] to: Logo=0, then you'll no longer see this screen at boot-up. |
Logow.sys and
Logos.sys
Step 3 Making Sure You can see the
DOS Prompt after Shutdown!
NOTE: Again that trying to
carry out Steps 3 and 4 under Windows 98, will cause problems!
The two screen images below are what you would normally see after using the
Shut Down... Windows selection from the START button.
( Many new computers today, however, have an auto shut-off feature
which means you'll never see the second screen shown below. If this is
the case, you'll need to consult with your vendor to learn how this can be
disabled; or if possible, triggered by some other command. If you happen
to know any details about how these types of computers power down
automatically, please write to me. )
 Logow.sys |
 Logos.sys |

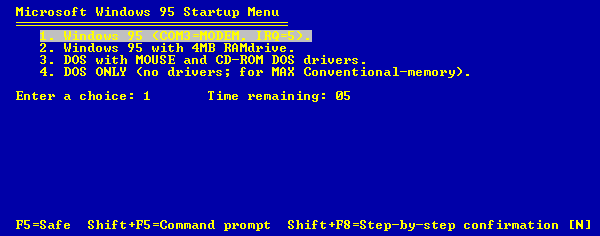
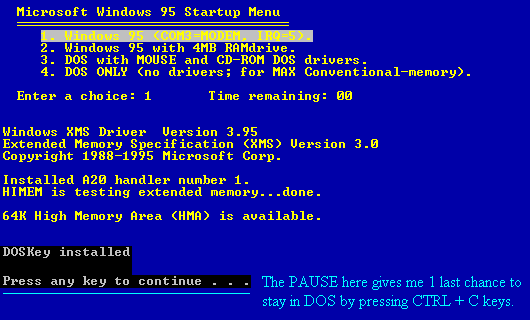
Step 4
The Menu System
When Windows 95 first came out, many people
who wanted the option of booting to DOS simply used just The Windows 95
Startup Menu to boot either DOS (#6 'Command prompt only ' above) or
Windows (#1 'Normal ' Windows boot) at power-up. By creating
a second menu using the file CONFIG.SYS, you can have any number of
specialized options for both DOS and WINDOWS
at Startup! Here's a fairly simple one that 1) Continues booting into
WINDOWS normally or 2) with a RAMDRIVE or 3) Installs mouse and CD-ROM
support for a DOS session, or 4) Boots just DOS alone:
Click here: to see a copy of a CONFIG.SYS file that includes all the info you need for creating various colors; I prefer yellow text on a blue background myself!
You can now reboot your system to view the new Personal
Options Menu.
Again, if you have any comments or questions about
using a menu system, I'd be glad to hear from you. You can send me an email
using this online reply form
(opens in a new window).
Microsoft is a registered trademark, and the Microsoft
Windows logos and screens are trademarks of Microsoft. The phrases
"Windows 95," "Windows 98," "Windows NT," etc.
may also be trademarks of Microsoft. All other logos or trademarks are owned
or are property of their respective owner or owners.
Although I do
try to help those in need when time permits, I am not responsible for
any damage which may be caused by any software or information that you view
or download from this web site, nor for any information obtained from or
regarding the personal descriptions or opinions of others on pages that may
be accessible from this page.