Face and Hair


First off, it should be obvious if you look at several of my illustrations of the same person, that I don't really maintain a true likeness of an individual. What I do is copy the face on whatever starting image supplies a particular pose. There are a few things that can be done to make multiple illustrations look more compatible, but they are minor tweaks that are done incrementally, not real fixes. For example, you can make a chin a little more pointed than the original model, and so on.

On the other hand, limited talent is its own reward in this case. If you make ALL the faces look much the same, because you only know how to do noses one way, or lips, or eyebrows, and so on, then . . . I guess it's good enough, because that's all I do.

I've used two other sketches to illustrate this instead of Xora in her gown. The sketch showing the face is one I'm working on now, and I had some intermediate steps available. The one showing the transformation of hair is the original from which the hair style for Xora was selected.


Why mess with a pretty face?


On the left is the face portion of a photo, blown up to 4 times the size of the original. In fact, I often work at 8 times normal size in order to change individual pixels. That's one of the advantages of computer drawing. The other is that no matter how many times you erase something, the drawing never gets smudged. Finally, with most graphics programs, you can do color replacements, allowing you to use some distinct, contrasting color during a working stage, then replacing it with a more blended color when the shape is correct. That's the biggest reason I stick with .gifs. With them, I can get exact color replacements.

Below the blown up sketches, are the 'normal' sizes of the working sketches, plus one that shows finished hair (and the top of her costume). Things that look pretty uneven at the blown up size look a bit better at the final size.

On the right is the same image, now redrawn with the limited color palette I use for my sketches. As you can see, it is basically just copying over as closely as I can, using the standard colors I have available. That might seem like a waste of time, but when I work on the things that *must* be changed, leaving a portion like her face as it was in the original will look very incompatible. It is at this stage the the image changes from something that looks 'real' (a good painting or a photograph) to something that looks like a comic book, and for much the same reason - a limited selection of colors.

This doesn't always work exactly, due to the limited resolution and colors. This particular original had a very strong light source from the model's right. Trying to capture the shine on her nose just didn't work (at least, not to me) so I ended up adjusting that a bit (and I'm still working on this sketch). In addition, shading variations that are apparent on the model need to be merged into fewer gradations, another aspect of the comic book look.

There are a few changes that can be made to improve it, though. This is in part where you can make dissimilar originals look more like the same character. First, I have made her eyes a little larger, and outlined them more distinctly. As long as they are looking in the right direction (copied from the original), that can be adjusted without looking wrong. Keep the symmetry as good as you can, meaning if you make the eyelid one pixel higher on the left eye, do the same on the right. The same applies to eyebrows, which can also be arched just a bit more (or less) or made heavier (or lighter) than this particular original image to match other images you have already used.

Also, at this stage you can fix the eye color and lip color to whatever you're using.

This shows a bit of the 'trick' of color replacement, taking advantage of a limited color palette. Contrasting colors that stand out against the 'real' image are used during the working transition from the original to the final. In this sketch, I have used purple to start defining her hair. Later, anything that is not purple (within the limits of her hair) will be made white (one lock shown that way at this stage), then filled with the color you desire. Finally, the purple lines in her hair are changed to something compatible. In fact, even 'black' hair includes several colors to give it shape (I use black and three blues). Blonde hair is even more complex, which I'll get into later. You can just see a bit of the colllar of her costume in the enlarged image, showing red and yellow and other high-contrast colors. In the normal size image, those are replaced with the colors of her uniform. This allows you to try different combinations, too. She could have been a redhead in a green suit just as easily.


Hair - that was why I started all this.!


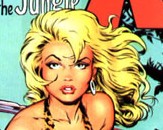
The image on the left is from a Dave Stevens comic book cover of Sheena. It has wonderful energy, but it also provides a lot of shape despite using relatively few colors. Sometimes comic book art is a good starting point for comic book sketches (well, Duh!). You'll see that hairstyle on several Xora sketches, though it evolved a little as well. It is, however different from the very smooth look of the Olivia image I used for the basic pose. To transfer it, key features need to be redrawn since the scale and pose won't allow a straight cut and paste.

The key features include things like the lock on her forehead and on her cheek, the part, the wavy, complex shape to the mane, and the curls at the end. Notice how the locks taper continuously toward the ends. Even those in the mane do that, though others fill in behind so that the fan of her hair stays constant in width (height in this angle).
Also, regions of the hair show a 'family' relationship, not rigidly parallel, but variations about a common aspect. For example, the lines defining her hair as it comes from the part all curve up and over with a similar shape, yet no two lines are exactly parallel. This similar-but-not-identical set of lines shows a hair 'style' yet retains real-world variability - adding life and energy.

On the right is the finished design of Xora's hair (used in another pose, but it was what set the hair style). As you can see, her hair is a lot longer than Sheena's as interpreted by Dave Stevens. The ends of a hairstyle always look distinct, so what I did was cut the ends of Sheena's hair and paste it in further away, then fill in between. This is done by drawing it freehand, but following the 'rules'. All locks continuously taper to the ends, with more showing behind as any individual ones terminate. Lines are always curving, and 'families' of lines curve in similar but not quite parallel ways, which provides the tapering look. Since this is blonde hair, there are actually 8 colors (instead of the 4 I use for black hair), but that complexity can always be 'lost' later so working in blonde first provides the most options.

Now that her face and hair are finished, on to Clothes.