
Sierra Middle School
Riverside, California
(951) 788-7501
Mr. J. Myers
Art Teacher
[email protected]
http://www.rusd.k12.ca.us/ourschools/sms/
| Home |
| Parent Letter and Information |
| Classroom Rules |
| Grading |
| Extra Credit |
| Links of Special Interest |
| 7th Grade |
| 8th Grade |
Family Crest
Goal: The student will create a family crest that displays their interests and hobbies using pencil in the rough draft mode and a final “good copy” in felt pen. There is an option to do additional work using colored pencils which the student may choose to do on their own keeping in mind color blending and smooth pencil work. The student will always carefully compare their work with that posted in the room and with any other research of comparable artwork to see areas in need of further attention.
Materials:
9” X 12” newsprint pencil sources of shield shapes
9” X 12” white paper felt pen paints and/or colored pencils (optional)
Steps:
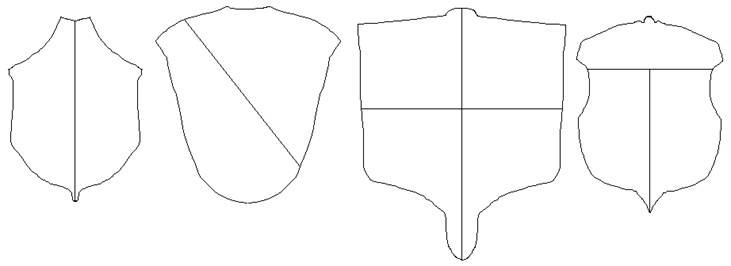
1. Draw 10 quick 1” shield shapes. Vary the tops and swap bottom shapes. Be creative!!
2. List all of your hobbies and interests. These can be “likes” if you have no hobbies.
3. Draw icons, or logos, for each item in #2 above. Be simple. It may be only an outline, or it may be filled in. The more shapes you have to choose from, the more fun the project becomes. Why not draw several different ideas for one hobby?
4. Draw ribbons. See attached directions.
5. Place your last name, in capital letters only, neatly on the ribbon.
6. Select one shield shape and draw it to fill the vertically aligned newsprint.
7. Divide the shield into major and minor areas. Two areas minimum and 4 or 5 areas maximum.
8. Decide on where the ribbon will go. Will it be above, or below? Will it wrap around the shield? You may have to reposition the ribbon from the previous step.
9. Add vines and leaves? Does this interest you? If so, plan to have this extra material placed BEHIND the main subject. Some may overlap the front, but not by much!
10. Select 3 to 5 items from the lists in step 3 and place them on the shield. Be aware that if they are too large the entire shield will look cramped for space. Care should be taken in placing the items. Why not make the most important item the largest, or at least place it in an important position?
11. Now that you have your idea planned IN PENCIL, go over it all and make corrections.
12. Using a felt pen, darken in the lines to be traced.
13. Show the teacher and receive your “good paper”. Carefully tape the rough draft onto the back of the final paper. Trace it using the felt pen.
14. Apply you full name, then date, THEN period number onto the lower, back, right-hand corner of your work IN PENCIL.
Grading Rubric
A Leaves and Vines
Name in CAPS
Crest (shield)
3 – 5 hobbies
Time was spent wisely. Not only that but you understand the project so well
that you can help others achieve this high level of understanding too. Well done!
B Missing the fine details. (That means that it is somewhat sloppy)
But hey, it is all there and time was spent wisely. You can tell others how to do
this project but don’t quite understand everything.
C Missing items from an “A” work of art. Some part of your work is not up to what
it should be. You are an “average” student. You would be hard pressed to teach
another student what to do. You could tell them but that would be about it.
D Poorly done, but you did try most of the time. Your time was spent somewhat wisely,
to tell another what is going on would tax you to the point of having to say that you
are sorry, but you can’t help them much.
FAIL You did NOT do what you needed to do and time was not spent wisely at all.
You were given chances to fix your work and/or get help and chose not to do so.
You do not understand what is happening or else you have chosen not to do the work
even though you do understand it. You have made a poor choice. Remember though,
You can change attitudes and succeed. All it takes is work on your part. Don’t get mad
that the word “work” was used. “Work” is your friend; it tells you that you are
accomplishing something.
“Quitters never win. Winners never quit.”
Last updated on 18 November 2008