Go to the beginning of this article.
Remove the airbox. In order to access the valves, you need to lift the tank and remove the airbox. See the airbox page for some tips on this. In my case, I had removed the tank anyways, and I really appreciated not having it in my way while I worked. To remove the tank, it's helpful to have a second quick disconnect (dry break) to use to drain the tank, because there is no petcock on the high pressure fuel outlet. You can unplug the sender at the harness under the seat. At any rate, it's probably not necessary to remove the tank to service your valves.
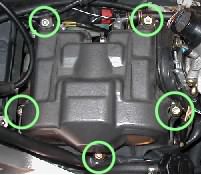
Remove the valve covers. It goes without saying that you want to be clean at this point, so wipe down any dirt from around the frame rails and underside of the tank. Anything that can fall in the motor while you work needs to be moved. There is nothing really in the way of removing the rear valve cover. The five screws come off and it's free. The front valve cover takes a bit of blind work to get at the screws, and you'll probably have to loosen the throttle body boot clamps and pop the throttle body off to get removal clearance. You don't need to totally remove the throttle body--just unseat it a bit to raise the throttle cables. On the rear cover, remove the reuseable rubber gasket with the cover. On the front, my gasket was tacked in place near the throttle body with a blob of silastic. This turned out to be very helpful, so I recommend you leave the gasket on the cylinder head if the factory has tacked yours down too.
 |
Remove five perimeter bolts to remove the valve covers. Rear cover shown here. Front will probably require that the throttle body boots be loosened too. |
Find Top Dead Center. At this
point, the cams are now exposed (enough). When you are measuring the
clearance on a valve, you want the cam lobe to be rotated completely
off the bucket. In principle, you can measure clearances anytime the
cam lobe you are working on is not in the 90 degree rotation that
faces the valve. At TDC, you can measure all four valves at once.
On most bikes, it's easiest to just remove the access plug and
rotate the crankshaft with a socket until the cylinder you are
working on is at top dead center. On the Falco, this requires
a 14 mm allen key which I didn't have. I chose to
just bump the bike over with the starter. Be careful with this
route--you don't want to start the bike and the Falco won't bump
over with the kill switch active. Any way you choose to turn the
bike over, it's nearly impossible to stop the motor at TDC with
the spark plugs installed. You need to release the compression.
I removed a plug and reinstalled it into the plug cap with a ground
lead attached between the battery ground and the plug ground.
The Falco ignition is probably not CDI, so this step may not be
necessary, but I wanted to be sure there was a spark gap to load
the coil just in case. On the Falco, the two cam lobes are facing
away from each other at TDC. If you look at the cam drive gears,
each is marked twice: once with an intake mark (IN)
and once with an exhaust mark (EX). This is because
the cam gears are one common part and are used on both cams. When
viewing the exhaust cam (the cam closest to the header pipe), only
pay attention to the EX mark. When viewing the intake
cam (the cam closest to the throttle bodies), only pay attention to
the IN mark. At top dead center, the EX
on the exhaust cam faces and aligns with the IN mark on
the intake cam. You can measure the clearances without these being
perfectly aligned. The other hitch is that on the rear head, there
is a balance shaft drive gear blocking the exhaust timing marks.
Just bring the intake mark horizontal and facing the exhaust cam
and you'll have TDC.
Measure the clearances. Slip a feeler gauge between the cam and the bucket. The range of acceptable clearances is small, so you'll probably just be able to do a go-no-go type of test. The there is a little drag on the feeler, you've got the right size. If it slides in easily, you probably have a clearance a half size looser. Of course, if the gauge doesn't fit at all, you've got less clearance than the gauge. Try to determine and record the valve clearance for each valve to the nearest half feeler size.
| 2000-1/2 Aprilia Falco Valve Clearance Specs and Measurements | ||||
|---|---|---|---|---|
| Valve Type | Valve Location | Acceptable Clearance | Front Cylinder Measurement (my bike) | Rear Cylinder Measurement (my bike) |
| Intake | Gear side | 0.005-0.007 in | 0.0045 | 0.0060 |
| Opposite Gear | 0.0050 | 0.0055 | ||
| Exhaust | Gear side | 0.009-0.011 in | 0.0090 | 0.0100 |
| Opposite Gear | 0.0100 | 0.0095 | ||
You can see from the table that I had an intake valve on the front cylinder was too tight. While it wasn't an exhaust valve, it could still be subjected to overheating. Also, I have no history so I don't know if it will continue to move before my next service interval. That shim will need to be swapped. If your valve clearances are in tolerance, congratulations. Button the bike up and check them again in 9,300 miles.
Continue to the Valve Clearance Adjustment page.
Go back to the Falco home page.