Tools used:
Phillips head screw driver (#2)
Box end wrenches and rachet wrench or nut drivers (10mm)
Sharp utility knife
Drill and bits
Allen (hex) wrench (5mm)
Ruled straight edge
Pencil
Tape or rubber bands
Remove seat (and while you're at it get rid of the two hooks -- it'll make seat removal/reinstallation a snap!).
Disconnect the two white electrical lighting connectors for the brake light to free the cowl fairing (pinch the connector and gently pull).
Remove rear cowl fairing.
Six fastener points: two hex nuts on the side, two phillips screw at back, two expansion phillips screws underneath. Pay attention to the order of washers and sleeves, and what came from where.
Disconnect the license plate bulb wiring.
Do it from the connectors under the seat, not at the bulb. The wiring pair are color coded (grn and brown) so don't bother tagging them. Pull the now-disconnected shielded wiring down and out of the way.
Remove the license frame/bulb housing. Two bolts.
Remove the rear reflector. One bolt.
Get the directional lights out of the way.
Remove the rear directional bolts, one each side. Don't bother disconnecting the wiring. Then pull each housing out a bit and bend it vertically. Use a length of tape or a rubber band to keep them vertical.
[Now is a good time to remove the ugly side reflectors. These are riveted on. Take a drill bit (size smaller than the rivet head), press the black plastic mounting down a bit to get perpendicular access, and gently drill through the rivet head (from above). They'll drop out easily.]
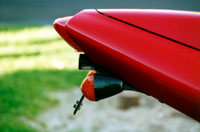
Measure twice.
Use a sharp pencil to draw your cut lines. You can cut exactly seven inches off the fender, as measured from the bottom of the stock fender. Anything more than that will not be of benefit if you intend to reuse the stock license frame and bulb housing, or you might run into clearance problems or get ugly results. A 7" cut will keep the taillight from touching the remounted license light housing (when you later put it all back together; there will be a small but eye-pleasing gap: 1/3").
Cut once.
You'll get the cleanest cut with a utility knife and a new blade. Better than a sabre saw, hack saw, or Dremel (this is pretty soft plastic). Use a steady, careful hand to make the cut (I did it w/o a guide -- you might come up with a different method). Do the sides first, then the back. A careful cut is important! Good lighting helps. Trim any ragged pieces as necessary.
Make a new access hole for the wiring.
Using drill bits, measure the size of the hole in the stock fender where the lic plate wiring runs. Using that size bit, drill out the hole where the rear reflector was previously secured. This location will hide the wiring nicely. BE CAREFUL. The bit will grab the plastic and go through quickly. You do not want to drill anything but the fender!
Fashion a mounting support for license light housing.
Retrieve the lopped off fender. Make a rectangular cut around the thick middle section with the two holes where the license light housing previously secured. This piece will go behind the newly trimmed fender to provide solid support for the license light's new location. You do not have to be very neat here. A hack/sabre saw or Dremel will be speedier. The piece needs only to be about 1" x 2-3" (mine was 1 1/4" x 2 1/2").
Locate the license light and drill holes.
Place the housing such that the bottom of the new fender lines up close to the bottom of the housing and center it. Get it the way you like it and pencil the drill points. Drill the same size holes as those in your fashioned mounting support (they need to be big enough to allow the housing bolts' collar washers to fit). You can use your fashioned support as a guide to make accurate holes.
Secure housing.
Placing the flat side of the fashioned support behind and against the fender, line up the housing and support and insert the collars and bolts. Straighten and tighten.
Run the license bulb wiring through the drilled hole made in step 11. Reconnect brown-to-brown, green-to-green.
Put it all back together.
Nothing hard here. Just reassemble: Rear directionals first, cowl fairing electrical connectors, fairing fastener points, and seat.
Step back and enjoy the result! (And then clean up.)
