
VIDEO GAMER X BUILDS THE ULTIMATE PC (CONTINUED)
READ BEGINNING OF ARTICLE
Now, as I said at the beginning of this article I will make a PC, but I will be making a Cadillac of PC's. This will be a gaming PC, but it will certainly be all purpose and become the nexus for all the PC's in my house. Hard Drive upgrades will take this puppy up to 1 Terabyte someday. I will probably be one of a few elite home computer owners that has a Terabyte machine.
THE CASE - Of course I'm going to need a good foundation to build on. Thusly, I needed a case, but not just any old generic creme colored case would do. I scoured the internet in search of my case and sure enough I discovered sites about "modding" cases and towers to look truly impressive. This is a new thing, and not many people are doing it, but I gather that it will catch on with the prices of PC components bottoming out, more money can be spent on the asthetics of the unit now. Some major companies that produce modded cases are CoolerMaster and Lian Li, most of these are Mid-Towers with room for extra fannage, and a cool see-thru window on the side. But no, I didn't want to stop with just one see through window, rather let's push the envelope and get a tower with TRIPLE windows. This was a tough find, and I only found one site with a case that had triple windows, on both the sides and top. Thanks to the guys at CircoTech for supplying Video Gamer X with a kick ass PC Tower that any other PC towers will cower in subservience to. *grins devilishly*
HERE IT IS
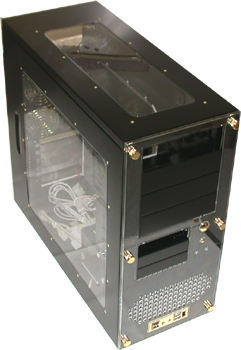
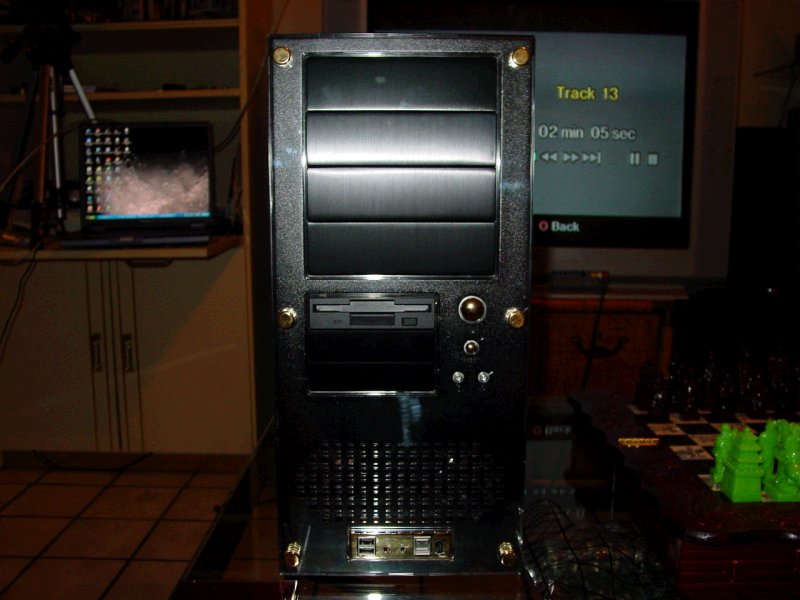
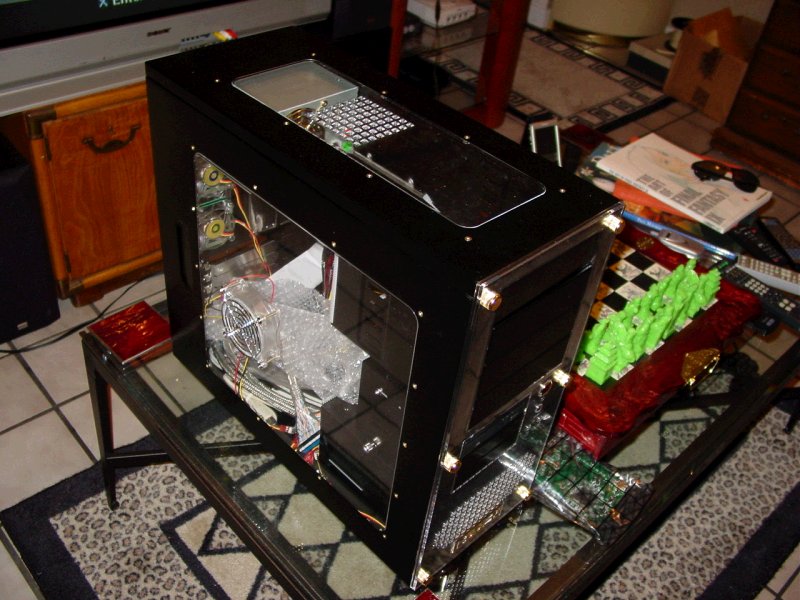
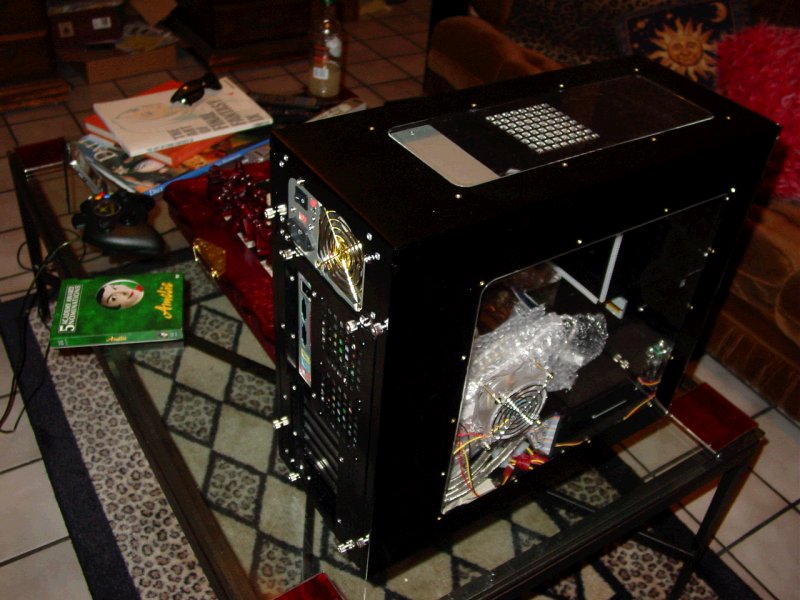
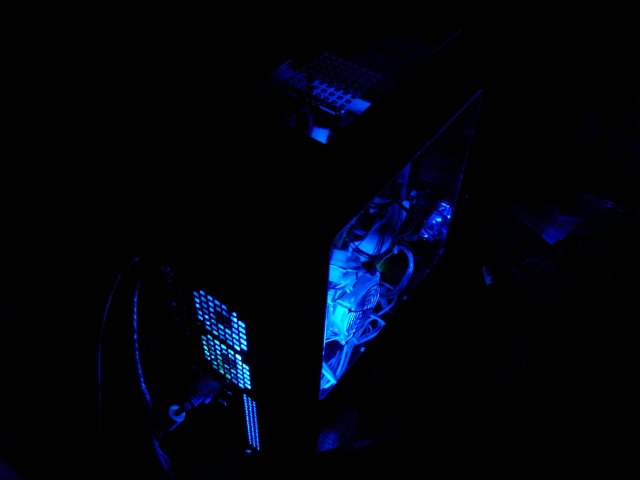
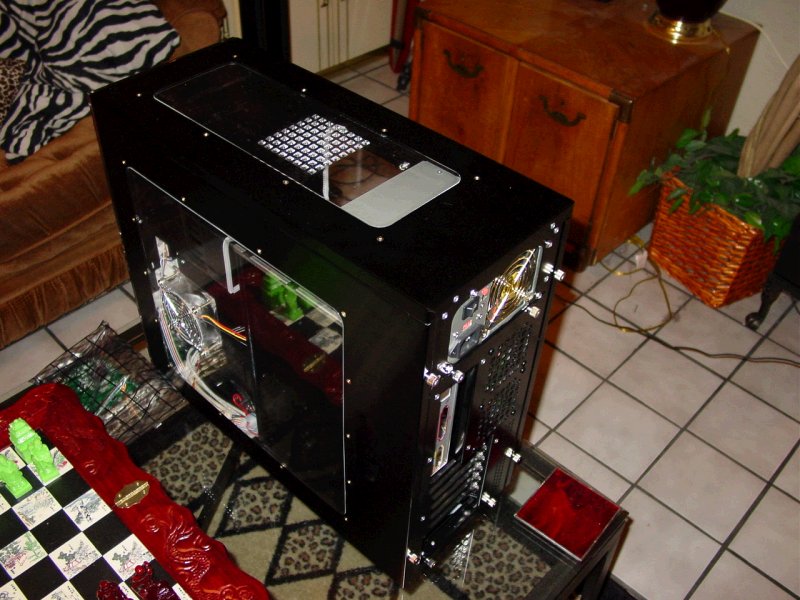
This is a Mid-Tower ATX Case in Black Aluminum with Triple Plexiglass Transparent Panels on the sides and top of the Case, the front USB Panel is gold plated, the thumbscrews are gold plated, the front is covered in a plexiglass coating with gold screws. The rear fan grilles are gold plated. There are four 5 1/2 Bays, and five 3 1/4 bays, three visable, two inside. Their rig came as you see it, but I made a few modifications. I added a 520 Watt Triple Fan Gold Plated Power Supply. I added a Black Floppy Drive (for nostalgia's sake) with a blue LED. The Hard Drive Activity light is a bright blue that casts a fan of blue light out from the front of the case, the Power button is "mystery purple" and I added 5 Extra fans, some translucent, with lights built into the blades, mostly blue, and two green ones in the rear. I added a Sound Activated Blue Lightsabre Cold Cathode in the bottom to case an eerie glow to the interior of the case and refract off the plexiglass.
UPDATE:It Arrived!
My customized ATX CPU case arrived via UPS today. Yippie! Here's the Pictures.
See More Pictures of Case...
SIDE/BACK VIEW
FROM FAR AWAY
FROM FAR AWAY 2
Okay now that I have the case out of the way, I can focus on the interior components of the PC. These are the things that will actually make my pretty box functional.
THE MOTHERBOARD - Obviously I'll need one of these. For sure I want to go with 533Mhz Bus, RAID, 8X AGP, Serial ATA, etc. I've found only one ASUS board like this, and I always have so many fans of AMD saying, go with AMD, and others saying use RAMBUS, but the board I was shown has these specs except it's using DDR RAM, which is probably fine, but I checked out a gaming site that ran a board that had a 2.53 Ghz Intel CPU with RAMBUS 1066 RDRAM and it outclassed the Athlon XP 2600+ by a pretty good margin on various benchmarks. As of 8/31/2002 I'm still looking for the perfect and sweetest ATX board I can find. So far no one has this ASUS "P4S8X" Motherboard anywhere.
UPDATE 9/9/02 - Dead in the water. Still no motherboard or processor, I called three companies locally for the board I wanted, and no one had it. I went to one place and they said they would order it and call me back, they didn't.
UPDATE 10/17/02 - I finallly found the mother board I was looking for on a website. It arrived in the mail today, and I started putting the tower together. It came with the Intel 2.53 Ghz processor already mounted into the 478 Pin socket, with the heatsink and cooling fan installed. It came with a pile of cables, and extra FireWire and USB ports.
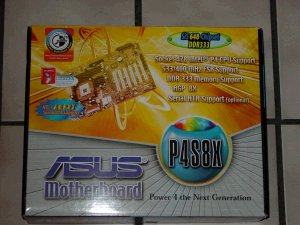
CLICK ON THE MOTHERBOARD TO SEE IT OUT OF THE BOX
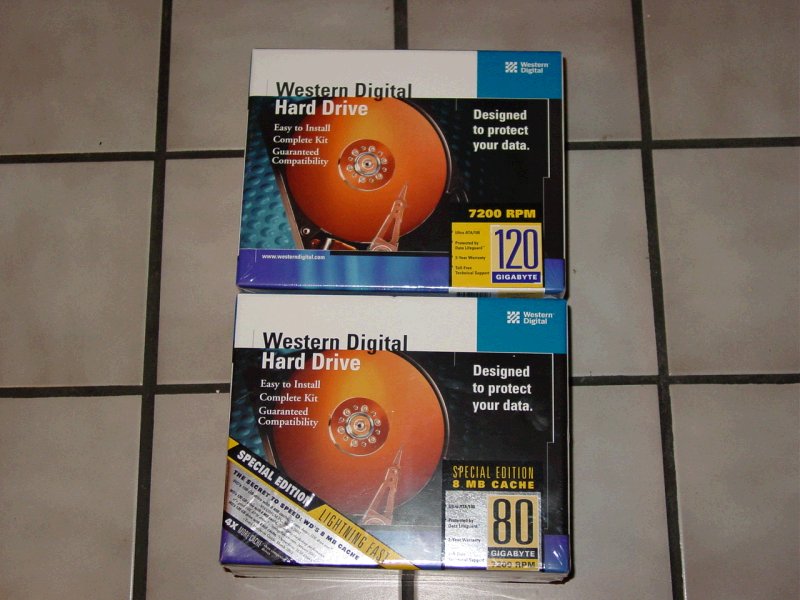
HARD DRIVES - I decided to go with Western Digital because I want to have the most reliable quality and a good three year warranty. I bought 2 Drives so far, a Western Digital 80 GB Drive ATA100 UDMA 7200 RPM with an 8 MB Cache which I intend to be my primary Master drive, and for now a 120 GB ATA 100 UDMA 7200 RPM as the first Slave drive. I have round IDE RIbbon cable instead of that cheezy grey ribbon cable they gave me with the drives. I got a pretty good deal on these guys, and intend to get a few more. I wanted a 120 GB with an 8 MB Cache, but they didn't have that drive that I could get my discount on. This will have to do for now until they come out with 200 GB's with 8 MB Cache.
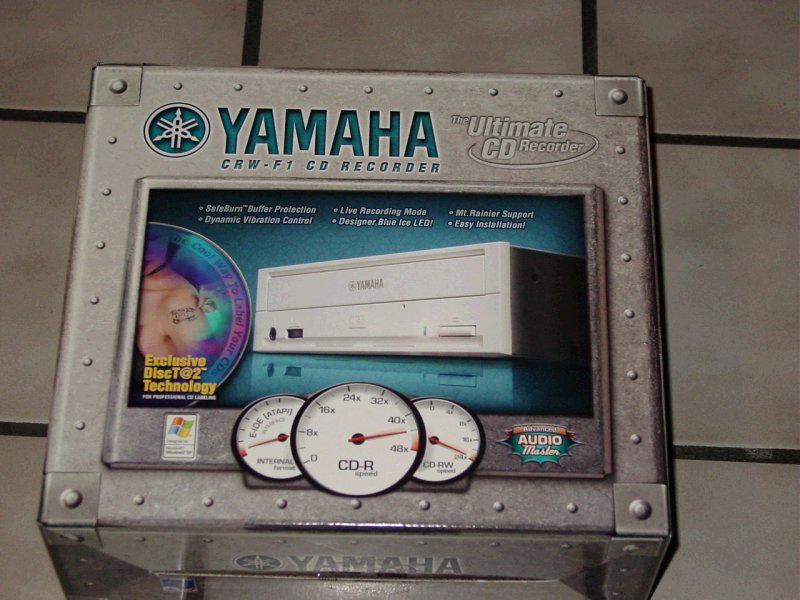
CD-RW DRIVE - Most CD-RW's are pretty generic, I think the fastest you can buy right now is 48x. I was really looking for something that stands out from the rest and I found it with the Yamaha CDW-F1. Officially it's a 44x24x44x. According to the specs it has an 8MB Buffer, Dynamic Vibration Control, Full-CAV Recording, 24X Re-Write, 44x Read, 44x Audio Ripping, Safeburn Buffer Management System, Underrun Protection, Flash-ROM, Silent Operation, Advanced Audio Master Quality Recording System, Mt. Rainier Recording, Purephase Laser System, and CD Text Support. My favorite feature is the DiscT@2, which allows me to ENGRAVE images and text directly onto the CD writing surface to create refractive/reflective imagery on the surface of the disc! Bad ass! It has a blue drive access light to compliment my overall blue lighting scheme on the PC. I'll have to paint the drive black though, since it's that eggshell color.
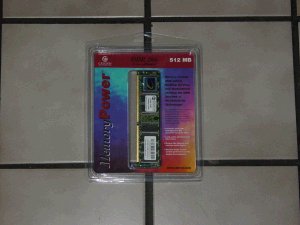
RAM - Since the Motherboard I'm gettng supports DDR RAM, which stands for Double Data Rate, if you didn't already know, I figured I would try to find the largest amount that was reasonably priced. As it turned out, I was able to get 512 MB at a good price, I would have perfered DDR 2700, but this stick will do for now until I can get three 1 GB DIMMs of DDR 2700 for this machine.
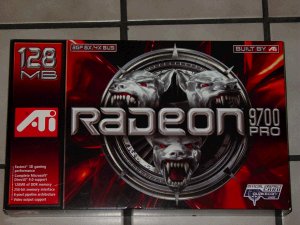
GRAPHICS CARD - Perhaps to a gamer, especially a PC gamer, the most important part of his computer is the Graphics Card, and I did a lot of research on this. I read over reviews of the Nvidia Geforce4 Ti4600 and of course this Card was very awesome, however I knew that ATI had something up their sleeve and sure enough, there was a card that intregued me, the Radeon 9700 PRO, a 128 MB DDR 8x AGP card, with a lot of new technology built on board. Currently there are no boards on the market that support 8x AGP, so I figured I would wait until the Radeon 9700 PRO debuted.
UPDATE 10/09/02 - I got the Radeon 9700 PRO Graphics Card, at a pretty good deal, a lot lower than it's $399.99 retail, so I'm happy. To give you an idea of how powerful this card is, here are some of the specs: First and foremost it uses 128 MB of DDR Ram on board, 256-bit memory interface removes hardware performance bottleneck. It uses 8 pixel pipeline architechture. Supports the new 8x AGP standard, providing a pipeline of 2.0 GB/sec to the PC. Supports Microsoft Direct X 9.0 and the latest OpenGL. Uses SmartShader 2.0 for photorealistic effects in gaming. Smoothvision 2.0 eliminates the jaggies and aliasing without reducing performance. It has 128-bit floating point color precision. Some key features include, 8 parallel rendering pipelines, 4 paralell geometry engines, Hyper Z III Technology, Truform 2.0, Videoshader Engine, FullStream, DVD video playback, Dual monitor Support, and DVI-I Digital Flat Panel Display support. In short, this Card really kicks ass.
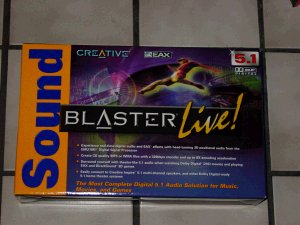
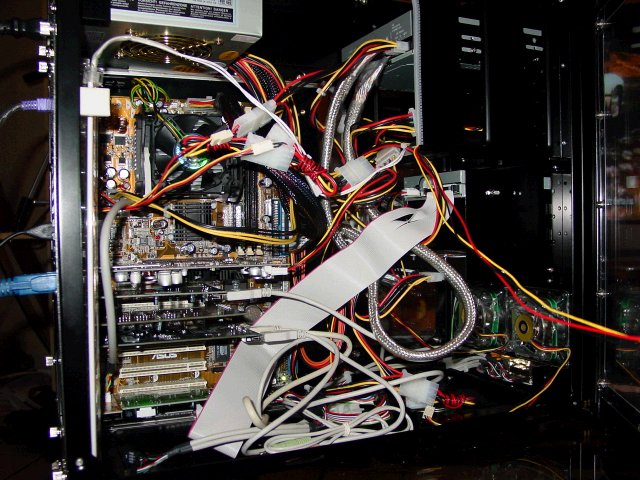
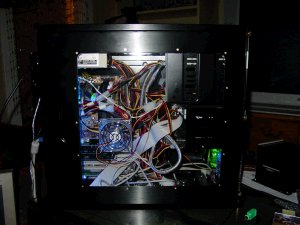
UPDATE 10/18/02 - I started construction now that I have all the basic parts aside from the DVD+/- RW and the Sound Card. For now the Motherboard has sound built in so I'll use that until I get a sound card. I mounted the motherboard to the chassis inside the case using risers to keep it from touching the metal plate behind. The processor was already mounted so I didn't need to do that. I plugged in all the power cables, and connected the leads for the Reset Button, Power Button, System Speaker, HDD LED, etc. I installed the AGP Graphics card, mounted the Hard Drive and the CD-RW. I connected the IDE and Floppy cable. The only thing that seems not quite right is that the case has two USB cords and a IEEE1394 on the front panel, and these are actual USB and 6 pin FireWire cables on the inside of the PC instead of leads with ground and voltage for the motherboard. Furthermore the front panel sound jacks are cables with 3.5 pin jacks on the interior.
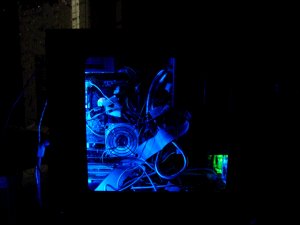
I plugged in all the fans and the light sabre cold cathode blue light tube mounting that on the left interior wall. I connected a monitor and a keyboard and booted the computer up. It worked! I didn't make any mistakes, everything turned on. All the fans inside started whirring, and the lights lit up, however I think the lighted fan configuration is wrong because there is one green and one blue fan in the back, and one green and one blue fan in the front instead of two blue in the front and two green in the back. And there seems to be a short in the part that lights the fan in the back blue. I can tap that fan and make it light up, but it goes out again.
Now that I know that the system actually works. I checked the BIOS and it recognizes all the devices attached on on the motherboard. The computer is ready for an operating system. First things first, since there is no way for the computer to operate the disks, it needs a rudimentary operating scheme. I used one of my other PC's to create a Windows Boot Floppy. With the Windows Boot Floppy in the A: drive I booted the machine up, and it recognized the disk. This allows you to type commands at the old fashioned DOS prompt. Man this brings back memories of computing on the 286 Machine back in 1991. I ran FDISK on the Drive to partition it FAT32, but this didn't seem to work out right. I used the drive's installation disk and let it install the partition for me rather than use FDISK command. I had *cough* "obtained" a copy of Windows XP Pro and a valid serial and at first it wouldn't install when I typed E:Setup, but what I had to do was type CD 386I\ and then type at the prompt WINNT, and it launched the install utility.
It took a few hours for Windows to install, but when it was finished everything worked out properly. After this I figured it would be time install the remaining components. I added a couple USB/FireWire Cards, the Sound Card, and 56k Modem. Almost every PCI slot on my PC has a hole sticking out from it now.
 _____ _____
 _____ _____
So now the PC is finished -- or is it? Actually, that 512MB of RAM is going to eventually be bumped up to 3GB, and 200 GB Hard Drive space total is just the beginning. Eventually I want to have 200 GB each Serial ATA Drives. I will probably be adding a front mounted temperature and speed guage in one of the 3.5" Bay or the 5 1/2".

BACK TO VIDEO GAMER X
|
