 |
| PROJECTS |
| "Regular" & "Goggle Type" Blind Fold |
| 2 Types of BLINDFOLDS that can be made at home. |
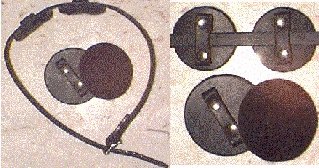
| Goggles Blindfold The 'goggles' design is so called because it looks like a pair of swimming goggles. Again, the design is fairly straightforward. A nice feature is the ability to make multiple sets of eye patches in different sizes for use with the same head strap. Difficulty: Easy Tools Utility Knife, Punch, 1" Oblong Punch, Edge Beveler #2, Rivet Setter, Scissors, Strap-Cutter (optional), Skiver (optional), Eyelet Setter and Anvil (optional) Parts Checklist Long and Medium Rivets �" buckle (1) Felt Lining 3/16" Eyelets (optional) (3+) Leather Checklist Head Strap: X+4" x .5" Eye Patches (2): ~3" x ~3" Eye Patch Straps (2): 3.625" x .5" Steps 1 - Measure Measure the circumference of the target head loosely, across the eyebrows and above the ears. Add about �" to accommodate the eye patches and you have X in Diagram 1 below. You can measure from the eyebrow ridge to the top of the cheekbone for a good eye patch diameter, although you may want to experiment. 2 - Cut Leather The best way to cut the eye patches is to find something solid of approximately the desired diameter. Likely candidates are cups, glasses, and steel washers. Anything round. Failing this, you'll have to either draw the circle freehand or with a compass, and cut freehand. If you find a good object to cut around, hold it firmly on the leather and make several light passes around with a utility knife. When cutting freehand, I prefer a heavier initial cut followed by several light cuts to make it all the way through. Obviously, you need two leather circles. Next, you need a �" wide strap, X+4" long. You might want to leave some excess for now, since it is easier to take more off than put some back on! I recommend using a skiver to thin the strap leather to about 2/3 of its original thickness. This will allow the buckle to operate more easily, as most �" buckles are not intended for leather this thick. Finally, two retaining straps are required. These are simply �" by 3 5/8". 2A - Skive strips (optional) If you own a skiver, you may want to skive both straps to make the buckle operate more smoothly. Just thin the strips by about a third. 3 - Finish Edges Bevel all edges of the primary strap, the tops of retaining straps and the top both eye patches. 4 - Punch Attachment Holes Punch the holes indicated below in both retaining straps. Also, punch two holes in each eye patch, each 9/16" out from the center along a line. These holes end up 1 1/8" apart and line up with the middle holes in the retaining straps. 5 - Secure Retaining Straps Use two long rivets to secure one retaining strap to each eye patch. The ends fold under as shown in Diagram 1, leaving a rectangular slot through which the primary strap may pass. 6 - Glue in Lining Since the blindfold will rest against the sensitive skin of the face, a heavy felt or fur lining is recommended. Cut two pieces slightly larger than the eye patches and place them inside-down on the work surface. Apply Fabri-Tac or similar glue to the first eye patch, making sure the edges are well covered. Starting at one end. Lay the glued area down onto the lining while applying firm pressure. Once in place, press firmly on the eye patch for a few seconds. Repeat with second eye patch. After the glue dries, trim the excess lining off with a pair of scissors. 7 - Punch Buckle Holes Punch the four round and one oblong holes indicated in Diagram 1 in one end of the primary strap. 8 - Secure the Buckle Use two medium rivets to secure the buckle to the buckle strap. 9 - Punch Belt Holes Thread the primary strap through both retaining straps and position them appropriately. Use the target head to decide the right location for the belt holes. Mark the desired length, then punch one or more holes at which to buckle. Optionally, you might want to reinforce these holes with 3/16" eyelets. 10 - Shape Strap End You probably don't want a square end on the belt strap. Shape it as desired. Round, pointed, whatever. Bevel the edges of the new point. 11 - Finish Edges Apply Edge Coat to all edges of the piece. Goggle Blindfold Diagram 1 |
 |
 |
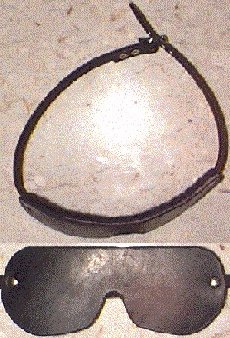
| Regular Blindfold While a scarf or bandanna can serve as a blindfold and knotted towel works admirably as a gag, leather is sexier, isn't it? Blindfolds and gags are generally easy projects, and make nice additions to a leather collection. This first blindfold project gets its name from the great book Screw the Roses, Send Me the Thorns by Miller and Devon. There are lots of steps, but most are really easy. Difficulty: Easy Tools Utility Knife Punch 1" Oblong Punch Edge Beveler #2 Rivet Setter Scissors Strap-Cutter (optional) Skiver (optional) Eyelet Setter Anvil (optional) Parts Checklist Medium Rivets, �" buckle (1), Felt lining, 3/16" Eyelets (optional) (3+) Leather Checklist Front Plate: ~7" x ~3.25" Buckle Strap: ~12" x .5" Belt Strap: ~12" x .5" Steps 1 - Measure Measure the circumference of the target head loosely, across the eyebrows and above the ears. This is X in Diagram 1 below. Also, measure from temple to temple across the eyebrows. This is the width of the front plate, and should be about seven inches. 2 - Cut Leather Cutting the front plate well is the most challenging part of this project. Ideally, you should make a cardboard template, the width of the second measurement above and about 3 �" high. Fold this piece in half for all cutting to keep the piece symmetrical. Cut the template down a little bit at a time, holding it against the target face until you get the right fit. Now, use a felt-tipped pen to transfer this shape to a suitable piece of leather. The top of both template and leather should be straight, and matching these eliminates some cutting. The rest of the cutting must be done freehand. Use a shallow stroke initially, and make several passes to cut all the way through. Next, you need two �" straps, one for each side. The respective length of these straps determines where the buckle lies when the blindfold is on, which are mostly a matter of personal preference. The total length of the two straps will end up at about X - 1 �", given a seven-inch front plate, one inch overlap with the plate for each strap, two inches of fold-over for the buckle, and an excess 1 � inches for the tongue of the belt. Neither strap should be extremely short, and leave some excess at this point. I recommend using a skiver to thin the strap leather to about 2/3 of its original thickness. This will allow the buckle to operate more easily, as most �" buckles are not intended for leather this thick. In cutting the straps, just estimate the desired location for now, and be sure to leave 3" or excess length on the buckle strap and 2 � inches on the other end (this includes and inch on each for overlap). 2A - Skive strips (optional) If you own a skiver, you may want to skive both straps to make the buckle operate more smoothly. Just thin the strips by about a third. 3 - Finish Edges Bevel all edges of the both straps (although at least one of them will be shortened in a moment) and the top of the front plate. 4 - Punch Attachment Holes Punch the attachment holes. One �" back from one end or each strap and two on the front plate. The latter should be �" back from the edge and high enough to rest above the temples. 5 - Secure Straps Use two medium rivets to secure both straps to the front plate. The ends of both straps should be under the front plate. 6 - Punch Buckle Holes Now it is time to decide where the buckle should end up. Hold the piece up to the target head and decide. Cut off the buckle Strap Square, 1 3/4 inches longer than the desired buckle location. Punch the four rounds and one oblong hole indicated in Diagram 1. 7 - Secure the Buckle Use two medium rivets to secure the buckle to the buckle strap. 8 - Punch Belt Holes Again, use the target head to decide the right length for the other belt strap. Mark the desired length, and then cut this strap square, 1-� inches longer than the desired location. Punch one or more holes at which to buckle. Optionally, you might want to reinforce these holes with 3/16" eyelets. 9 - Shape Strap End You probably don't want a square end on the second belt strap. Shape it as desired. Round, pointed, whatever. 10 - Finish Edges There are two areas that need to be beveled at this point - the shaped end and the folded end by the buckle. Bevel these edges and apply Edge Coat to all edges of the piece. 11 - Glue in Lining Since the blindfold will rest against the sensitive skin of the face, a heavy felt or fur lining is recommended. Cut a piece slightly larger than the front plate and place it inside-down on the work surface. Apply Fabri-Tac or similar glue to the front plate, making sure the edges are well covered. Starting at one end lay the glued area down onto the lining while applying firm pressure. The best way that I can think of the describe this action is to 'roll' the leather down on the lining. Once in place, press firmly on the front plate for a few seconds. After the glue dries, trim the excess lining off with a pair of scissors. Regular Blindfold Diagram 1 |
 |
 |

|
| Diagrams are NOT to scale here, but can be downloaded so you can save and/or modify to you needs. |