|
Teak
Wood Frame Tutorial |
 |
|
Teak
Wood Frame Tutorial |
|
|
Here is a simple Teak Wood Frame with Gold Font Corners for you to make and add to your
PSP Frames collection. This tutorial involves the use of layers and the instructions are set
out so that it is very easy to follow. Please choose a photo that you like, or perhaps a graphic of a scene that will look good under your Frame. This tutorial was designed in PSP 6.02 and can be completed in other |
| Level of difficulty: Beginner |
|
|
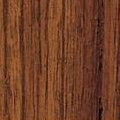
1. Save the "Teak wood" image to your hard drive by right clicking on it and save it
in a folder where you can easily retrieve it.
2. Click on the "Color Options pallet." |
 |
| 3. I have included an image on the right showing the layers pallet for illustration purposes. | 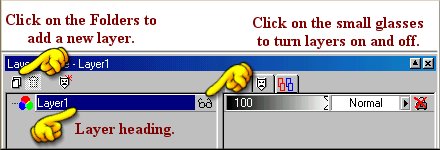 |
|
4. Open new image, width="300" height="350", 16.7 million colors, Transparent. We need
a "Transparent" base layer for our final PSP Frame.
5. Click on the "Layers Option Pallet." 6. Click on the "Flood Fill Tool" 7. Open your "teak wood" graphic." |
|
|
8. Return to your main image. Add another layer and name this new layer "Border."
Click on the "Flood Fill Tool" 9. Left click on the "middle tab" of the "Tool Options pallet" and scroll down until you find the "teak wood" image. 10. Left click on the "border layer" of the main image and the "Teak wood" pattern will flood fill this layer." |
 |
|
11. Go to "Selections/select all." The "Marching Ants" will surround the outside of the
Border image.
12. Go to "Selections/modify/contract" and when the "Options box" pops up, type in contract by 20. Click Ok. The "Marching Ants" will move in by 20 pixels from the outside edge. Hit the "Delete key" and the center of the teak wood will disappear, leaving the white color showing through. Deselect by going to "Selections/select none" or by pressing the keys "Control+D" together. |
 |
|
Now would be a good time to save your work and save it often so that you do not lose
all your hard work if anything should go wrong.
Go to "File/save as" and save your work as "teak_frame1.psp." Make sure that you save it in the ".psp extension." |
|
13 Click on the "Magic Wand Tool," 14. Go to "Selections/invert" and the "Marching Ants" will now surround the Teak wood "Border." 15. Go to "Image/effects/inner bevel" and select the following settings. "Inner bevel"
|
 |
| Now to save your work again. Go to "File/save" and your work will be updated in the same name of "teak_frame1.psp." | |
|
16. Open a new image W="100" x H="100", 16.7 million colors, "Black." We are going to
create our "corners" using a fancy font. We need a "black background to see our work.
17. Click on the "Layers Option Pallet." |
|
|
18. Click on the "Text Tool" 19. Click on the "Mover Tool" |
 |
|
20. Click on the "Layers Option Pallet." 21. Go to "Image/flip" and the "copy of Font layer" will now appear. |
 |
|
22. You have 3 layers now. "Layer 1"; "Font layer" and "copy of Font Layer". Turn off
"layer 1" by clicking on the small glasses to the right of the "layer heading." A red cross
will appear on the "small glasses."
23. Go to "layers/merge/merge visible." You will see that now you have two layers. "layer 1" and the layer named "merged." 24. The "merged layer" heading will be highlighted in a blue color. Right click on the "merged layer" heading and in the "Options box" that pops up, left click on "Properties" and rename the highlighted heading "Corner." 25. Turn "Layer 1" on again by left clicking on the "small glasses" and the red cross will disappear. |
|
26. Click on the "Magic Wand Tool," 27. With the "Magic Wand," left click on one of the "B's." The "Marching Ants" will appear. |
 |
|
28. Go to "Image/effects/sculpture" and select the following settings. "Presets=Gold;
Size=100%; Smoothness=10; Depth=3; Ambience=0; Shininess=46; Color=white; Angle=315;
Intensity=30; Elevation=56." Click Ok. The "Corner B's" will now be a rich "Golden Color."
29. While the "Marching Ants" are still around the "Corner," go to "Edit/copy." |
|
|
30. Return to the main image of our "Teak frame."
31. Click on the "Layers Option Pallet." 32. Add a new layer and name it "Corner 1." |
| To Page 2: | To Tutorial Index: |