Door Harp Tutorial #2.

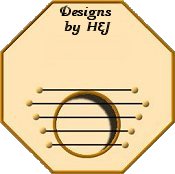
7. Add a new layer and name it "strings horiz."
Click on the "Color Options pallet." Color Options Pallet Change foreground color to Black="#000000"
Keep this new layer highlighted. Click on the "Drawing Tool" Drawing Tool and on the "pop up" option choose, Single Line, Stroked and filled, line width=2, Antialias=checked.

On this layer start at co-ordinates w=105, h=180, hold down your left mouse button down and drag the line across horizontally till you reach w=245, h=180. Release your left mouse button.

Draw another 4 horizontal lines approx. 15 pixels apart and of different lengths.
Activate the "Layers Option Pallet" Layers Options Pallet. Turn off Background [layer 1].
Go to layers/merge/merge visible. Save your work.
example at the right.

8. Add new layer and name it "toggles".
Click on the "Color Options pallet." Color Options Pallet Change foreground color to "#C59953"
Click on your "Preset Shapes Tool," Preshapes Tool open your "Tool Options Pallet" Tool Options Pallet and choose, circle, filled, width=1, antialias=checked.
Place circle on left side of first hoizontal line and draw circle approx. 10 pixels.

Activate the magic wand in the centre of the brown circle and the marching ants appear.

9. Go to image/effects/inner bevel with the following settings on the Options pallet, width=2, depth=2, Smoothness=40, Shininess=10, Intensity=67, Elevation=20, Angle=315.
click ok.
While brown circle [toggle] is still selected go to edit/copy. Then edit/paste/new selection and place second toggle on right hand end of the first line.

Go to edit/paste/new selection another 8 times placing toggels on ends of each horizontal line. Deselect.
Activate the "Layers Option Pallet" Layers Options Pallet. Turn off Background [layer 1].
Go to layers/merge/merge visible. Save your work.


10. Activate the "Layers Option Pallet" Layers Options Pallet Turn off Background [layer 1].
Go to layers/merge/merge visible.
Add a new layer and name it "Bridge 1".

Click on your "Preset Shapes Tool," Preshapes Tool open your "Tool Options Pallet" Tool Options Pallet and choose, Rounded rectangle, filled, width=1, antialias=checked.
Start at width=120 height=110, hold down left mouse button and drag across and down to width=230 height=130. release button.
11. Click on the "Magic Wand Tool" Magic Wand Tool and click on center of Rounded rectangle.
Go to image/effects/inner bevel [same settings as before]. Deselect.
Activate the "Layers Option Pallet" Layers Options Pallet. Turn off Background [layer 1].
Go to layers/merge/merge visible. Save your work.

12. Add new layer and name it "strings vert".
Click on the "Color Options pallet." Color Options Pallet Change foreground color to Black="#000000"
Keep this new layer highlighted. Click on the "Drawing Tool" Drawing Tool and on the "pop up" option choose, Single Line, Stroked and filled, line width=2, Antialias=checked.
On this layer start in the centre/left of the bridge, hold down your left mouse button down and drag the line down vertially till you reach the first horizontal string. Release your left mouse button.

Draw another 4 vertical lines approx. 15 pixels apart and of different lengths to reach the other hoizontal strings.
example at the right.
Activate the "Layers Option Pallet" Layers Options Pallet. Turn off Background [layer 1].
Go to layers/merge/merge visible. Save your work.


Back. Next.

1
Hosted by www.Geocities.ws