Navigational
Techniques
Knowing how to use your compass, or count
kick cycles, is only the beginning skills
required for underwater navigation. A
knowledge of how to use environmental features
can simplify navigation. The use of cross
bearings is essential to accurately locate
dive sites. And there are many more skills
you can use. But never fear - if you've
figured out how to use your compass you are
already 99% of the way there! This page
describes many of these techniques.
Natural Navigation:
Even though the underwater environment
tends to have limited visibility you can still
use landmarks to navigate. For example you
can use objects such as wrecks, cliffs,
pinnacles, gorges, anchor chains, reefs and
sand bars as points of navigation. Current
and waves can also provide reference points.
Sometimes entire dives can be done by
following natural landmarks (i.e. following a
wall, our the outside of a reef), whereas in
other dives natural points may be used along
with compass bearings.
Before you start your dive you should look
around the dive site for objects which could
potentially be used for natural navigation.
These include waves, sun angle, currents,
tidal movements, and offshore objects. During
your dive you can use these observations as
references. Some of these techniques are
explained in detail below.
Waves and
Current: Waves and currents are some
of the least used, yet most prevalent, markers
while diving. Generally speaking currents
will flow in one direction during a dive
(unless you dive at slack, where the currents
may change direction). You can drift with
currents (they'll carry you in the same
direction as they move), or swim perpendicular
to them. Both of these techniques can be used
to navigate. Waves also provide references.
Even small waves will disturb sand and silt on
the ocean bottom. Often this will result in a
series of ripples in the sand/silt
perpendicular to shore. So it's easy to
follow the shoreline by swimming along these
ripples.
Tides: Tides are not that useful as
a navigational aid, but knowing their
direction of flow is important for dive
planning. For example, if you are diving in a
bay the tides will tend to push you towards
shore while they flood and pull you out
towards the open ocean as they ebb. So you'll
probably want to plan your dives so that the
tides are coming in (flooding) when you end
your dive - that way you don't have to fight
the tide to return to shore.
Sun Angle: The sun angle can
provide you with a general directional
reference during a dive. Unfortunately the
sun moves throughout the day, and isn't always
visible underwater, so it isn't the best of
navigational markers. However, the angle of
sun beams, or a direct view of the sun, can
give you general directional cues. For
example you could start you dive swimming away
from the sun - that way you know if you swim
towards the sun you'll return to your start
point.
Natural
Markers : Underwater objects often
play an important role in navigation. Ship
wrecks, kelp beds, high/low points, underwater
cliffs and many other underwater objects can
provide important navigational cues during a
dive. You may follow a cliff during a wall
dive, or use a kelp bed as a intermediary
point in a dive. If you can determine where
these objects are before you start your dive,
these objects can even tell you where you are
relative to the surface.
Current:
So far the process of navigation hasn't
been too hard. Unfortunately all of these
ideas only work it the water you're swimming
in does not move. But most oceans have
current in them, so we have to compensate for
that. For long swims through high current
this is quite difficult, and requires a bit of
math.
Larry Harris has written an excellent
article on the math behind this so I'll direct
you to
his page for the details.
But dealing with currents doesn't have to
be as difficult as Larry makes it out to be.
If the current runs parallel to shore you can
sometimes guestimate how far it will carry you
while you are swimming. If you know this you
can start upstream of your your target and
allow the current to carry you to your
objective. In some cases you can use currents
to drift through a dive site. This is some of
the best diving there is - you don't need to
swim as the current carry you, so all you have
to do is relax and watch the reef float by.
Navigation on the
Surface:
Many shore dives and boat require a
degree of surface navigation to put you at the
right place. These day's boat navigation is
easy - GPS systems can put the boat within 10m
or less of the target. But what if you're
diving from shore? Here's some ways to find
your way on the surface.
Compass
bearing from a know point: Many SCUBA
guide describe the location dive sites using
bearings from known land marks. For example,
to find the reef at one of our favorite dive
sites (Henderson Point) you must swim approx.
30m (100') on a bearing of 230 degrees from a
flag pole. This type of navigation is
simple. Set your compass at the desired
bearing and start swimming. At any point you
can turn around and look at the reciprocal
bearing to determine if you are off track.
Really simple. But an even better method is
to set a reciprocal bearing on your compass
(see compass section). Swim backwards, and
use your compass to insure that you always are
on track. This works best with 2 divers - one
swims backwards and keeps track of the
bearing. The second diver swims facing
forward and looks out for obstructions.
Cross
Bearings: Sometimes you need to place
yourself more accurately then you can with a
single bearing. Usually this is done using
cross bearings. Usually the dive site
description will read "the dive site is
located on a bearing of x degrees from object
x, and y degrees from object y". For example,
let's say we're trying to find a wreak in a
bay (see figure 1). The wreak is really
small, so finding it requires more accuracy
then swimming along a single bearing, so we'll
use cross bearings to find it. On the west
side of the bay is a lighthouse, and the wreak
lies 500m WSW (240 degrees) from the
lighthouse. Dead center in the bay is a funny
looking tree, and the wreak lies 300m due
north (0 degrees) of the tree. So to find the
wreak we'll start at the tree and swim north
(0 degrees). When we start at shore the
lighthouse will appear to be north-east of us
(45 degrees). As we swim towards the wreak
the lighthouse will seem to move "southwards",
until we reach the wreak. When we reach the
wreak the tree will still be due south of us,
and the lighthouse will have "moved" to 60
degrees. If we pass the wreak the lighthouse
will appear to move further south (i.e.
greater than 60 degrees), so it's easy to tell
if we've passed the wreak. Depending on the
accuracy of your bearings and the distance to
your markers this system can be extremely
accurate, accurate to as little as 5m.
Ideally cross bearings require two landmarks,
separated by at least 20 degrees (the closer
the separation is to 90 degrees the better).
For more distant objects three or even four
landmarks can be used to increase accuracy.
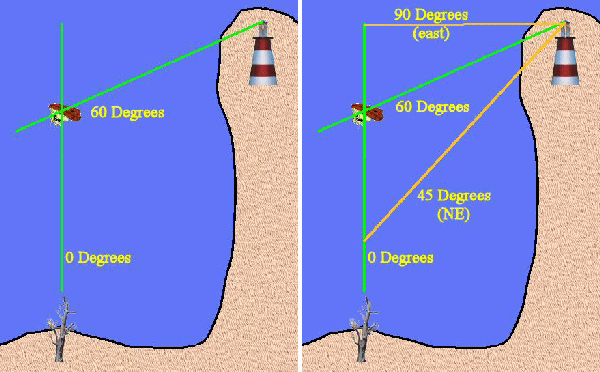
Figure 1: Cross bearings.
Left: Cross bearing of a wreck located at a
bearing of 0 degrees from a dead tree and 60
degrees from a lighthouse. Right: To find the
wreck the diver swims along a bearing of 0
degrees. When the diver reaches the boat the
lighthouse will be located at a bearing of 60
degrees. Before the diver reaches the boat
the lighthouse will appear to be between 0
degrees and 60 degrees in bearing. If the
diver passes the wreck the light house will
appear to be at a bearing greater than 60
degrees. Therefore by monitoring the bearing
to the lighthouse the diver will know if he is
approaching, at, or passed the wreak.
Object
Alignment:
It is not always necessary to have a
compass bearing to find a site. Sometimes
landmarks can be used to find an site. For
this to work there has to be 2 landmarks in
line with the site. Ideally one of these land
marks will be located a great distance away
(hill top, antenna, etc.), and the second
landmark close to the dive site. While
swimming out to the dive site you simply keep
the landmarks aligned with each other (see fig
x below). Although this system is simple and
works very well it is not good for longer
distances, simply because as you move away
form your landmarks they will appear to align
when you are off track. Good landmarks
include hill tops, towers, lampposts, signs,
unusually shaped trees,
and any other tall object which is
visible form the water. Often this method of
finding a site is combined with a bearing to
another object, giving cross bearing.
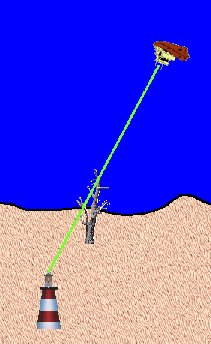
Figure 2: Using object
alignment to find a dive site.
At Night:
Surface navigation at night is more
difficult then during the day. Many landmarks
will not be visible in the dark, and it can
even be difficult to see what is shore and
what is water. The easiest method of
navigating during the night is to leave a
light source on the shore. This can be the
lights of your car, a flash light, or even a
street lamp. One trick, which takes a little
planning, is to setup your shore light in
alignment with another, more distant light.
If you align your shore light and a second
light so that they point along your desired
bearing navigation becomes simple - you just
keep the lights aligned and they''ll guide you
to your site. If one light is coloured this
is even easier, as the alignment of the lights
can be used to determine in what direction
you've moved off course.
Underwater Navigation:
Using a compass under water is much
like using one on land. You set the bearing,
and then continually monitor your compass as
you swim. this should keep you on track
towards your goal. For details on setting
bearings and general compass use see the
underwater compass
section, as well as our
page on land compasses. But it's not as
simple as that - you need to monitor more then
your compass bearing while underwater.
Monitoring depth and looking for obstructions
is also important as you move underwater.
Having a consol mounted compass simplifies
this - tank pressure, depth and your compass
are all located on the same panel so it's easy
to keep track of everything. But in some
situations it is best to work as a buddy
team. Proper use of a compass and the buddy
system are described in depth below.
Using the
compass: Unfortunately using a compass
underwater isn't quite as simple as on land.
Because we are swimming it is possible to have
the compass aligned on the correct bearing,
but swim in another direction. To prevent
this the compass must be centered on your
body, and pointed in the same direction as you
are swimming. To ensure this is the case you
can:
-
Wrist mounted compass.
Stick your arm
without the compass on it straight
out in front of you. Grasp the elbow of
that arm with the compass arm. Your arm
with the compass on it should now be bent at
a right angle with the compass directly in
front of you. By swimming like this you
ensure that the compass is centered on your
body and pointing in the same direction you
are swimming
-
Slate mounted compass: Hold
the slate with both hands in front of you.
Keep both of your elbows bent at about 45
degrees and the slate level. This should
keep the slate aligned with your body.
-
Consol mounted compass.
This is the hardest compass to align
properly. Make sure the hose is long enough
for your consol to be easily moved in front
of your face. Using both arms hold the
compass in front of you, making sure each
arm is bent equally. It is easiest to keep
your arms held properly if you tuck them
against your body. Concentrate on keeping
the consol in line with your body - if the
consol is angled you'll swim in thee wrong
direction!
Following a
Bearing Solo: If you are diving alone,
or if your buddy is not helpful, you'll need
to be able to follow a bearing on your own.
This requires a great deal of concentrations
as you must monitor your bearing, air supply,
depth and look for obstructions all at the
same time. A consol mounted compass is best
for this as it concentrates all of your gauges
and your compass in one place. You want to
continuously scan your instruments and your
surroundings as you swim. It is easiest to
pick an order for this - for example you could
look at your gauges from the top of your
consol to the bottom, followed by a look
around for obstructions. Keep in mind you
want to look completely around you - this way
if your slightly off course you sstand a
chance of seeing your target, and you'll be
able to identify potential threats that may
not lie directly in your path. Once you've
looked for obstructions go back to your
gauges, checking each one in the same order.
By repeating this you can keep a close eye on
your bearing, air consumption and depth while
remaining aware of your environment. This is
why consol mounted compasses are best for solo
navigation - if you use a slate or wrist
mounted compass you'll have to constantly
release your compass to look at your gauges.
With practice this can be a quick and
efficient method of travel.
Working as
Buddies: It is easier to navigate with
a buddy. Generally speaking when buddies are
navigating one will monitor the bearing while
the other monitors depth, air consumption and
looks for obstructions. To simplify things
well call the navigating buddy the "navigator"
and the other buddy the "commander". The
navigator lines himself up with the desired
bearing and starts to swim, with the commander
above them and holding onto their tank. The
navigator keeps all of there concentration on
keeping the course, while the commander
monitors depth, air consumption, etc on their
gauges. If the navigator starts to sink or
rise above the desired depth the navigator can
push/pull on the tank to keep the buddy team
at the correct depth. Likewise the commander
can signal to the navigator (usually by
tapping their head or pulling on their tank)
to indicate if there are obstructions in the
way. Although this sounds like a difficult
way to do things it is quite easy with a
little practice. This system of navigation is
particularly useful when moving over open
ocean. When crossing deep spots, gorges or
channels it is not that uncommon for divers to
loose track of all visual references (i.e. you
can't see anything in any direction besides
water). Many people will find themselves
swimming deeper then intended under these
conditions. Using this two buddy system makes
it easy to accurately follow a bearing, even
under conditions of limited viability or even
a complete lack of reference points.
How To
"Cheat": As you can imagine it can be
very difficult to work with a compass under
water - especially if you are not good at
mental math. Adding or subtracting bearings
in your head can be difficult, especially if
you have to do it several times in a short
period of time. Luckily there is a simple way
to "cheat". This method is so good we decided
to give it it's own page.