<== Prev Page Next Page ==>
Polishing the Frame
At first I wanted to do a finish similar to my Combat Commander, but the more I thought about it I gravitated towards a brushed finished on the flats, with a matte finish on the rest of the gun. Besides, a very high polish is a lot of work. I figured 400 grit would be about right for this gun. The Combat Commander has a 1000 grit finish.
The KT frame was milled out of billet steel, so its surface is free of serious imperfections. Only some light toolmarks remain. To remove these, I began by taping a sheet of 180 grit emory paper to a piece of plexiglas, and used a light oil for a lubricant. After about 10 minutes I realized I wasn't making much progress. I grabbed a fine-cut file and went to work draw filing the flats. This worked much better. The file easily removed the toolmarks without introducing deep scratches... it helped that I cleaned the file every few minutes. Placing the frame back on my sandpaper sheet, I noticed things were going a little quicker, but the oil tended to form a thick slurry on the sheet. I changed over to mineral spirits for a lubricant, and things began to go much better.

After the file marks had been polished out, I exchanged the 180 grit for a sheet of 240 and polished another 10 minutes or so. I grabbed the plunger tube and polished it as well, since it came in a matte blue finish. Before I do any more polishing I want to sandblast the rest of the frame and slide.
The KT frame has some excess material at the rear of the frame. When the slide's in battery, there is about 3/32" of frame sticking out of the back. A Dremel griding stone made quick work of this material, and I polished it up with a dowel wrapped in sandpaper.
Polishing the Slide
The Essex slide came in a matte blue finish that I will need to bring up to the level of polish on the frame. I'm going to use sandpaper wrapped around my square polishing stone, as a backing block. At first I was wary of the "polish the slide against the table" trick because this may have the unwanted effect of polishing the slide serrations as well. But a close look showed that the tops of the serrations were well below the flat sides of the slide, so it looks like I can do it with no problem. I started with 180 grit to get out most of the toolmarks. I followed up with 240 grit and that's all I want to do now. I will need to stake the front sight before I sandblast it, because I want the sights to have the same matte finish as the top of the slide.
Polishing Various Parts
Before I put a final finish on the gun, there are several parts that need some attention. The thumb safety had a very coarse ground finish, and needed some reshaping to blend in nicely with the altered frame. A few minutes with a needle file and some sandpaper took care of this.
I want to polish the sides of the blued hammer to make it stand out more.
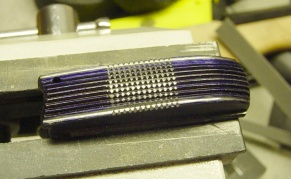
The serrated mainspring housing has seen some wear and tear, so I needed to do something with it. Luckily it is serrated at 20 lpi -- hey, a light bulb just turned on. I grabbed my checkering file and went to work. About 30 minutes later I had a checkered arched MS housing that matched my frontstrap. It didn't take long at all since the hard part (serrations) was already done.

Dehorning
Another task to complete prior to finishing is to dehorn the frame for comfort. All 1911 'smiths talk about doing this (some call it a "carry bevel"), but nobody ever tells you exactly what they do. The idea is to round off the sharp edges on the gun that make it uncomfortable to handle. This also helps reduce wear on holsters and clothing. Some of the sharp edges on the new frame and slide are sharp enough to cut you. To some it may seem odd that I make a big deal about softening other surfaces when the checkering is abrasive enough to hurt, but I'm not a big believer on chewing my skin up on edges that have no reason to be so sharp. Anyway, I take a needle file and do the following:
- radius the front edge of the dust cover
- break the edges on the inside & outside of trigger guard
- break the corners on the rear of the frame, above the beavertail
- slightly break the corners on the bevel around the mag release boss
- round off the corner of the frame where the mainspring housing pin goes
- round off the sharp surfaces around the front of the magwell
- file down the sharp diamonds around the magwell
- break the corners on the slide's muzzle area (I like to really round off this area) and barrel bushing
- bevel the ejection port edges, rear slide edges, front and rear sights (but don't touch the edges on the actual sighting surfaces, they should appear crisp)
- any offending edges on the external parts such as safeties, hammer, slide release, etc.
After I have used the needle file to do modify the surfaces above, I follow with a Cratex bit to smooth out the filed surfaces.
Slicking up the Action
Once you have had the gun together and function tested it, this is the ideal time to polish mating surfaces to smooth out the action. These surfaces may never see the light of day, but they can make a world of difference when operating the action and controls. It isn't strictly necessary; most factory guns come out of the box fairly rough and will "wear in" somewhat after a certain amount of use. But the whole point to building a custom gun is to go the extra mile and take care of the myriad little details that result in a gun to be proud of. To do the job I use either a fine Cratex Dremel bit, or a bit of 600 grit paper for light polishing. Here is a list of the surfaces I polish.
- Pins: hammer, sear, thumb safety pin (very lightly, do not remove metal)
- Plunger tube detents (the ends)
- Mag release, including the spring channel, and corresponding frame surface
- Mag release spring retainer
- Mainspring housing spring channel
- Mainspring cap
- Outside of trigger stirrup, and corresponding frame cuts
- Sides of hammer (pivoting surface area), and corresponding frame surfaces (very lightly)
- Round edge of hammer (where sear drags when you cock the hammer - leave sear ledge alone for now)
- Top of disconnector (slightly break any sharp edges)
- Thumb safety, where spring detent bears
- Thumb safety, inside (side facing frame)
- Recoil spring guide rod & inside of spring retainer
- Slide release, detent area, and remove any burrs, but do not break corners except on exterior "user" surfaces
Staking the Front Sight
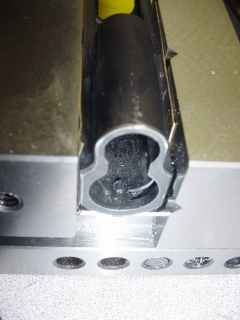
When I was younger and less well-equipped, I'd purchased a sight staking tool from Brownell's. I'd used it maybe twice before with mediocre results. Now, older and wiser, I was determined to master it, or die trying. First step was to take a diamond-coated ball end Dremel bit and relieve the bottom of the slot to allow some space for staking. The sight would nearly fit into the slide with hand pressure, so that was good. I degreased the areas with brake cleaner, placed a drop or two of Loctite on the sight tenon, gently tapped the sight into place with a soft-faced hammer, and clamped it in my mill vise as shown below. Brass shims were used to protect the sides. You can't see it in these photos, but I had used my file to ramp the rear face of the sight. Out of the box, it was nearly vertical, which I could imagine tearing my holsters up. Anyway, here is how I clamped it down, before staking it.
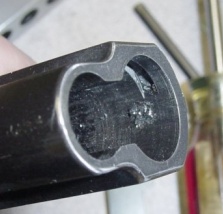
, and I began staking the sight with very light hammer blows. I gradually increased the weight of the blows until the tenon began to deform. This went pretty well, but soon the tenon had been hammered into a mess of peaks and valleys. I couldn't hammer the peaks down because the tip of the tool kept slipping off. That was when I really looked at my staking tool for the first time. The tip resembles an elongated pyramid, and I noticed it was held into the tool with a set screw. Loosening the set screw allows the tip to be rotated 90 degrees, which then allowed me to peen down across the peaks and valleys, rather than in line with them. Soon I had the tenon flattened out as much as I could. Here's what it looked like.
I used the Dremel with a small cylindrical stone to grind away any metal that was still sticking too far out.
Tomorrow: abrasive blasting and more polishing.
<== Prev Page Next Page ==>
Home Page