|
Disclaimer: You are now
entering a portion of the site that contains information that does not
belong to us. All information, photos, names and ideas of Harry Potter are
property of JK Rowling, Bloomsbury Publishing, and Scholastic Books. They
are not way and shape belong to any of the web staff. And are placed on this
site strictly for the purpose of this fansite. No copyright infringement
intended nor applied.
Graphics Tips
With a few simple steps we are going to teach you how to make a
photomerged image like the one found on this site. In order to do this you
must have a graphics program that has this feature. I will be using Adobe
Photoshop. Please note that some programs will automatically merge photos,
but in this case I will show you what to do if it can't be.
Step One
Pick three photos. To make the blending easier and less noticeable, try
and find ones of the same size and similar looking.
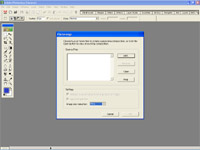
Step Two
Open Photoshop. Go to File and scroll down to Photomerge. Double Click
and a window like this should appear.
Step Three
In the box, click the Add button and place the file name of your three
photos in the box.

Once this has been done,
adjust the Settings by checking both boxes and changing the Image Reduction
Size to 75%. Then click OK.
Step Four
You will see the program try and merge the image but will not be able
to. You should then get a window like this.
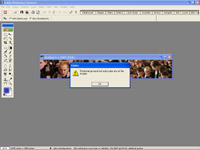
The warning box will tell you
that it cannot automatically place the images. Click the OK button. You
should then be taken to a screen like this.
Step Five
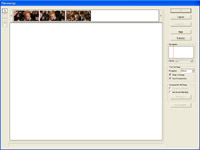
Select one photo and place it
in the middle of your page. This will be your center. Try and pick a photo
that has the most available space. Then place the other images on either
side of the center image. You should get something like this.

Step Six
Now its time to adjust the
effects on the photo. To do this I open another graphics program Paint Shop
Pro v 7. First I smooth out the image. Go to Effects. Scroll down to noise.
Choose Edge Preserving Smooth. Adjust the smoothing to 2. Click OK. Repeat
the first to parts of the step this time choosing Texture Preserving Smooth.
Adjust the correction to 1 and click OK. Then go to Colors. Scroll down to
Adjust. Choose Brightness/Contrast. Adjust the Brightness to 33% and
Contrast to 45%. Click Ok. The image should look something like this.

Step Seven
Open the image in Photoshop. Go to Edit and scroll to fill. Double
click. Adjust the Use to Patter and Blending to Overlay with an Opacity of
33%. Then choose squarish pattern from the menu and click OK. You
should get something like this. Click the image to get a better look at the
pattern.

Step Eight
Finally add some text and a border and you have the finished product.
Click the pick for a better look.
 |