 |
| Making your own tank out of acrylic is a rewarding, cost saving, do-it-yourself project. It requires only a few essential tools and a good plastic supplier, the rest is up to you & your budget!
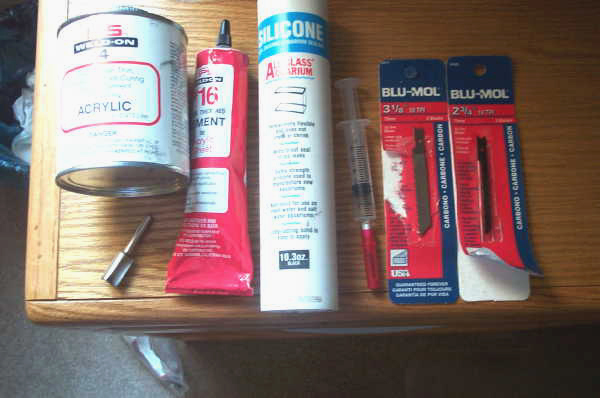
Step one is deciding what size tank to build, this will determine the thickness of acrylic sheet required. The height of the tank, not the gallons, determines the thickness required. You can have a huge shallow tank for a lot less money than a taller, smaller tank, something to consider if money is an issue. Expect to pay $60-70 for a 4ftx8ft sheet of 1/4" acrylic, $110-130 for 3/8" sheet, $150-180 for 1/2" sheet. You can see that the price goes up quickly as the acrylic gets thicker. Since you're on an African Cichlid site, you'll be happy to know that most African Cichlids do just fine in tanks 24" deep or shallower. Anything over 2 feet tall requires acrylic thicker than 1/2", and we won't go into building tanks taller than 24". Tanks up to 13" tall can be assembled with 1/4" acrylic, from 13"-19" w/ 3/8" acrylic, and tanks over 19" up to 24" require 1/2" acrylic. Since the sheets are 4x8, it's to your advantage to make tanks that can use as much of the sheet as possible w/out waste. For example, a tank that is 4 feet long, 4 feet wide and 2 feet tall ( a 4x4 cube tank) would require only two 1/2" sheets. But a tank 8 feet long, 2 feet wide, and 2 feet tall would require 2 and a quarter 1/2" sheets. But both tanks have the same capacity~240 gallons When designing your tank, it helps to get out some paper and see how much tank you can get out of the least amount of sheets. I've got a lot of experience w/ this, and w/ a little time you'd be amazed what you can get out of a couple sheets of acrylic! Some sites show acrylic tanks being built w/ strips along the top to brace it from bowing, In my opinion it's much safer, stronger, and better looking to have a solid top piece w/ the openings cutout. This adds a bit to the cost, about 15%, but it's a small price to pay in the long run. Once you have an idea of the size of your future tank, and the amount of acrylic you'll need, the next step is locating a plastic supplier. Look in the Yellowpages under "plastics", if you live in a large city you should find several suppliers, if not, you may have to check your nearest large city for listings. YOU MUST USE "CELL-CAST" ACRYLIC SHEET, THIS CANNOT BE OVEREMPHASIZED! Try several different suppliers, you'll be surprised how the price varies, and MAKE SURE to ask if they include cutting in the price~trust me, you do not want to attempt the cuts yourself, except cutting out the lids & plumbing holes. This article will only deal with square or rectangle tanks, other types require a bit more experience, and I'm not in a position to explain how to do hexagon, curved, or other designs. When making a tank, you want the top, bottom, front & back to all be the same length. The side pieces will be the width minus 2 times the plastic thickness. For example, a tank 6 feet long, 2 feet deep, and 18 inches tall, which would require 3/8" thick acrylic, will have a front, back, top & bottom ALL 6 feet long, the top & bottom will both be 6'x2', the front&back will both be 6'x18inches, and the sides will be 18"x24"minus 2X 3/8"=3/4" so the sides would be 18"x23 1/4", I hope this is clear, if not e-mail me. Once you have nailed down a plastics supplier, let them know you'll be making an aquarium and the cuts MUST be exact, there's not much room for error here and most good shops will make satisfactory cuts, but be sure to take a tape measure w/ you when picking up your order, and do not accept any pieces that are more than 1/16" off your measurements! Some shops can router finish your pieces, and if you don't mind paying a bit extra for this service, it can result in beautiful joints, but you can make a good strong joint w/out the router finish, just not quite the same clean look. One more thing, ALWAYS ask for some acrylic scrap when picking up your order, most shops have a pile of odd pieces and you can use these for cement practice, and for little odds & ends. Your cut pieces will have a protective plastic or paper attached to it, DO NOT remove the paper/plastic while assembling the tank. Take all your cut pieces and do a test fitting, they should fit well w/ no visible gaps along the sealing edges, and should not overhang the top & bottom pieces, but it IS OK if the pieces are a bit shorter than the top & bottom pieces. If you have some cuts that are a bit off, you need to use them for the top seal of the tank, you DO NOT want any visible gaps on your bottom or side seals, these are the joints under the most pressure and need to be solid. If you have any plumbing that needs to be addressed, it's much better to plan ahead and do the cuts prior to assembly, but they can be done later if you don't have your system finalized. You also need to outline your cuts for the tank lids, make sure you have a center space between the lids that's at least 8 inches wide, this will provide support, and keep the tank from bowing out, and the side, front & back spaces should be at least 4 inches wide to keep the tank rigid. For example, the above tank example would have 2 lids w/ 4 inch spaces front, back& side, and 8 inches between the lids. This would make each lid 28"longx16"wide, again, hopefully this is clear to you. THE TANK IN THE PICTURES IS A 190 GALLON, THE SPECS ARE: 78"Widex30"Deepx18.75"High USING 2 4X8 SHEETS OF 3/8"ACRYLIC, TOTAL COST: $240 The following are the tools or items you'll need to complete your "dream tank": 1. Weld-on #4 Solvent Cement 2. Weld-on #16 Thick Solvent Cement (optional) Aquarium-safe Silicone (preferred) 3. A Solvent bottle or Syringe w/25guage needle (I prefer the syringe, very cheap too @ vet/livestock supply shops) 4. 2-3 rolls of electrical tape 5. 2 sawhorses 6. 1 drop light 7. Jigsaw/SabreSaw and appropriate blades for cutting plastic 8. 2-flute square-cut router bit (no router req'd) Weld-On Products & the Solvent bottle will be available where you buy your plastic. Any time you drill or cut acrylic sheet you need to have a spray bottle w/ water so you can keep the saw blade, holesaw, or drill bit cooled as you cut. Just keep the cutting area soaked down as you cut and you'll have good results, otherwise a melted mess will occur w/ poor results. The best way to cut out the lids is to use a jigsaw/sabresaw w/ a plastic blade, this makes quick, clean cuts. The best way to start the cut is drill several small holes (1/16" bit is OK)in a line and work the drill between each hole until you have a cutout big enough to slip the saw blade through. Make sure you have the plastic supported underneath w/ 2x4 lumber, and keep the lumber close to the cutting line, supported on both sides of line. You won't be able to make a sharp turn w/ your saw so you'll have to make a new set of drill holes each time you change direction with the saw. When drilling plumbing holes (or holes on the top for feeding access) the best tool is a holesaw, the kind used for putting in deadbolts/doorknobs. When using one, make sure you use plenty of water, these get very hot and will literally melt themselves to the hole. Start by drilling about 1/8" into one side, then flip the acrylic over and drill out the hole, this will keep the acrylic from splintering-out or cracking along the hole edge. Remember to have the plastic supported underneath. If you're drilling a feed hole, save the cutout from the hole, this will make a good cap for the feedhole later. Once you get all the holes & openings cut out, it's time to prepare the edges for sealing. You'll want to pull back the protective paper only on the edges to be sealed (both sides of the sheet), and using scissors or utility knife,cut back the paper about 1/2 an inch from the edge of the sheet all the way down the sides to be sealed, and re-tack the paper to the sheet (this will keep any solvent from getting under the paper and staining the plastic). This pic is before cutting the paper back. Once you get both sides of the paper cut back, you'll want to smooth out the edges on your plastic. Your plastic will come from the shop w/ small saw grooves on the edges, and these need to be minimized. I've found that a standard 2 flute-straight cut router bit works really well for scraping the edges smooth. Just run the bit down the edges (by hand), keeping the bit blade flat against the edge, and you'll see the saw marks get smoother. You don't want to scrape too long in one area or cut into the plastic, this will cause a wavy edge, just go lightly over the entire edge until you get a reasonably smooth, and flat surface. The smoother the surface, the less bubbling that will occur in the joint. There are other tools that can be used for scraping, like the back edge (not the knife edge) of a utility knife, the back edge of a hacksaw blade, etc. This step is VERY important, and you don't want to use anything that will round the edges of the plastic (this will result in a smaller sealing surface, and weak joints will occur). This is a good time to utilize any scraps you were hopefully able to pick up w/ your plastic. When joining acrylic, practice makes perfect. It's really good if you can practice scraping and joining quite a bit before trying it out on the real project! One thing I've learned (the hard way), is you want the parts to be sealed to have VERY minimal pressure applied to them. If you have them too tightly pressed the solvent won't be able to flow completely into the joint, and you'll get a lot of bubbling, and very inferior joining. This is another reason that you must practice a bit before diving in! A good way to see what a perfect joint should look like is try this on a couple small scraps: Put one flat surface (the side protected by the paper) facing up, and lay another smaller piece, with the flat side facing down on top of the first piece. Run some solvent (Weld-On #4), don't skimp too much, along the side of the joint until you see that it flows under the entire piece. You should go slowly to make sure you fill any air gaps along the way. Once the joint is entirely filled, you may notice some small bubbles develop along the edges, don't wait more than a few seconds and run another bead of solvent along the edge, this will fill up the gaps. Only do this once, the seal will weaken if you keep running fresh solvent over the joint. You should end up w/ a perfectly bubble-free joint, this is what you'll be striving for w/ your tank joints, although some bubbling will occur due to the rougher edges of the saw-cut plastic. Now try this w/ some saw-cut edges, and you'll probably see a bit rougher joint w/ some bubbles & gaps. The trick is applying a good pool of solvent that fills the entire joint, w/out too much joint pressure(just enough pressure that the pieces touch each other). All I can add here is practice until you get a good strong joint w/ minimal bubbling. Once you're satisfied with your joining skills you can move on to assembling your tank. You want to get a good flat support to lay your bottom piece on, an old door works well, or some 2x4's along the edges. Make sure you remove enough paper along the bottom to allow the joining edge and an additional 1/2" for the solvent run. I usually just cut an inch off all the bottom sides. Using electrical tape, put a strip every 4" along the entire bottom piece (you'll want each piece of tape to be about 8" long). You'll want the piece to be elevated (by the door or 2x4s) so you can get the tape under the piece. Once you get the bottom all taped, then it's time to get a helper and put the sides on top of the bottom piece. You don't need to add much tape to the sides, just enough to secure them (at this time). Pull the tape from the bottom piece up to the Front/Back& Side pieces, not real tight, just enough to hold. If you have an overflow to install, now is the time time to attach it as well. Now it's time for all your practice to pay off! Have your helper follow you around the tank w/ a bright spotlight shining in the joint area as you apply the solvent. You ONLY apply solvent on the horizontal plane and from the inside of the tank, do NOT run solvent up or down the sides, this is for another step! Go slowly, and apply a generous amount of solvent. If you have an area that only penetrates halfway through, then you'll have to go to the outside of the tank and apply some there. Do not wait until your halfway around the tank to fill in these joints, like I said, go slowly and concentrate on getting a good fill through the entire surface area. When you get about halfway down a side have your helper shine the light back to the beginning and check for any gaps, if you see any go back NOW and fill them, from whatever side will give you the best access. Continue along the bottom until you get the entire seal completed. If you have any gaps after this, don't worry, we can address them later, DO NOT re-solvent the joint after a couple minutes have passed, this will only stress the joint. DO NOT HANDLE THE TANK FOR FOUR HOURS!!!!!!!!!!!!!!!!! The next step, 4 hours later, is putting the tank on it's back and sealing the 2 back joints (and overflow if applicable), apply additional tape if needed. You'll want to have your helper here to assist in moving the tank, be sure to carefully hold the back piece when laying the tank down. Again, you'll be running your seam along the horizontal plane, which are now the sides, just make sure to get good light on your seams so you can get rid of any gaps! WAIT 4 HOURS BEFORE MOVING TANK! Put tank on front side & repeat previous step. Wait 4 more hours! Put top piece on & secure w/ tape. You'll then need to put tank on sawhorses, or equivalent support, you may need more than 1 helper for this depending on tank size. THEN FLIP TANK UPSIDE DOWN, being careful to keep top piece secure during this. You'll be crawling under tank and sealing top section from below, this keeps the solvent from flowing over viewing areas which will stain the plastic. Just keep sealing the same as before, the top isn't as critical for sealing pressure, as the bottom & sides, but still try to keep the bubbles minimized. Again, wait 4 hours before moving tank! After waiting the final 4 hours, examine all your joints, if they look mostly free of bubbles, it's good to go. If you have some large clusters of bubbles or gaps, you'll need to run a bead of Aquarium grade silicone along the seams in question. You can use the thickened Weld-on 16, but I've found it to be quite weak for this purpose. If you're generally not satisfied with the bottom or side joints, you can cut some strips of Acrylic w/ a table saw, and join them along the bottom and sides. These strips only need to be as thick as the Acrylic you've been using. For example, an 18" tank using 3/8" acrylic would use 3/8" thick strips. I usually use these for large tanks, just to increase the strength of the overall tank, and they're not an eyesore if sealed properly. You should wait 24hrs before filling a 1/4" thick Acrylic tank. If Silicone was used, wait an additional 48hrs!!!! "" "" "" 48hrs "" "" 3/8" """ """ """ "" "" "" 72hrs "" "" 1/2" " " " One final note, for the lid covers it's best to use glass, unless you have a lot of plastic scraps and you can support the lid cutouts around the outside edges. The acrylic will sag when used as lids, so be forewarned. Have Fun Building your Tank! Brad Duboisi.com & Brad Newton claim no responsibility for any problems or damage that may incur from building your own tank. This includes but is not limited to home incineration, joining fingers together, loss of hair, minor or major cuts, solvent rushes, rashes, cuts in the floor, tape balls, or food and beer spills. The information above is what has worked for the Author and other aquarium builders, but building your own tank, or any other project for that matter, has implied risks. |
 |
| BUILDING YOUR OWN ACRYLIC AQUARIUM WRITTEN AND ILLUSTRATED BY: BRAD NEWTON |
| THIS PAGE IS UNDER CONSTRUCTION Photographs need to be installed |