| Build a 140 Gallon Wood and Glass Aquarium |
|
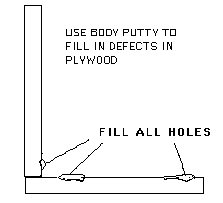
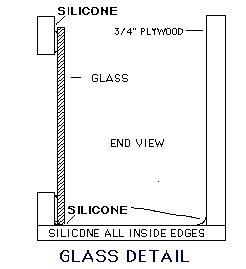
First things first: These plans for a 140-gallon plywood aquarium come compliments of the Geothermal Aquaculture Research Foundation, Inc. I have never built this aquarium, and cannot guarantee that it will work, but someday plan to give it a try. It seems like a good idea and I cannot see any reason why it should not work, and save you some $. Notwithstanding, I share these plans with you with no express guarantee. If you attempt to build this aquarium you do so at your own risk and indemnify me of any responsibility. Good luck and have fun! Overview These plans are for a 140-gallon aquarium: 96" x 24" x 16 3/4" (lxwxh). These plans can be adjusted, however, to make aquariums of many different sizes. Notwithstanding, it is not advisable to make an aquarium that exceeds 500 gallons and you should not make your tank deeper than 18" with 1/4" glass. If you want to build a 500-gallon aquarium or larger, you will need to construct it using concrete. Here is a link to a site that may interest you if you are considering building a 500-gallon+ tank: Mr. 4,000. Note: This is a 2-3 person project. Tools: ? 1 - portable or table power saw ? 1 - screw gun, with Phillips bit ? 1 - orbital or belt sander, with medium grit ? 1 - caulking gun ? 4 - 4-inch paint brushes, one for each day of painting [KEEP BRUSHES IN FREEZER TO REUSE] ? 2 - 16-inch stanchions (May be boxes, or anything of this height, used to support the plywood pieces during construction) ? 3 - 6 Various containers for mixing glue, putty, and paint Materials List: This materials list is calculated for the construction of two tanks. This is because some of the materials can only be purchased in larger quantities. Besides, why build only one when you can build two, right? ? 3 - 4-foot by 8-foot sheets, 3/4 inch, AC EXTERIOR plywood ? 2 - 94-inch by 14-inch glass, 1/4-inch plate ? 1.5-pounds, 2-inch drywall screws (Approx. 240 count) BR> ? 1 - two-can container, Resorcenol waterproof glue ? 1 - gallon, autobody putty w/ hardener ? 5 - gallons, two-part epoxy paint ? 2 - tubes, silicon caulking, non-toxic aquarium suitable ? 1 - gallon, Xylene glass cleaner ? 1 - pint, commercial glass cleaner ? 6 - sheets, 120 grit sandpaper ? 2 - sheets, 220 grit sandpaper ? 2 - packs, paper towels Sufficient for more than two tanks Cutting List: Again, note that these pieces will be sufficient to build two tanks. ? (2) 24-inch by 8-foot (bottom panel) ? (2) 16-inch by 8-foot (backpanel) ? (4) 3-inch by 8-foot (upper & lower face frames) ? (4) 3-inch by 10-inch (left & right face frames) ? (4) 16-inch by 22 1/2-inch(endpanels) ? (2) 12-inch by 22 1/2-inch (top brace) Tank Assembly: These instructions are for a single tank assembly. You will need a clean, dry work area, indoors if necessary to insure cleanliness, out-of-doors if possible. Later, when you paint your tank, you will need a well ventilated, warm area for the final tank drying. 1. Inspect all plywood pieces for rough or flawed edges, which might later affect tank integrity. Sand as needed. 2. Lay bottom panel on the 16-inch stanchions. 3. Apply glue along all four edges of bottom panel, sufficiently heavy to accommodate the edges of the backpanel, endpanels, and face frame. 4. Raise backpanel up under bottom panel, mating long edge of backpanel into glue along edge of bottom panel. Insure that edges are flush, and that they make a 90-degree corner. 5. Turn bottom panel over, glue side down, centered on stanchions so that all edges of bottom panel are accessible. 6. Using screwgun, screw backpanel to bottom panel, inserting 2-inch drywall screws at 3-inch intervals along entire length. INSURE THAT ALL SCREWS ARE FULLY SEALED, AND TIGHT. 7. Apply glue along one 16 inch edge of each endpanel. 8. Raise each endpanel up under bottom panel, and screw tightly to both bottom panel and backpanel. Place drywall screws at three inch intervals. 9. Apply glue along inside edges of face frame, where they will mate with the endpanels. Raise lower face frame up under remaining edge of bottom-panel, and screw into place to bottom panel and endpanels. WIPE EXCESS GLUE FROM ALL JOINTS AFTER FINAL TIGHTENING, AS IT IS VERY DIFFICULT TO CHIP OR SAND AWAY AFTER IT IS HARDENED. 10. Use three (3) screws in each end, and normal three-inch intervals along length. Insure that all edges are flush, and tight, after final tightening of screws. 11. Turn partially-completed tank right side up on stanchions for inspection. At this point, all panels screwed together should rest on the bottom panel, for the strongest possible base. If this is not the case, quickly disassemble the pieces before the glue sets, and reassemble properly. 12. Turn the tank face-up on the stanchions. 13. Apply glue to FRONT exposed edges of endpanels. 14. Lay upper face frame in place, and screw to edge panels, using three screws in each end. 15. Check short face frame pieces for proper fit, sanding if necessary. THEY MUST FIT TIGHTLY WITHOUT SPRINGING UPPER AND LOWER FACE FRAME PIECES APART. 16. Apply glue to ends of short face frame pieces. 17. Lay short face frame pieces into place, and screw firmly to end panels, insuring that the outer edges are flush with the ends of the tank. 18. Recheck all work, wiping away excess glue, and insuring that corners are square, true, and not pulled open by later construction. 19. Allow to dry overnight if possible, though this is not critical. Tank Painting It is extremely important that you follow the following precautions any time you use epoxy paint: 1. NO SMOKING 2. DO NOT LET BRUSHES DRY 3. DO NOT BREATH FUMES APPLY PAINT IN A WELL-VENTILATED AREA, PREFERABLY OUT-OF-DOORS, AND MOST ESPECIALLY AWAY FROM THE AIR SUPPLY INTAKE. THE FUMES ARE HIGHLY TOXIC, AND MAY RESULT IN SERIOUS RESPIRATORY PROBLEMS IN HUMANS IF THEY ARE CONCENTRATED AND EXPOSURE IS PROLONGED. 1. Apply epoxy paint to all exposed wood surfaces of tank. 2. Make coat of paint as thin as possible, while covering the wood surfaces completely, because the paint runs easily. 3. Allow coat to dry overnight. 4. Fill all cracks and holes with autobody putty, making as smooth a surface as possible. 5. Sand entire surface, using 120-grit paper or power sander, and apply second coat. Again, insure that the coat is as thin as possible, to avoid running paint. 6. SANDING DETAILS ? Use the 120-grit sandpaper for sanding the first two coats of epoxy paint. ? 220-grit for sanding the third coat, in preparation for the fourth or final finish coat. (If power sander is used. then the sanding pressure applied would be less for the last coat.) 7. Repeat procedure in steps until four (4) coats of the epoxy paint are applied. 8. Allow tank to dry in well-ventilated, warm area for 24 hours before proceeding. Glass Installation: 1. Turn tank face down on level, flat surface, insuring that entire face frame is supported. 2. Use 220-grit sandpaper to rough up a two-inch strip of the epoxy paint on the inside of the tank, around the glass opening. This rough area will serve as a bonding area for the silicon glue. 3. Sand or file all corners of the glass panel, to avoid later injury to either workers or fish. 4. Clean entire surface, and edges, of glass panel with Xylene cleaner, and then commercial glass cleaner. 5. Apply 1/2-inch bead of silicon caulking around entire opening in face frame, on inside of tank. The bead should be approximately one inch from edge of opening, except along the top, and there the bead should be approximately one-half inch from edge of opening. 6. Install glass on inside of tank, insuring that the lower edge of the glass is resting full- length against bottom panel of tank for support. 7. Press evenly on glass to remove all bubbles and gaps from silicon caulking seal. 8. Recaulk glass, along all edges. pressing caulking with finger firmly into the corner formed by glass and face frame. 9. Final caulking seal should be smooth, rounded, and gap and bubble free. Wipe any excess caulking away after seal is finished. Final Finish: 1. Using three screws for each end of brace, install tank top brace, centered, spanning from top, inside edge of backpanel to top inside edge of upper face frame . 2. Apply heavy bead of silicon caulking into all interior corners of tank, again smoothing the seal with finger, removing all gaps and bubbles, and wiping away excess caulking when finished. 3. Allow tank to dry for 48 hours in warm, dry area before adding water. The only adjustment to these plans you might consider, and that's only if you can afford it, would be to lay Plexiglas or eggcrate on the bottom and back. This will serve to ensure that your rocks won't scratch through the paint. If you use Plexiglas, you only need to use the really cheap and thin stuff. ? Disclaimer: By building this DIY project you agree not to hold the author or the owners of this Web site responsible for any injury or bodily harm you may cause to yourself or others. Always wear safety glasses when working with tools and keep chemicals and power tools away from children. Read and understand all safety instructions pertaining to equipment prior to use. |
 |

|
| Number of Visitors Since 7/6/06 |
 |
 |