 |
|
|
|
|
|
|
|
|
|
|
|
|
|
|
|
|
|
|
|
|
|
|
|
|
|
|
|
|
|
|
|
|
|
|
|
|
|
|
|
|
|
|
|
|
|
|
|
|
|
|
|
|
|
|
|
|
|
|
|
|
|
|
|
|
|
 |
|
|
 |
|
|
|
 |
|
|
|
MIRROR CELL CONSTRUCTION |
|
|
HOME |
|
|
|
|
|
|
|
|
|
|
including MIRROR MARKING and MIRROR FIXING |
|
|
THE TUBE |
|
|
|
|
|
|
|
DIAGONAL |
|
|
|
|
|
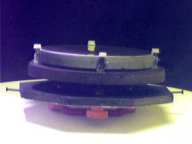
After the fun of building the tube, the next job was to construct the mirror cell. The basic idea is to make a strong, rigid base on which the mirror can be fixed in such a way that it can be tilted any way about the major axis of the tube. It also needs to be able to be moved forwards and back. |
|
|
|
|
|
ASSEMBLY |
|
|
|
|
|
|
|
|
|
|
 |
|
|
|
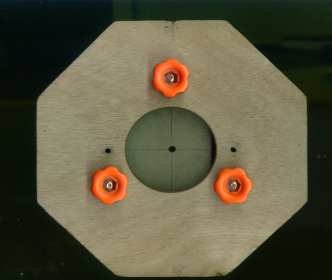
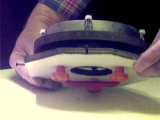
Here's my completed mirror cell. The mirror is glued to a disk of 3/4 inch chipboard and the back-plate is a piece of 1/2 inch plywood. Three spring - loaded bolts hold the two pieces together, adjustable all ways by three threaded knobs on the rear. This is an essential feature to allow in-the-field collimation adjustment. |
|
|
|
|
|
The working drawing looks like this thumbnail pic. only a lot bigger ! |
|
|
|
 |
|
|
|
Want a look at it from the side ? - as usual, a bigger pic is but a click away. |
|
|
|
 |
|
|
|
The back-plate had been cut and finished at the same time as the tube because it acted as a template during construction. The cell was cut from 3/4 inch chipboard and drilled according to the drawing, noting that some holes are counter-sunk on the front face and some on the rear (see below). It was then given a light spray coat of matt-black paint, having masked off the actual mirror area. |
|
|
|
The photo below shows the rear view of the mirror cell before painting and mirror fittting. Note, although this shows a central hole through the mirror cell, there is no central bolt - the hole is from the circle - cutting process. What about the two spare holes in the back -plate ? - they are for a handle. |
|
|
|
 |
|
|
|
MIRROR MARKING |
|
|
|
There was one important job to do on the mirror before mounting - mark a small dot in the exact centre of the mirror. What ! mark my new mirror ? - yes, it's needed to provide a reference point during collimation and, anyway it won't have any effect on the performance as it is hidden by the diagonal. To make the mark, a piece of clean paper is needed, the exact diameter as the mirror. This is then folded in quarters and the corner snipped off with scissors. When opened out, a hole has been made in the exact centre - the paper is then placed over the mirror and a mark made with a waterproof felt-tipped pen or paint through the hole. On larger mirrors they recommend using a ring-binder reinforcement 'doughnut' as the marker. |
|
|
|
 |
|
|
|
MIRROR FIXING |
|
|
|
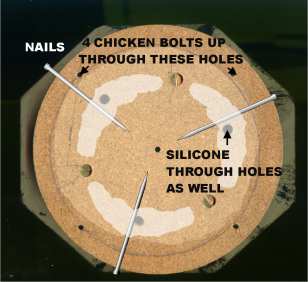
Finally - sticking the mirror in place ! -scarey ! I used low-modulus permanently flexible colourless silicone glazing sealant. There is no doubt it would stick to the glass - it's made to, but to the wood ?. That's why three holes have been made and have been opened out on the rear side. They act to key the sealant through the mount. |
|
|
|
So, the first step was to put the three cell holding bolts through from the front, add the washers and nuts and really tighten well, checking that the bolt-heads were well-recessed into the board on the front. The heads were then covered with small squares of adhesive tape. |
|
|
|
The safety, or 'chicken' bolts aren't fastened with nuts - there's no room for them at the side of the mirror. Instead the corresponding holes in the board were drilled undersize and the bolts were screwed in, cutting a rough thread as they went. Although all four holes should be 'tapped' in this manner, only three of the bolts were left in to allow easy placement of the mirror. |
|
|
|
Next step was to squeeze sealant through the holes from the rear and then continue by putting three arcs of sealant on the front face - you don't need to cover the face with the stuff - it's very strong !. Three nails were then placed on the face, points inwards and pressed flat to the face as shown here. They act as spacers to ensure the mirror is seated squarely on the face but still with an even coating of silicone between. |
|
|
|
 |
|
|
|
The mirror was at last placed carefully down on the face (right side up !) and pressed down around the edges till it bottomed on the nails, keeping it centred on the face. The fourth chicken bolt was then screwed in from the back, keeping the mirror flat at all times. The mirror was then centred between the four bolts so that it didn't quite touch any of them and silicone squeezed between each bolt and the mirror as a fillet, to act as a flexible cushion. |
|
|
|
Finally, four nylon nuts were screwed over the bolts until each is just proud of the mirror. They just protrude over the mirror as a safety feature to hold it in place in the unlikely event of the silicone giving way !. |
|
|
|
The deed was done - whew ! and the assembly was left face up, for 48 hours to allow everything to set. The three nails were then carefully but firmly pulled straight out. The mirror cell could now be bolted to the back plate together with the spring spacers etc. It is ready to be mounted in the tube once a few other little jobs have been taken care of. |
|
|
|
 |
|
|
|
Finished ! |
|
|
|
|
|
|
|
|
|
 |
|
|
|
|
|
|
 |
|
|
|
|
|
|
|
|