 SLISHMAN
SPLINT TMSLISHMAN
SPLINT TM
SLISHMAN
SPLINT TMSLISHMAN
SPLINT TM
Shoulder Reduction
Click this image for a 1-2 minute video
demonstrating splint application:
Official disclaimer:
There are many ways to reduce shoulders. Generally these reductions are performed by physicians. Risks exist for causing further injury to nerves, vessels, bones, etc., if the procedure is performed incorrectly. In the emergency department, we often perform pre-reduction X-rays to confirm dislocation rather than fracture. We therefore cannot bill the Slishman Splint as an officially approved device for reducing shoulders.
However, certain people are frequent dislocators and "just know" when they have dislocated. Reduction of a dislocated shoulder in the back-country turns a victim from someone incapable of carrying a pack and generally needing transport, to someone potentially capable of staying with the group and continuing on the trip. For this reason, we think owners of the Slishman Splint should know about this feature.
Potential candidates should meet these general criteria:
1. Force causing dislocation was delivered to the shoulder via indirect torque, rather than direct contusion.
2. Transport to medical care will be prolonged, perhaps 30 minutes to 1 hour. Over that time shoulder muscles tighten and the reduction becomes increasingly difficult.
3. Patient believes
strongly that he or she has dislocated rather than fractured his or her
shoulder: "I do this all the time."
The procedure is as follows:
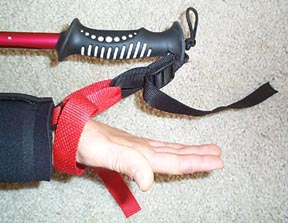
1. Apply wrist (or ankle) strap to wrist
with buckle and loop in palm.
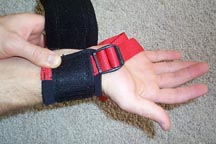
2. Wrap strap around wrist.

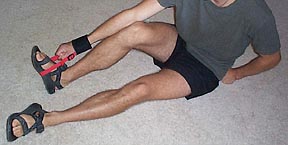
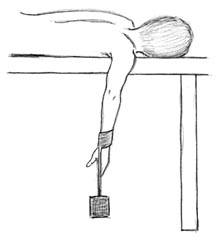
Use the strap as shown above, or attach
it to a fixed point on a bed rail, small tree or the like. Then instruct
the patient to lean back. The strap also works well for hanging weights
onto the limb for the Stimson technique:
If simple reduction techniques using just the strap are unsuccessful, continue with step 3 below. The success rate using the splint may be greater because it provides mechanical advantage. This means that the splint applies 3-4 times the tension to the arm that one could apply by simply leaning back using the strap alone. In addition, the shoulder (or groin) strap helps to provide countertraction, holding the shoulder girdle in place.
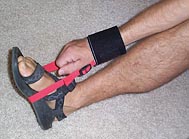
3. Loop handle strap through wrist (or
ankle) strap.
4. Apply shoulder (or groin) strap loosely
around affected shoulder.

5. Loop strap over splint tip above basket
and lock strap in basket slot.

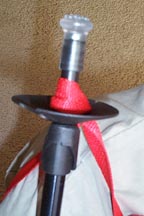
Flicklock 2 should never be locked during shoulder reduction.

7. Apply tension to the cord using one of the following techniques:
This step takes time and requires patience.
Gradually the shoulder muscles fatigue allowing the humerus to find its
way home.


8. If the shoulder is not yet reduced after
near maximal traction and after the shoulder muscles are fatigued, apply
a lateral tug to the upper arm. This step is necessary about 50%
of the time. The force of the tug is not large. It simply guides
the humeral head over the lip of the glenoid.

Subject: Testimonial regarding shoulder device
Date: Thu, 27 Feb 2003
Sam,
I wanted to thank you again for providing the wonderful device utilized to relocate my dislocated shoulder. I originally dislocated my shoulder fifteen years ago in a very serious ski accident. The pain was excruciating, but I was able that time to put my shoulder back in place by ramming it against a snow bank. Over the years it dislocated two more times and I was able to put it back into place without losing consciousness. However, last year, the fourth time it dislocated, I was not able to get it back into place and was rushed to the hospital in an ambulance. The emergency room physicians were not able to get it back in place and just when it appeared that they'd have to put me under and perform emergency surgery, I was asked if I'd be willing to try one time to put it back in myself using your device. They strapped the device to my body, I gave a push and it worked like magic! I can't put into words how much I appreciate your innovation. Your device provided instant relief, and, just as importantly, it gave me a few weeks to prepare for the major corrective surgery that I underwent to permanently, hopefully, fix the problem. If I can ever be of service to you, just let me know.
THANK YOU,
Alan M. Varela, Esq.
Director, NM Workers' Compensation Administration