Launching Javica
Running Javica depends on how you installed it. If you installed it on your Mac, there should be a Javica application icon in the folder where you installed it. It should look a little like this:

Javica
If you installed on Windows, there might just be a little icon that looks like this:
Javica
Unfortunately, the icon sometimes disappears. If that happens, you can click on the Application file Javica.exe or JavicaC.exe.
Both files are pretty much identical, except that JavicaC.exe will pop up a DOS box which allows you to see any error messages, which is useful if you think you've found a bug.
If you installed Javica on Linux, you probably also installed the JDK, in which case you know more about running Java applications than most human beings and would probably take offence at being told to click on an desktop icon of any kind. You might want to try something like the following command to launch Javica:
java -cp Javica.jar com.javica.Javica
From this point on, the manual is somewhat out of date. If you get stuck, please feel free to Contact me.
The Manual
When Javica first starts up, no images or thumbnails are loaded. All the image panels default to a light grey, and most buttons and menu items are dimmed.

This is Javica when you first launch it.
Viewing Mavica Disks
To look at the pictures on a Mavica disk, click on the Browse button. This will open a standard dialog, allowing you to select a file. Navigate to the directory where your Mavica Images are stored, and double-click on any file. The dialog will close, and Javica will begin loading the images. Depending on the speed of your disk drive, this may take a few moments.

Use this dialog to locate your Mavica Images
When the images are loaded, you will see thumbnail-size versions of each one, as shown below:
NOTE - Javica uses Mavica's thumbnail files to load the contents of your disk faster. The full-size images are not loaded until you select an image to view.

Javica displays your Mavica Images using tiny thumbnails.
Selecting an Image
As you move your mouse over each thumbnail, an enlarged version is displayed in the upper left of the window.
Javica displays enlarged thumbnails as your mouse moves over them.
To select a thumbnail, click on it once. A black border will appear around the one you selected. You can also use the Tab button to select thumbnails. Use Shift-Tab to move backwards. When you select a thumbnail, it is displayed enlarged in the center-left of the screen, above the Image file's details (File name, file size, and file date and time).

A black border appears around the thumbnail you select.
Viewing an Image
To view the sull-size image of the thumbnail you selected, hit the Enter key, or click on the View button. You can also view an full-size image quickly by double-clicking on any thumbnail.
A new window will appear with the image inside. You may resize this window to enlarge the image.
Double-click on a thumbnail to view its full-size image.
Renaming an Image
To Rename the selected image, click on the Rename button. A dialog will appear allowing you to select a new name for the Image. The new name defaults to the date and time the image was taken.
NOTE - Please do not include a filename extension (.jpg, .jpeg, .411) when you enter the new name. Javica will add the correct extensions for you. When you have chosen a name, click Ok to rename the file or Cancel to change your mind.

Deleting an Image
To Delete the selected image, click on the Delete button. A dialog will appear allowing you to confirm your decision. Click Ok to delete the file or Cancel to change your mind.

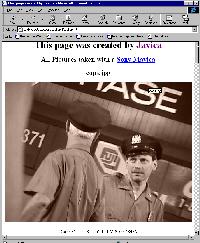
Creating a Javica Instant Gallery
When you have renamed your files and deleted the ones you don't want, click on the Instant Gallery button to instantly generate an HTML page that shows off your pictures. The following dialog will appear, allowing you to choose from four different kinds of gallery page.
Different types of Instant Gallery
|
The first choice, Pictures on page generates a page that contains all of your Images. This kind of gallery can take a long time to load, especially over a slow modem. It is very useful if you want to keep an album of all of your pictures on your hard-drive. |
 Pictures |
|
The second choice, Links to Pictures generates a page that contains links to all of your Images. This kind of page loads very quickly, even over a slow internet connection because it uses tiny GIF files, converted from thumbnails. It allows people to choose which fulll-size images to see, one at a time. |
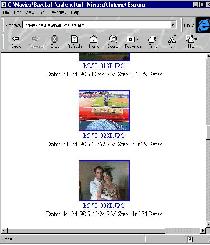 Links |
|
The third choice, Table for Printing generates a page that contains all of your Images aligned in a neat grid. This kind of gallery can take a long time to load, especially over a slow modem. It is especially useful for printing out the contents of a Mavica disk. |
 Table |
|
The fourth choice, Thumbnails generates a page that contains all of your thumbnails aligned in a wider grid. This kind of gallery takes a short time to load, even over a slow modem. The image name, size and date are stored in the HTML Alt tag. |
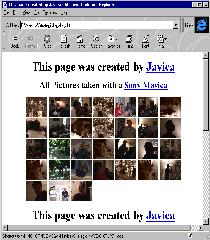 Table |
When you've chosen the type of gallery you want, type a name for it in the next box (or accept the default name of "gallery.html"), and hit the Ok button. Once your gallery has been created, you can edit the gallery file to make your own changes.
NOTE - A lot of times, your floppy disk will be full of pictures (or it would still be in the camera!!). In this case, Javica may not have enough room to write the gallery or the GIFs to the disk. Copy the floppy to your hard-drive and try again.
NOTE for GeoCities members - Javica automatically inserts the GeoCities geoguide tag in all of your galleries, saving you lots of time.
NOTE - You can create all four types of gallery for a single set of images, as long as you give each a different name. Try all four and see which one you like best.
NOTE - You can select the name of the instant gallery, but not its location. This is because moving the gallery file without moving the images would break all the links.
NOTE - If you delete or rename an image, you need to re-create your instant gallery.
Converting .411s to GIFs
When you choose the second or fourth kind of instant gallery, Javica automatically converts all the thumbnail files to GIFs. This can take a few moments.
Using the Pop-Up menus
If you right-click on any thumbnail, a pop-up menu appears, giving you easy access to the View, Rename, Delete and Thumbnail functions. On Mac, hold down the Apple key while clicking on a thumbnail. Unfortunately, pop-up windows are notoriously hard to take pictures of for inclusion in online manuals, so you'll just have to take my word for it.
Missing Thumbnails
Sometimes you may find that some files on your disk are corrupt and cannot be read correctly. They may even be missing. Thumbnails that Javica can't read are replaced by a  icon, as shown below.

The image in the top right corner has no thumbnail
This icon tells you that an image exists, but that no thumbnail is available. If you click on the icon, you will see the file's details appear on the left of the Javica screen.
Replacing Images
If there is a missing or corrupt Thumbnail (411) file, you can generate a new one by using the "Make Thumbnail" button, or the "Thumbnail" menu option.
Missing Images
In the opposite case, there may be a thumbnail, but no full-size image. If this happens, the thumbnail will be displayed as normal, but if you select it, the details will not be displayed on the left. If you try to view an image with a missing file, the view window will display the following image: