
| | Home |
| Tutorials |
| Exercises |
| | About Us | | | | |
Lessons:
Lesson 1
Lesson 2
Lesson 3
Lesson 4
Lesson 5
Lesson 6
Lesson 7
Lesson 8
Lesson 9
Lesson 10
|

Our next lesson is about Inserting images!
What is images, before we start?
Images are a kind of artifact that depicts or records visual perception of someone.
In other words, it can be anything that we see.
Sometimes, you notice that in our images saved in our desktop have these formats
- ".jpeg" - Also known as Joint Photographic Experts Group, it is the most common type of image format.
- ".png" - Also known as Portable Network Graphics, it is an image saving format commonly used by editors since this file format can have a transparent background depending on the image saved as "png."
- ".gif" - Also known as Graphics Interchange Format, it is also an image saving format but the difference is that some images saved in "gif" actually moves.
Now, how do we insert an image? Observe the code given at the image below.
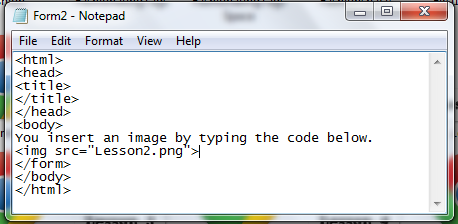
Wait, you tell me that it shows that the image is broken?
You should have your image and your HTML on the same folder especially if you will upload your HTML, like mine.
But if you just want, you can simply use the image's URL. How? Drag the image into your browser and it will show you its URL. Although if you changed the folder where it was placed, then the former URL will be void. You just need to repeat the process of getting the URL or return it to its original folder. The URL of the image will show something like-- "file:///C:/Users/Desktop/HTML/Lesson8.html."
Lesson 8 is done! Are you ready to move to the next lesson? Click here to move on to the next lesson.
|