


Creating a spider web effect (see sample here)
1.
Open a new file.Create
a new layer by clicking on the new layer icon. For the foreground color
select any color say dark blue. Using the paint bucket tool fill
the layer with this color.
2. Again
create a new layer by clicking the new layer
icon in the layers palette. For the foreground color choose a brighter
shade of blue.
3. Select
the rectangular marquee tool & draw a rectangle as shown here.

4.Hold
down the Ctr key & click on layer
2 in the layers palette.This will select the rectangle.
Now hold down the Ctr, Alt & Shift keys together. Keeping these keys
pressed, select the move tool & move
the rectangle. This creates a copy of the rectangle.Place this copy beside
the first one leaving a little gap in between. Similarly continue creating
copies & fill the entire document as shown in the picture.It is important
to keep the Ctr, Alt & Shift keys pressed so that all the rectangles
are created on the same layer.
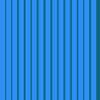 after
Step 4
after
Step 4  after Step 5
5.Keep layer 2 selected & go to Filter-Distort-Polar
coordinates.Choose the rectangular to polar option.The result should be
as in the 2nd image above.
6.Keep the layer 2 selected & using eye dropper tool select the same
color which you filled in the layer2. Now, for the background color, select
a darker shade somewhat close to the layer 1 shade. Now switch the foreground
& background colors.
7. Still keep the layer 2 selected. Now go to Filter-Texture-Stained glass.
Here enter cell size-14, border-2 & intensity -3. So, how's your web?

home | portfolio | must see | tips and tutorials | golden verses |
for your heart strings | my art gallery |
