| Creating A Personal Flag: The Basics |
| Step 1: Picking a shape. This is important because this will in large part determine what is on your flag and how it will be arranged. |
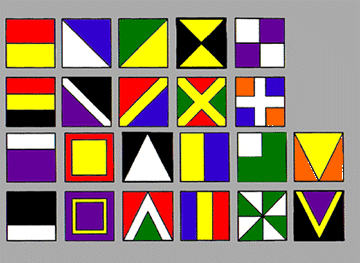
| Step 2. Partitions. Another important feature are what are known as "partitions" also known as "ordinaries". These are ancient devices used to help distinguish one knight's shield from another. These are very basic designs and can help enhance the look of a flag. A partition does not have to be used, but they can also be combined to create unique designs. |
| Step 4: Blazons. The "Blazon" is the central graphic element or elements of your flag. These can be almost anything you can imagine. Stars, animals, tools, or whatever. The important thing to remember is to keep it simple. Blazons can also be repeated giving your flag a unique look. For example a mechanic might want to use 3 wrenches. On a flag that is half white and half red, two wrenches can be red on the white half and one can be white on the red half. You may also want to use something out of the ordinary, such as anciet or non-European symbols. You can use emblems not normally found on traditional design such as Native American, ancient Egyptian, or other cultural designs. For my personal flag I chose an ancient Aztec warrior shield design and modified it to fit on a flag and used only two colors. For a good listing and examples of classic blazons go to the Heraldic Dictionary online. For a more complete listing go to Heraldic Clip Art or even this page. The Blazon does not have to be limitied to ancient designs, but can be more modern for the modern person. One thing I cannot stress more is to avoid using numbers and letters. This does very little for a flag and when it is viewed backwards and flying in the breeze, it will be unreadable anyway. If the symbols and colors do not convey the message you are trying to carry, then you need to rethink your design. |
| Step 3: Colors. Colors should be simple and as few as possible. Shades of a color should be avoided as this only makes the flag harder and more expensive to make and reproduce. An Attractive and distinctive flag can be made using as few as two or three bold colors. The colors yellow and white represent gold and silver respectivley. These are called "metals". The other colors are called "enamels". A good rule of thumb to follow is to never have a metal touching metal or enamel touching enamel. |
| White |
| Black |
| Blue |
| Red |
| Green |
| Purple |
| Yellow |
| Orange |
 |
 |
| The partitions to the left are shown in a variety of colors just as an example. Pick a pattern and colors that are meaningful to you and begin designing your own flag. For a greater variety of partitions click here. |
| ENAMELS |
| METALS |
| Step 5: Counterchanging. This is not a necassary step, but it can make a simple desing look even better if done right. At the left you will see a flag that is blue and yellow with a large star in the center that is "counterchanged". What that means is simply putting a device over the partition line and switching the colors. |
| BACK |
| NEXT |