.
.
.
  Happy Halloween!
Spooky music

Page 1 of "Haunted Path Block" lessons


Quilt is 37" by 37" which includes a two inch border.
Blocks are 8 inches X 8 inches *finished*
8 1/2"x 8 1/2" with seam allowances.

If you just want to make the pumpkin, it finishes 18" x 18" with a quick turn finish.


You can make just the pumpkin or make the whole quilt.  If you are new to appliqué, you may want to start with the practice heart to get the hang of hand appliqué.  Then when you feel comfortable with the technique, go on to the pumpkin.  I know...  but you have to learn somewhere... if you are learning to ski, you start on the baby slope... quilting is no different!
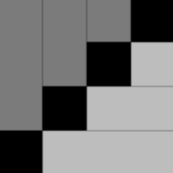
This is the basic block.  It is a modified log cabin with a "path" through the diagonal. 

Print out a copy of the above graphic and glue swatches of fabric to it as a guide. 

(in Windows and Netscape right click on image and select "view image" and it will come up in a separate window where you can print it out alone. )


This is the suggested shading.  Dark path, light side and a medium or contrasting color on the other side. 
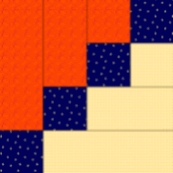
This is a color version.  You can use any colors and make this wall quilt fit any season by just changing the appliqué picture in the center of the quilt. 

Just replace the pumpkin with snowmen, a Christmas tree or a symbol of any holiday you celebrate... hearts for Valentines day... or flowers for spring... or a flag for the 4th of July!

For the Path Log Cabin blocks you will need the following:
Determine your color placement from the gray scale block above and by looking at the finished quilt pictures on the main page...

Cut strips as below for each fabric...

WOF means width of the fabric, which is usually around 42-44" in US fabrics.  If you are using Fat Quarters you can adjust accordingly... (probably double the strip amounts).  Fabrics that are more narrow you will have to adjust accordingly also. 

Cut four  2 1/2 inch  by Width Of Fabric (WOF)  strips of your selected dark  (or path) fabric.

1/3 yard all together


Cut one  2 1/2 inch by width of fabric strip of light fabric (or contrast #1)

Cut one 4 1/2" X WOF strip light fabric

Cut one 6 1/2" X WOF light

1/2 yard all together


Cut one   2 1/2"  X WOF inch strip of  medium fabric (or contrast #2)

Cut one 4 1/2" X WOF strip of medium fabric.

Cut one 6 1/2" X WOF strip of medium fabric.

1/2 yard all together


Background fabric for the pumpkin in the quilt...

Now, look at the quilt pictures.  You can use different backgrounds from the fabrics in your quilt for the pumpkin appliqué in the blocks.  Decide which of your fabrics you want the background for the pumpkin to be, then you will need 18 inches **extra** of that fabric. 


If you want another border around the outside of your quilt, you will have to buy extra fabric for it, depending on the width of the border. Decide which fabric you want to use for the border, then take four times the width you want your border and get that much fabric plus a little extra for insurance.  For example, if you want a 2" border, 4 times 2 = 8"  so get 8" plus a little extra for the border.  (I used a 2" border for the examples on the WWW page.)

For the appliqué pumpkin only you need will the following:

18 inch square of background fabric for under the pumpkin.  Look at the samples and see if you would like the background to be one of the  block colors and which one... or a color of it's own. 

About a 16" square of pumpkin fabric... That should cover all shapes of pumpkins... I made my pumpkin short and fat but yours can be any shape.

A 6 inch scrap of brown for the pumpkin stem. 

If you want to make a face for your pumpkin, you will need some yellow, black or whatever color you want the features to be. 

If you want leaves...  scraps of different green fabric for each leaf...  depending on how many leaves you want... if any. 

Some brown for the stems if you add leaves. (or you can make the stems green).  The bias strips will have to be cut on the bias so at least a fat quarter.   A selvage to selvage  quarter  yard of fabric won't make the stems long enough. 

Backing for whole quit:  The quilt finishes 37" x 37" so 1 1/3  yard of backing will be generous. I like to be safe! 
No binding for a quick turn finish... 
1/3 yard of contrasting  fabric or one from the quilt for traditional binding on the straight of grain. 

If you are just making the pumpkin, you will need  18" backing fabric for a quick turn finish.

Basic other supplies:

Thread:
to match pumpkin fabric for appliqué
To match green for the leaves
To match brown for the stem (unless you make the stem green). 
To match the yellow or black for face features

Neutral thread to sew your blocks together... I like either gray or a beige... light or dark depending on the fabric.

Small, sharp "to the point" scissors for nipping into corners.

Spray Starch... or if you don't have spray starch you can use liquid starch or mix some corn starch with water to form a light paste.  (It really works!)

Hand appliqué needles if you have them.  Or just some nice small and thin needles for practice. 

24"  or so of freezer  paper for appliqué

A small  piece (11"x 14" of  poster board, thin cardboard or manila file folder for pattern. 

Go have a cuppa tea and a snack... maybe  a Ginkgo tablet... then go on to the next page 2...
Introduction page, ideas...  Page 1
Supplies for blocks,
fabric amounts
Page 2
Sewing together the blocks
Page 3
Sewing together the blocks part 2
Practice Hearts Lesson... includes supplies needed for practice hearts. Step inside my Laboratory for all the ways to "work on" appliqué pumpkins.
Learn how to do the "A" word!
Back to Main Frenzy Page Back to the Applique Main Page
Hosted by www.Geocities.ws

1