| Do It Yourself . . . |
| Do It Yourself . . . |
| Custom Fiberglass Enclosure |
| Custom Fiberglass Enclosure |

|
 |
|
|
| Basic Fiberglass Enclosure |
| Basic Fiberglass Enclosure |
| Please Read First: Any practices carried out by using the information provided within these webpages should be done with extreme care. Fiberglass resin fumes are harmful, MDF particle dust is harmful, and working with power tools can be dangerous. Always use extreme caution and the proper safety equipment. (i.e. respirator, safety goggles, etc...) It is recommended that fiberglass and resin is used outside or in a well veltilated area, and all other manufacturer's recommendations are followed. |
| This page contains the very basics of fiberglassing. After reading it you should have a better understanding of the basic procedure of applying fiberglass, and how it's form and shape is created. |
 |
| The box made in this tutorial is simply a small box for a 6" x 9" speaker. For small speakers, it is often suitable to use thin wood. Here 1/4" hardboard is used. For larger speakers and subwoofers it is common to use 3/4" MDF. (medium density fiberboard) Very often you can simply outline the frame of a speaker with a pencil and use that as your guide to cut. |
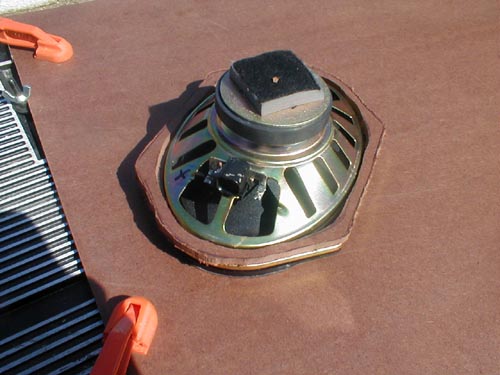 |
| The speaker manufacturer will usually give you the diameter or radius for the inner cuts. If you don't have this information, measure the offset and pencil it in. It is better to cut too little than too much, so if it doesn't fit after your first cut, cut more in small increments. You want to make sure the speaker won't fall through the hole, and also that there is wood under each screw hole so you have material to screw into. Make a wood box to serve as the base. Usually for simple fiberglass boxes you will want to make as much out of wood as possible. Wood is much easier to work with than fiberglass. When you use speaker mounting rings, like you will in most fiberglass enclosures, you will need to hold the ring in place. Here we have small pieces of plastic, but for larger boxes you would want to use wood dowels, or strips of metal or MDF. |
 |
 |
| The supports should be glued in using hot glue. This shows the speaker mount glued in place. Once all is dry, give it a little push to make sure it won't fall apart. This structure is going to be wrapped in fabric, and that fabric soaked in resin. When the resin dries, it heats up and has a tendency to pull the fabric. If this structure isn't that strong, the stretching will actually pull it apart and ruin the entire project. Especially for when you make subwoofer boxes, make a strong frame. (screwed/nailed MDF, metal strips, etc.) |
 |
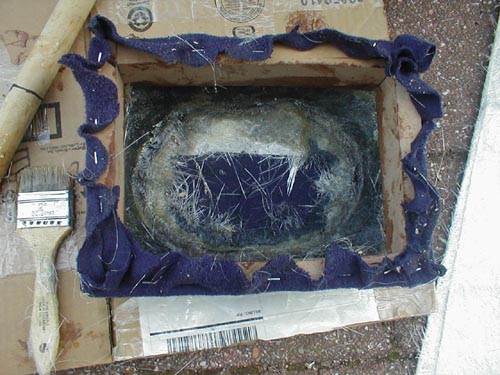
| For the fabric, you can pretty much use anything. Try to avoid anything 100% cotton, as it will shrink the most, but anything very think will absorb a ton of resin, which will but you. The material needs to be some-what stretchy, so thin (polyester) fleece is often chosen, as well as grill cloth. You want to pull the fabric around the front and make it as smooth as possible. Then glue or staple the ends. Cut away as much excess as you can, this will make it easier to work with, and finish later on. |
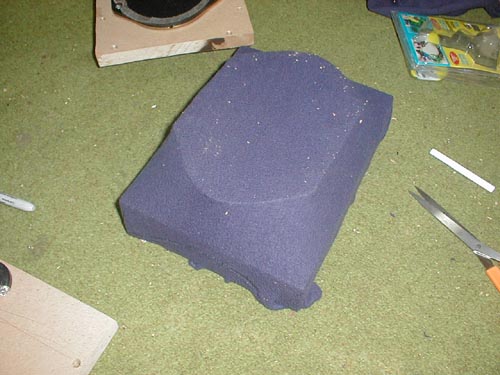 |
| This is the top side of the box. You want it to be as smooth as possible. Notice that there are no wrinkles. If you have wrinkles that you can't stretch out, they can be filled and sanded later on. You also want your fabric tight enough so it will not sag once it's covered in resin. |
 |
| For applying the resin, you should always use cheap paintbrushes. You can cut the bristles to about 1" in length. You will be using this to 'jab' the resin onto the fabric, and it's much easier with shorter, stiffer bristles. |
| First things first . . . Be aware that this stuff is MESSY! Protect yourself by wearing long sleeves and gloves. Getting resin stuck in your arm hair is not fun. Protect your vehicle with old sheets or other drop-cloths. When working out of the car, protect the work area. A little preparation will make clean-up so much easier. |
| Here is a simple list of supplies you will need to finish this project. |
| - The structure itself, covered in fabric. - Fiberglass resin and hardener (MEKP), most resin's come with hardeners inside. - Fiberglass, either chopmatt or weave. - Rubber gloves, several pairs. - Brush of brushes for applying glass and resin. - Mixing sticks. - Measuring cup / bucket. - Acetone to soak your brush in between coats. It can also be used to clean up any accidental spills. - Dust mask / respirator. Remember dust masks will protect your lungs from giberglass dust during sanding, but will not protect your lungs from resin fumes. Either work outside with adequate ventilation, or use an appropriate respirator. Resin fumes are not a joke, and can damage your lungs and nervous system severly and easily. The resin you buy will have instructions on how much MEKP to mix with the resin. You want to mix relatively small amounts at a time, because if you take too long the resin will 'gel' up and become useless. Also note that the mixtures are listed for 70 degrees F. If it's warmer, it will dry faster, so use less MEKP. If it's colder use more. If you use too little, it will never harden. If you use too much your working time will be cut down. |
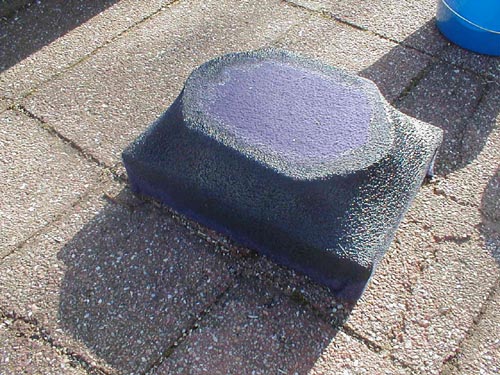 |
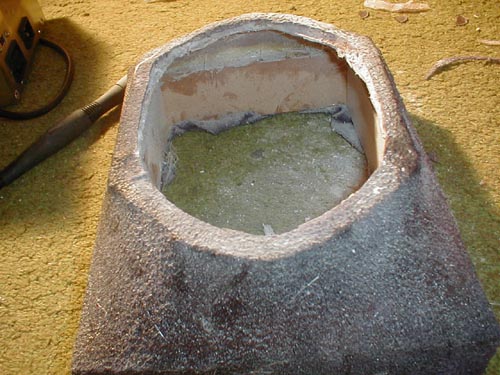
| The fabric will suck up a lot of resin, so you will need to keep mixing up batches. Saturate the fabric all over and make sure you miss no spots. You can simply 'paint' on the resin here, no need to use a dabbing motion. Let it sit until it's dry to the touch. When the structure had dried, you can cut the speaker opening and remove the mounting pieces from inside. In this project the fiberglass was laid on the inside of the enclosure. Once the fiberglass is dry, it is not perfectly smooth and needs to be sanded and covered with body filler in order to get a smooth look. |
| This is why it is better to fiberglass from inside, rather than the outside; however this is usually not practical. All of the other tutorials will be glassed from the outside. |
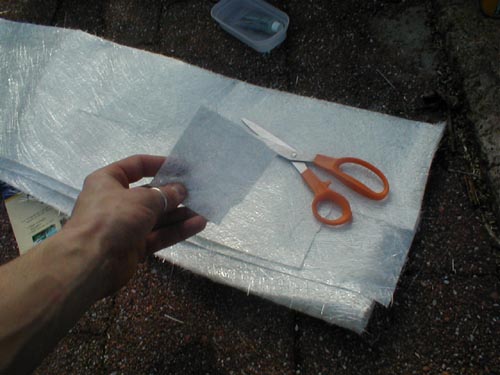 |
| While the resin is drying, you should take advantage of the chance to get your fiberglass and cut/rip some pieces. It is often better to rip them, because you will get frayed edges, which conform better to existing pieces. The fiberglass used here is chopmat. To lay the fiberglass, put a small amount of resin down first, then lay the chopmat over the wet resin. Then load your brush with resin and, with a stabbing motion, saturate the pieces until it becomes transparent. |
 |
| While doing this you will notice air bubbles start to form where fiberglass starts to curl up. It is essential that you remove as many of these bubbles as possible. Air bubbles will seriously weaken the structure when it dries. You can also buy a fiberglass roller that lets you roll out the air bubbles. You can lay a second layer of fiberglass right on top of the first one. I recommend doing 2-3 layers at a time then waiting for it to completely dry. Once it dries you start the process over until you reach your desired thickness and strength. |
| When you are done layering, clean your tools and wait. If you mixed your mixture right, it should be dry to the touch in 1 1/2 - 2 hours. You can then lay more layers as needed. For this demo box, only 2 layers were used. For larger fiberglass boxes you should use between 7-9 layers. You will want even more layers if you have large flat runs that could not be made out of wood. (Fiberglass is weaker when it is used on large flat areas.) If you used a thicker chopmat, you can use less layers, but keep in mind that a thick mat will not conform to tight corners as well as thinner mat. |
 |
| When the enclosure is completely dry, and you are done adding layers, you will need to cut away the excess glass. A flat router bit will work well for this cut. You can also use a Dremel tool with a cutting blade attached. Once you clean off all the extra fiberglass, you will need to make sure your speaker still fits correctly. You can see here that the dried fleece and resin still have a rough texture. Most of this can be sanded away, and any pits left can be filled with a body filler. Bondo works well for these projects. |
| To make sanding easier, use an electric sander. If one is not available, sanding by hand will work also. Sanding blocks are a big help here. Start with a rough grit, 60 is a good start, then move up to about 120. Again, you will need to wear a particle (dust) mask and eye protection and you should also wear long sleeves while doing any sanding. |
 |
| Here is a shot after sanding. Even though the entire structure is a lot smoother, you can see there are still pits. You will need to smooth these out with more body filler. You can apply the filler by spreading it with a putty knife. Once the filler dries you can sand it with a high grit sandpaper. (200-400 grit) Continue this process until you have a smooth finish. If you plan on carpeting this enclosure, it does not have to be perfectly smooth. If you are going to cover it in vinyl, any little bumps will show through. To paint the enclosure you will need a perfectly smooth enclosure. |
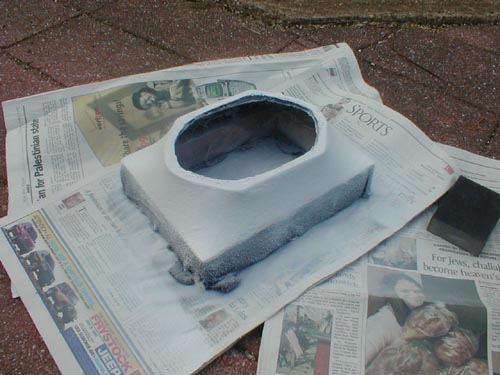 |
| When your enclosure is smooth, apply a coat of primer. The primer will help show any imperfection left on the enclosure. Remember these will need to be repaired or they will show through the final paint. If you can use a high build primer it will help smooth out small spots in the finish. High build primer can usually be found in automotive supply stores. As with any painting, paint from a distance (12"-18") and use even light coats. Make sure your enclosure is completely dry between coats. |