| D.I.Y. - MDF Rings |
| Do It Yourself . . . |
| Do It Yourself . . . |
| Custom Fiberglass Enclosure |
| Custom Fiberglass Enclosure |

|
 |
|
|
| D.I.Y. - MDF Rings |
| Please Read First: Any practices carried out by using the information provided within these webpages should be done with extreme care. Fiberglass resin fumes are harmful, MDF particle dust is harmful, and working with power tools can be dangerous. Always use extreme caution and the proper safety equipment. (i.e. respirator, safety goggles, etc...) It is recommended that fiberglass and resin is used outside or in a well veltilated area, and all other manufacturer's recommendations are followed. This page shows how to create MDF rings, which are used in nearly every car audio fiberglass project. These can vary in size from 1" for tweeters to 18" or more for massive subwoofers. This same method always applies! |
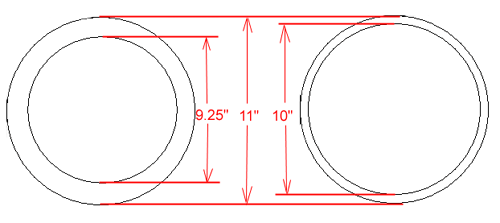
| The first things you need to do is obtain data about the speaker you are mounting. For most subs, this is often given, but it's easy enough to measure yourself anyway. The following numbers are for the sub shown in this picture. The names in the brackets will be referred to below. * Outer diameter [OD] edge to edge of sub: 10" * Inner Offset [IO] distance from edge of speaker to mounting edge: .375" * Inner Diameter [ID] measure inner edge of sub: 9.25" |
 |
 |
| These are the two rings that you are going to make. The rings here are 'flush mount' rings, meaning that when you mount them, the face of the subwoofer will be flush with the wood, not sitcking out the front of the enclosure. If you don't want to make flush mount rings, then you can just make the left ring below. |
| The ring on the left is what the sub will be mounted onto. It's inner diameter is the same as measured above. (9.25") The outer diameter will extend past the edge of the sub, usually no less than 1" past the OD. 11" is the number used here. The ring on the right is the flush mount piece, and it will sit on top of the ring on the left. This ring's |
| inner diameter is the measured outer diameter. This rings outer diameter is the same as the first, 11". The flush ring is for cosmetic purposes only, and only needs to be as thick as your speaker. For normal sized subs, 1/2" wood usually works well. For speakers or tweeters 1/4" should work fine. |
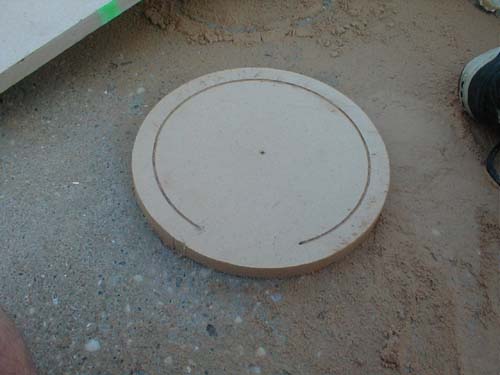 |
| Now you just need to trace and cut your rings. For making nice circles, you can simply use a string with the center nailed down, then measure the radius, attach a pencil and go around. You can also make a simple wood jig. For example, if you want a 10" circle, get a 5" long strip of wood attached to the pivot point (center of your ring), and trace completely around. If you are using a router / spiral saw when you do the actual cut, make sure you cut the outer diameter first so that you can use the same center pivot point for the next cut. (Side note - I use a Dremel tool with an adjustable circle cutter.) These are the two cut rings. The next step is to glue the rings together. Almost any type of wood glue or construction adhesive will work. Simply glue the smaller ring on top of the bigger one. Once the rings are glued together you will need to apply even pressure around the rings by using clamps. If clamps are not avaliable you can put a spare board on top of the rings and add weight. The board will then help disperse the weight evenly. |
 |
 |
| Throughout this entire project, patience will play a vital role in the positive or negative outcome of your project. If you get in a hurry, it will show in your work. Take your time, and do it right. It will pay off in the long run. |
 |
| This is how it will look once the speaker is mounted. This speaker will be mounted into the enclosure, not mounted onto it. Once the project is finished you will definitely be able to appreciate the over-all look of the enclosure considering the little bit of extra work that went into building these flush rings. |