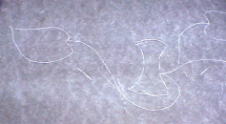
Here is want I did. I took wax paper and placed that over my pumpkin appliquéd background. Then drew on the wax paper with a pencil where I wanted my stems, vines and leaves to go. It just sort of scratches off the wax.
I like this way because the wax paper is easy to see through, it is cheap, and makes a great "overlay" to see where to place the other shapes on your background.
You can glue stick several widths together if you need it larger.
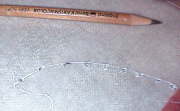
I scratched little holes along the lines on the wax paper pattern with the tip on my small scissors. (do this on your cutting mat!) How many holes you need will depend on how good you are playing dot to dot! Then I realigned the pattern on my pumpkin appliquéd background matching up the shapes.
Then I put a dot on my background through each hole with a water soluble pencil. Remove the was paper, connect the dots to make your bias sewing guideline.
This method works great for appliqué patterns with a lot of layers. Instead of outlining all the appliqué design pieces on your background fabric, just make one pattern on the wax paper. Glue some together if you need it wider. Make some sort of registration marks on both the background and the wax paper pattern.
Now, when you need to lay on the next appliqué piece on your background, just lay the wax paper pattern on top and line it up then slip the prepared appliqué pieces under the wax paper and line it up using the wax paper guide. Hold the appliqué in place, remove the wax paper and pin your appliqué. This way if your appliqué pieces don't cover the marking lines completely, you won't have those marks to try to remove.
Works for me!
Second: Finding true bias:
You need bias (or the stretchy part) of your fabric so you can make curved vines. Bias will stretch up and down, straight fabric will not.
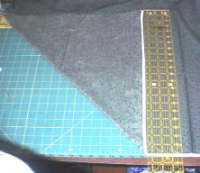
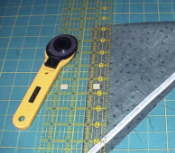
To find the true bias of your fabric, first trim the edge of the fabric so it is straight. Then line up a ruler on the finished edged of your fabric so the lines on the ruler are perpendicular to the fabric edge.
Fold the bottom of the fabric over to touch the ruler. The diagonal is the bias of the fabric.
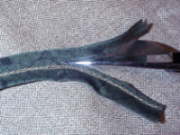
I just take my ruler and rotary cutter and trim off the fold of the bias edge and I have a triangle of fabric with a true bias edge.
Make sure your bias edge is as long as you need your longest piece of bias to be. You can move the ruler over on the base of the fabric to get a larger bias edge.
A good formula to go by:
2 times the width you want finish,
then 1/4" twice for the seam allowance= 1/2",
plus 1/4" more for "extra measure".
For my vines I cut my bias strips 1 1/4 inches wide for about 1/4 inch wide vines. You need that extra fabric to grab onto. You will think it is a waste to trim off all of that extra seam allowance but trust me... you really have more control over how the bias is applied with a wider seam allowance.
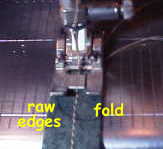
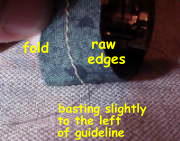
You will sew on a basting line of stitching "slightly more" than the width you want your finished vines to be. You will sew this stitcing from the folded edge of your bias which is placed to the right of the needle. This will be your sewing guideline.
Well, I didn't have any specific measurement in mind for my vines, so I just use the side of my pressure foot with the needle in the center and that is how wide they where ... works for me!
 We
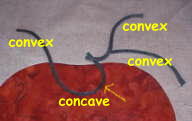
will be talking about concave and convex curves. I always remember which
is which of these two by thinking that "concave" is "caved in" so
it is the one shaped like a bowl. Hey, I would not have made it through
school without word associations!
We
will be talking about concave and convex curves. I always remember which
is which of these two by thinking that "concave" is "caved in" so
it is the one shaped like a bowl. Hey, I would not have made it through
school without word associations!
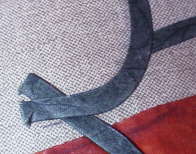
You will sew the bias binding directly to the quilt. There is one rule.... you have to sew the binding on *when possible* so the raw edges face the convex (outward) curve. Now, if your vine has in's and out's, what I do is pick the curve that there is the most on the outward curve and sew the raw edges to that curve.
This will be less important on a very thin bias. On a wider bias, you will have more fabric to try to ease into an "inner" curve.
Use a smaller stitch length when you sew on the bias because of the close trim we will be doing.
When you sew on the bias, you sew "slightly" to the left of the basting stitching line. (see step 31 below)
When you do have both in and out curves on a vine, you have to stretch the bias slightly on the inner curve (concave) so it will turn over without excess bunching up.
Remember... bias stretches but it does not shrink... so you need to sew normal on a curve where it will stretch outward. When sewing on a dipping (concave) curve, stretch the bias strip a little. That will give it less fabric on the shorter part of the curve, or where the fold of the fabric edge will be tighter after you fold it over, than where it is sewn on.
This is also a good tip for binding a quilt with a curved border.
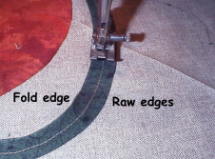
When you sew on the binding, you want to keep peaking under it and make sure that the guide line you marked on the background is just slightly to the left of the basting seam. You want the bias to cover the pencil line when you fold it over.
And remember, you are sewing just to the left of the stitching guideline.
After you sew your piece on, trim away the seam allowance close to the stitching. When you fold over the bias, you want the bias to cover the seam allowance. You can use that as a guide as to how close you really need to trim, as you don't want the raw edges to stick out beyond the bias.
Remember, use a smaller stitch length when you sew on the bias because of the close trim.
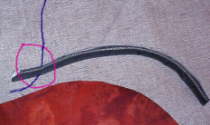
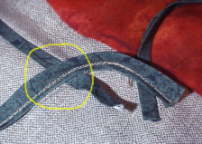
Now, what do you do when lines cross? This is easy. Just fold over the bias stem and press it down. (you don't have to stitch it down at this point unless you want to).
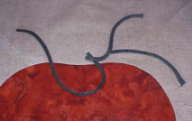
You can sew it all down now using that invisible applique stitch, or wait till you add the other pieces for your top and save the bias stitching hand work for travel, waiting time or in front of the TV watching your favorite show.
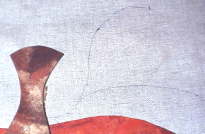
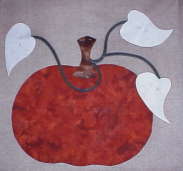 Here
is my pumpkin all done with the stems on and I am testing my freezer
paper leaf shapes to make sure they look pleasing and that they will fit
in my 16 inches of background. Remember that we cut the background
18 inches so we have some "fabric insurance". It is easier to take
more off and impossible to add more on! (A thing I learned from woodworking
actually) I will do the pumpkin stem and leaves next so they will
cover the raw ends of the vines.
Here
is my pumpkin all done with the stems on and I am testing my freezer
paper leaf shapes to make sure they look pleasing and that they will fit
in my 16 inches of background. Remember that we cut the background
18 inches so we have some "fabric insurance". It is easier to take
more off and impossible to add more on! (A thing I learned from woodworking
actually) I will do the pumpkin stem and leaves next so they will
cover the raw ends of the vines.
You look at the order of your pieces. Set them all on the background and what ever is on the bottom gets sewn on first! You sew on the pieces that are on the bottom first then work toward the top pieces. Any portion of an appliqué that will be covered by another piece need NOT be sewn down... it will be covered anyway. So I cut away that part that will be covered leaving a seam allowance of course.
I remove the background from behind each piece as it is sewn on so I always only have one layer of fabric on the back of work.
If you cut away that back fabric behind your appliqué, the
appliqué has a chance to "relax" and it just seems to "be of one
fabric" instead of "laying on top" of another piece of fabric.
Cutting away the backing allows the batting to fill up the appliqué
and make it "puff up" when you quilt around it, giving the appliqués
some added dimension.
Also if you appliqué light fabric over a darker or checked fabric for instance, the under fabric may show through.
Experiment and see what you like... there are no Quilt Police except for the self appointed ones... and I avoid them by any means!